# @aparajita/tailwind-ionic [](https://badge.fury.io/js/@aparajita%2Ftailwind-ionic)
This plugin for [Tailwind CSS](https://tailwindcss.com/) and [Ionic](https://ionic-framework.com) provides several features:
- Variants which help you to target specific platforms and modes in an Ionic application.
- A `part` variant to target CSS parts in an Ionic component (or any other component that uses CSS parts).
- Ionic CSS theme variables are converted into Tailwind colors.
- An `ion-checked` variant to target the checked state of an Ionic checkbox or radio button.
## Breaking changes from v1.x
- The non-abbreviated variants (prefixed with "ion-") in v1.x have been removed.
- The `ios` and `md` variants have been renamed to `mode-ios` and `mode-md`, and only apply to the `mode` attribute of the `html` element.
## Installation
```shell
pnpm add @aparajita/tailwind-ionic
```
If you only want the default variants and no Ionic theme colors, add the plugin to your `tailwind.config.js` file:
```javascript
module.exports = {
plugins: [require('@aparajita/tailwind-ionic')]
}
```
If you want to configure the behavior, read on.
## Usage
### Platform/mode variants
The platform/mode variants in the table below are supported. Variants lower in the list are more specific and are applied after variants higher in the list. This means that a less specific variant applied to a given class will be overridden by a more specific variant applied to the same class.
Note that you cannot combine variants directly, but you can combine the effect of separate variants.
| Variant | Target |
|:--------------|:---------------------------------------------------|
| plt-desktop | Desktop mode |
| plt-mobile | Mobile-like device (including browser simulations) |
| plt-mobileweb | Mobile device simulation mode in a browser |
| plt-native | Real device using Capacitor |
| plt-ios | iOS device (including browser simulations) |
| plt-android | Android device (including browser simulations) |
| mode-ios | App is in iOS style mode |
| mode-md | App is in Material Design style mode |
#### Examples (with abbreviated variant names)
```html
```
### Part variants
The `part-` variant allows you to target CSS parts in an Ionic component (or any other component that uses CSS parts). All of the currently defined component parts are provided as auto-complete suggestions in your editor. Part variants can be combined with other variants.
#### Examples
```html
```
### Checked variant
The `ion-checked` variant allows you to target the checked state of an `ion-checkbox` or `ion-radio`. It can be combined with other variants, in particular the `part-` variant, to accomplish complex styling of `ion-checkbox` and `ion-radio` components entirely with Tailwind.
#### Examples
Here is a radio group using images for the radio buttons. The checked state is indicated by a blue ring.
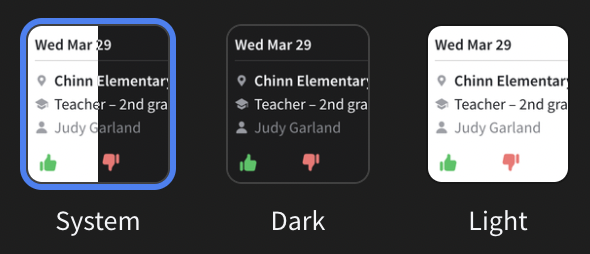
Here is the markup:
```html
![]()
{{ info.label }}
```
Or, for example, if you want a checkbox to be `yellow-500` in the unchecked state and `indigo-500` with an `indigo-400` border in the checked state, you would do this:
```html
```
Note that `part-container` is used to target the checkbox markup itself and `!` is necessary to override the Ionic styles.
### Theme colors
If you pass the plugin one or more valid paths to a CSS file containing Ionic theme variables, they are converted into Tailwind theme colors.
```javascript
/** @type {import('tailwindcss/types').Config} */
/** @type {import('@aparajita/tailwind-ionic').plugin} */
const ionic = require('@aparajita/tailwind-ionic')
module.exports = {
plugins: [ionic('src/theme/variables.css')]
}
```
You may also pass the path as a `.theme` property of an options object, or an array of strings or objects with a `.theme` property. This allows you to access the Ionic theme files along with your own customizations.
```javascript
/** @type {import('tailwindcss/types').Config} */
/** @type {import('@aparajita/tailwind-ionic').plugin} */
const ionic = require('@aparajita/tailwind-ionic')
module.exports = {
plugins: [ionic({
theme: 'src/theme/variables.css',
})]
}
```
```javascript
/** @type {import('tailwindcss/types').Config} */
/** @type {import('@aparajita/tailwind-ionic').plugin} */
const ionic = require('@aparajita/tailwind-ionic')
module.exports = {
plugins: [ionic([
'src/theme/variables.css',
'assets/css/theme.css',
require.resolve('@ionic/vue/css/palettes/dark.class.css'),
)]
}
```
#### Example
If the file `variables.css` is this:
```css
/** Ionic CSS Variables **/
:root {
/** primary **/
--ion-color-primary: #3880ff;
--ion-color-primary-rgb: 56, 128, 255;
--ion-color-primary-contrast: #ffffff;
--ion-color-primary-contrast-rgb: 255, 255, 255;
--ion-color-primary-shade: #3171e0;
--ion-color-primary-tint: #4c8dff;
/* ...lots more */
}
```
then your effective Tailwind config ends up being this:
```js
module.exports = {
theme: {
extend: {
colors: {
// ...whatever colors you have in your tailwind.config.js
'ion-color-primary': 'var(--ion-color-primary)',
'ion-color-primary-rgb': 'var(--ion-color-primary-rgb)',
'ion-color-primary-contrast': 'var(--ion-color-primary-contrast)',
'ion-color-primary-contrast-rgb': 'var(--ion-color-primary-contrast-rgb)',
'ion-color-primary-shade': 'var(--ion-color-primary-shade)',
'ion-color-primary-tint': 'var(--ion-color-primary-tint)',
// ...and so on
}
}
}
}
```
Because the variables are part of the color palette, they are added into all of the Tailwind color utilities: text, bg, border, etc.
```html
My label
Success!
```