In this section we will use cocreate-api to create a customer and send dynamic data from the frontEnt to the Websocket.
npm i @cocreate/apiOr you can use cdn link:
<script>https://cdn.cocreate.app/stripe/latest/CoCreate-api.min.js</script>According to the usage of the official documentation of stripe LIST_CUSTOMER
Name-file : index-connect.html

<form realtime="true" id="customer-form" array="modules">
  <button class='listCustomersBtn'>Click getList</button>
</form>
The code, used for the front-end custom classAs can be seen, we only edit the parameter of the class where the css selector for the trigger buttons is registered classBtns
Name-file = Cocreate-stripe.js

var CocreateStripeAPi = function() {
...........
    this.classBtns = ['.listCustomersBtn']
...........
}
Only, we will show the interesting parts of the code, since in the index we show the general configuration of the websocket endpoint
Name-file = Cocreate-stripe.js

........
switch (type) {
	case '.listCustomersBtn':
    	const customers = await stripe.customers.list({limit: 3,});
        utils.send_response(that.wsManager,socket,{"type":type,"response":customers},send_response)
    break;
}
........
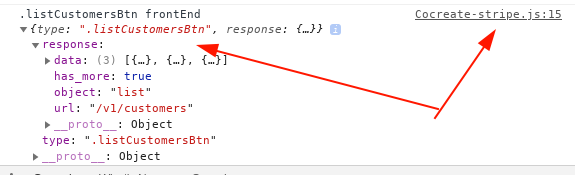
If you have done everything right you will have an answer similar to this
But now we need to handle this result in our custom front-end class
Name-file = Cocreate-stripe.js

var CocreateStripeAPi = function() {
...........
    this.setResult = function(data) {
    if (typeof(data["type"]) != 'undefined'){
        let type = data["type"];
        switch(type){
                case '.listCustomersBtn':
                    console.log(".listCustomersBtn frontEnd", data)
                break;
            }
        }
    }
...........
}
For this case we will use a template, which will be filled with the data obtained by the webSocket using CocreateRender
<div template_id="abc1" array="render_test">
  <div class="template card card margin:10px "
    value="{{render2.data._id}}"
    template_id="abc1"
    render="render2.data">
        <div class="display:flex justify-content:space-between align-items:center width:100%">
          <div class="display:flex">
            <div class="display:flex align-items:center">
              <span class="icon status font-size:20px margin-right:10px"></span>
            </div>
            <div class="display:flex align-items:center  flex-wrap:wrap">
              <h3 class="margin-right:10px" value="{{render2.data.id}}">ID</h3>
              <span class="margin-right:10px" value="{{render2.data.email}}">email</span>
            </div>
          </div>
        </div>
  </div>
</div>
To capture the data that the webocket responds to, we must override the setResult method, here all the responses from a specific endpoint will arrive for this specific example, our enpoint is stripe, and our typeRequest is listCustomersBtn
this.setResult = function(data) {
    if (typeof(data["type"]) != 'undefined'){
        let type = data["type"];
        switch(type){
            case '.listCustomersBtn':
                CoCreate.render.data('[template=abc1]',{
                     render2: {
                        data: data.response.data
                    }
                });//end Render
            break;
        }
    }
}
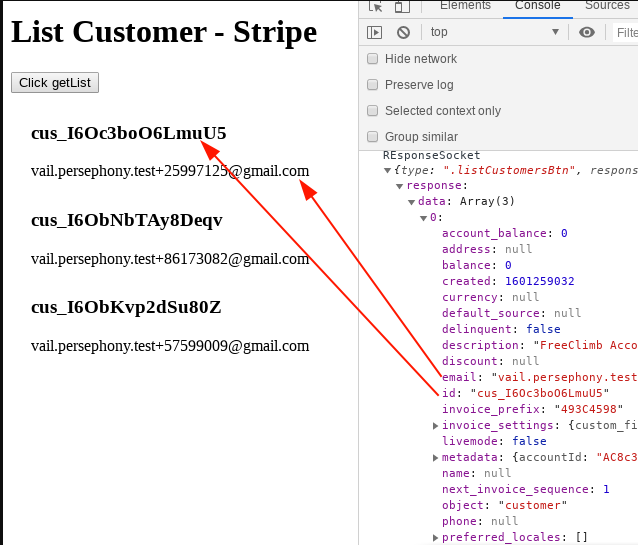
In the following image we see the result of the template on the left, and on the right the result that the websocket responds to the frontEnd
Here we list the methods that can be overridden of the cocreate-api class, to control the data according to the life cycle
- preview_validate_btn(btn,event) : Ideal for front-end validations, false should be returned in case the client's input does not comply with its validation logic
- setResult(data) : We use this method to manipulate the data once it reaches the frontEnd
- manipulateDataToSend(btn,data) : all methods are optional, this method is only used in case you want to manipulate the data or change the format of a variable before sending it the websocket