# @nextcloud/vue
[](https://www.npmjs.com/package/@nextcloud/vue)
[](https://dependabot.com)
> 🖼️ UI Kit for building Nextcloud apps with Vue
- ✨ Standardized UI Components
- 🛠️ Composables and frontend utilities
- 🔗 [Reference providers](https://docs.nextcloud.com/server/latest/developer_manual/digging_deeper/reference.html) utilities
## 📄 Documentation
| Version | Target | Documentation |
|----------------|-----------------------|-------------------------------------------------------|
| v9.x [main] | Nextcloud 31+ (Vue 3) | https://nextcloud-vue-components.netlify.app |
| v8.x [stable8] | Nextcloud 28+ (Vue 2) | https://stable8--nextcloud-vue-components.netlify.app |
| v7.x [stable7] | Nextcloud 25 - 27 | https://stable7--nextcloud-vue-components.netlify.app |
| v6.x [stable6] | Nextcloud 24 - 25 | https://stable6--nextcloud-vue-components.netlify.app |
## 📦 Install
```bash
npm i @nextcloud/vue@next
```
## 🚀 Usage
Import corresponding components and other modules on use. Check the documentation for more details.
```js
import NcButton from '@nextcloud/vue/components/NcButton'
import { useHotKey } from '@nextcloud/vue/composables/useHotKey'
```
Import from a single root is available as well. Use with caution: this might lead to slower build time and larger bundles in some cases.
```js
import { NcButton, useHotKey } from '@nextcloud/vue'
```
## 🤝 Contributing
### 📜 How to contribute
1. It's always good to check/create an issue first and discuss the problem or feature you want to work on
2. Fork the repository and create a new branch
3. Make the changes
4. Check the change in Vue-Styleguidist and/or Nextcloud apps
- Do not forget to `lint` and `test` your changes
- If possible, add tests and documentation for your changes
5. Commit and push your changes, create a Pull Request
- Make sure to follow the [Conventional Commits](https://www.conventionalcommits.org) in commit messages, and PR titles, for example:\
`fix(NcButton): correct layout on Safari`
- Make sure to follow the **Pull Request template**
- Sign-off you commits for the [Developer Certificate of Origin (DCO)](https://developercertificate.org/)
6. Get your PR reviewed
- If you don't receive a feedback in a week, feel free to mention the maintainers, for example, last developers worked on the module
7. Get your PR merged
Please read the [Code of Conduct](https://nextcloud.com/community/code-of-conduct/). This document offers some guidance to ensure Nextcloud participants can cooperate effectively in a positive and inspiring atmosphere and to explain how together we can strengthen and support each other.
More information on how to contribute: [https://nextcloud.com/contribute/](https://nextcloud.com/contribute/)
### 🧑💻 Development setup
First, install dependencies with `npm`:
```sh
npm ci
```
#### 🐸 Development with Styleguidist
The simplest way to develop and debug `@nextcloud/vue` is to use our live documentation via [`vue-styleguidist`](https://vue-styleguidist.github.io).
Run the development server with component documentation and playground:
```sh
npm run styleguide
```
You can also test if the design still works with a legacy Nextcloud version by setting `NEXTCLOUD_LEGACY` ENV variable.
```sh
NEXTCLOUD_LEGACY=y npm run styleguide
```
#### ☁️ Development with Nextcloud apps
To test or debug `@nextcloud/vue` in Nextcloud app you need to [pack](https://docs.npmjs.com/cli/v11/commands/npm-pack) the library and **install** it in the app.
1. In `nextcloud-vue`:
1. Build the library with:
- `npm run dev` for development build
- `npm run build` for production build
2. Pack with `npm pack`
2. In the Nextcloud app:
1. Install the packed file by path to the file, for example:
```sh
npm install --no-save ../../../nextcloud-vue-9.3.1.tgz
```
2. Rebuild the app or run it in `watch` mode
3. To remove the linked package, reinstall dependencies with `npm ci`
3. Repeat every time you do a change in `@nextcloud/vue`
4. Do not commit the created `.tgz` file
> [!WARNING]
> Do not use `npm link`
>
> While it is a simple and popular way to connect a local npm package to another package, it doesn't have proper dependency resolution which leads to issues. Adding a package via `npm pack` does exactly the same as installing a published package.
### 🌐 Translations
Use `t` and `n` functions from `src/l10n.js` to display translated strings. They follow `gettext` and `ngettext` interface from [`@nextcloud/l10n/gettext`](https://nextcloud-libraries.github.io/nextcloud-l10n/modules/_nextcloud_l10n_gettext.html).
```vue
{{ t('Choose') }}
```
When you edit/create a translated string, you need to update the l10n files.
Our awesome translation community will then be notified and a bot will sync translations automatically.
```sh
npm run l10n:extract
```
## 📤 Releasing a new version
- Pull the latest changes from `main` or `stableX`
- Checkout a new branch with the tag name (e.g `v4.0.1`): `git checkout -b v`
- Run `npm version patch --no-git-tag-version` (`npm version minor --no-git-tag-version` if minor).
This will return a new version name, make sure it matches what you expect
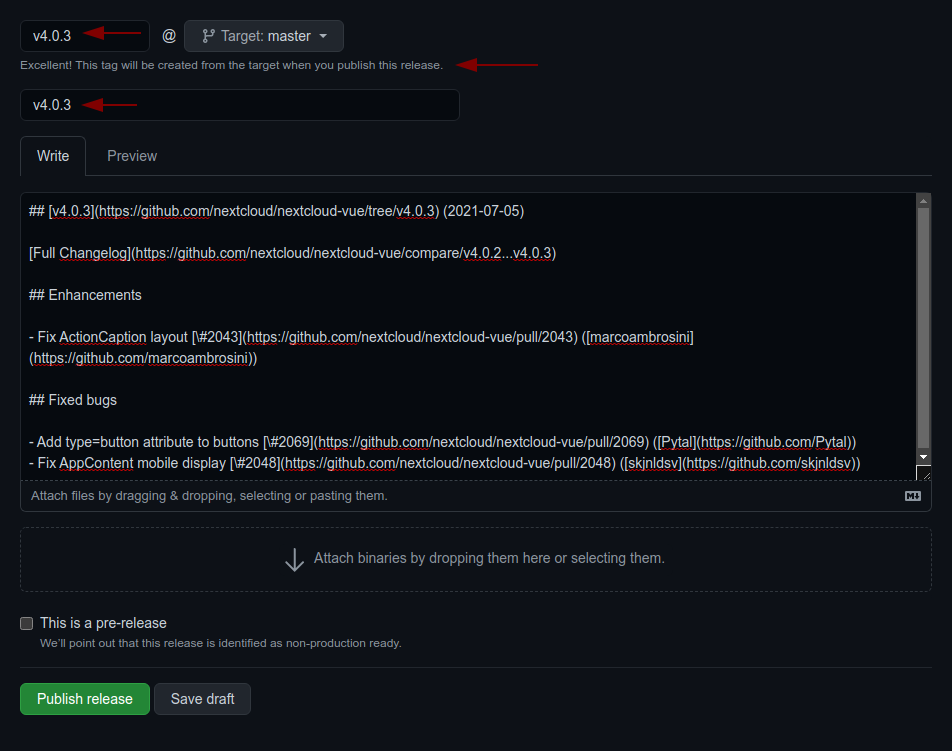
- Generate the changelog content from the [release](https://github.com/nextcloud-libraries/nextcloud-vue/releases) page.
Create a draft release, select the previous tag, click `generate` then paste the content to the `CHANGELOG.md` file
1. adjust the links to the merged pull requests and authors so that the changelog also works outside of GitHub
by running `npm run prerelease:format-changelog`.
This will apply this regex: `by @([^ ]+) in ((https://github.com/)nextcloud-libraries/nextcloud-vue/pull/(\d+))`
Which this as the replacement: `[\#$4]($2) \([$1]($3$1)\)`
2. use the the version as tag AND title (e.g `v4.0.1`)
3. add the changelog content as description (https://github.com/nextcloud-libraries/nextcloud-vue/releases)
- Commit, push and create PR
- Get your PR reviewed and merged
- Create a milestone with the follow-up version at https://github.com/nextcloud-libraries/nextcloud-vue/milestones
- Move all open tickets and PRs to the follow-up
- Close the milestone of the version you release
- Publish the previously drafted release on GitHub
 ### Releasing a pre-release
A pre-release can be built in the same way as described above, however it requires manual adjustments to avoid that npm ships the pre-release to all users:
1. Retag latest to the last stable release
npm dist-tag add @nextcloud/vue@5.4.0 latest
2. Tag the new pre-release as next
npm dist-tag add @nextcloud/vue@6.0.0-beta.2 next
### Releasing a pre-release
A pre-release can be built in the same way as described above, however it requires manual adjustments to avoid that npm ships the pre-release to all users:
1. Retag latest to the last stable release
npm dist-tag add @nextcloud/vue@5.4.0 latest
2. Tag the new pre-release as next
npm dist-tag add @nextcloud/vue@6.0.0-beta.2 next