[](#) [](#)  

## About
[Passage by 1Password](https://1password.com/product/passage) unlocks the passwordless future with a simpler, more secure passkey authentication experience. Passage handles the complexities of the [WebAuthn API](https://blog.1password.com/what-is-webauthn/), and allows you to implement passkeys with ease.
Use [Passkey Flex](https://docs.passage.id/flex) to add passkeys to an existing authentication experience.
Use [Passkey Complete](https://docs.passage.id/complete) as a standalone passwordless auth solution.
Use [Passkey Ready](https://docs.passage.id/passkey-ready) to determine if your users are ready for passkeys.
### In passage-flex-react-native
Use passage-flex-react-native to implement Passkey Flex in your Swift application to add native passkey authentication in your own authentication flows.
| Product | Compatible |
| --- | --- |
|  Passkey **Flex** | ✅
|  Passkey **Complete** | ✖️ For Passkey Complete, check out [passage-react-native](https://github.com/passageidentity/passage-react-native)
|  Passkey **Ready** | ✖️ For Passkey Ready, check out [Authentikit for Android](https://github.com/passageidentity/passage-android/tree/main/authentikit) and [Authentikit for iOS](https://github.com/passageidentity/passage-authentikit-ios) |
## Getting Started
### Check Prerequisites
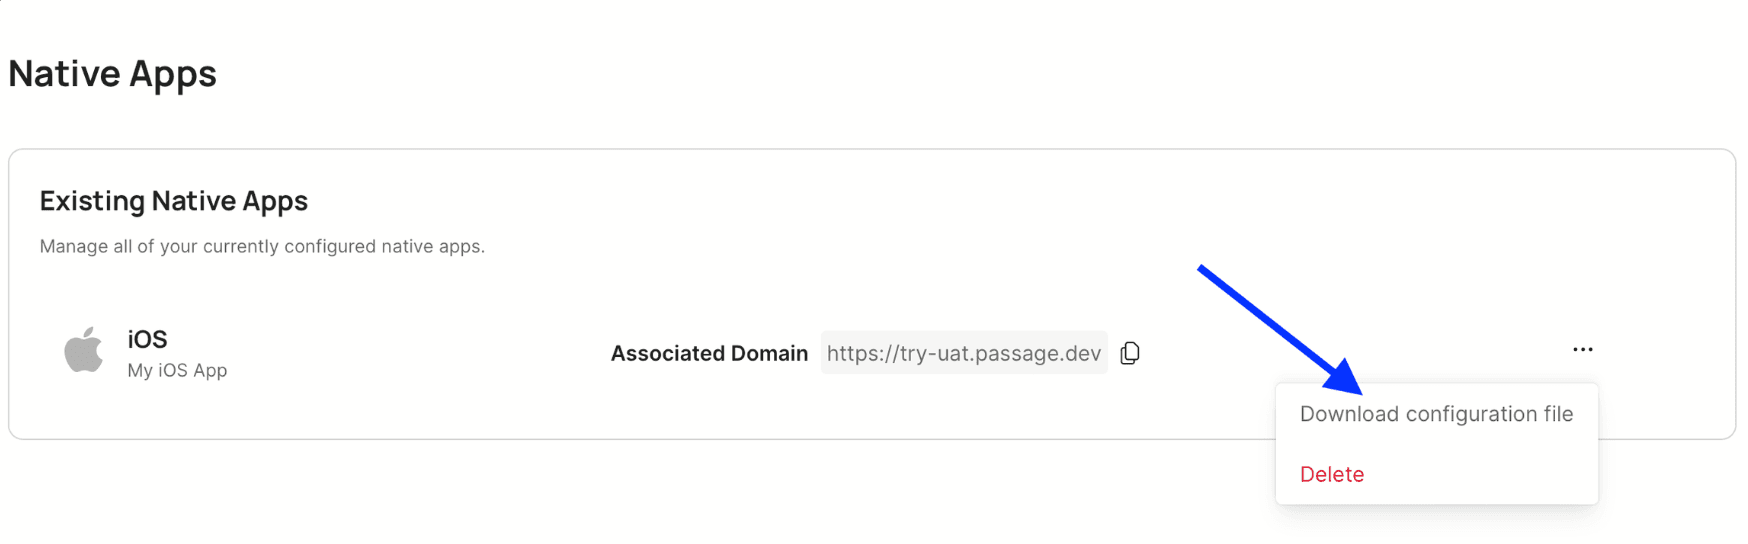
Add an Android and/or iOS app in the Native Apps section for your Passkey Flex app.
Note: When you add your Native App info, you can generate the associated domain file for that app if you haven’t already created it yourself, as shown:
### Install
```shell
npm i --save @passageidentity/passage-flex-react-native
```
### Configure
> [!IMPORTANT]
> In order for passkeys to work, you’ll need to associate your native app(s) with the public web domain you assigned to your Passkey Flex app.
>
> Android requires an `assetlinks.json` file configured and hosted Learn more about Adding support for Digital Asset Links →
>
> Apple requires an `apple-app-site-association` file configured and hosted Learn more about Supporting associated domains →Expo Configuration
Add the `passage-flex-react-native` expo plugin in `app.json`:
```json
"plugins": [
"@passageidentity/passage-flex-react-native"
]
```
Add `ASSOCIATED_DOMAIN` value to your app's `.env` file:
```
ASSOCIATED_DOMAIN=example.com
```
Run the following:
```
npx expo prebuild
```
Bare React Native Configuration
See our Passkey Complete documentation for setting up a React Native app for passkeys and Passkey Flex.
### Import
```tsx
import { PassageFlex } from '@passageidentity/passage-flex-react-native';
```
### Initialize
```tsx
const passageFlex = new PassageFlex('YOUR_PASSAGE_APP_ID');
```
### Go Passwordless
Check out the [API Reference](#api-reference) below, along with more details about Passkey Flex on our [Passkey Flex Documentation](https://docs.passage.id/flex) page.
# API Reference
### passageFlex.passkey.register
To register a new user passkey, use the `passageFlex.passkey.register` method.
This is a three step process:
1. Your app should POST a user identifier (like an email) to your backend, which should request a transaction id from the Passage server to return to your app.
2. Your app should then call `passageFlex.passkey.register(transactionId)` to prompt your user to create a passkey. On success, the `register` method will return a nonce.
3. Lastly, your app should send this nonce to your backend to verify the user has been registered successfully. At this point, your backend could return an access token.
Example:
```tsx
const onPressRegister = async () => {
// 1. Get transaction id string from your backend.
const transactionId = await getRegisterTransactionId("newuser@email.com");
// 2. Prompt user to create a passkey and get a Passage nonce value on success.
const nonce = await passageFlex.passkey.register(transactionId);
// 3. You can send this nonce to your backend to complete user registration.
const accessToken = await getAccessToken(nonce);
};
```
### passageFlex.passkey.authenticate
To log in a user using a passkey, use the `passageFlex.passkey.authenticate` method.
This is a three step process:
1. Your app should POST a user identifier (like an email) to your backend, which should request a transaction id from the Passage server to return to your app.
2. Your app should then call `passageFlex.passkey.authenticate(transactionId)` to prompt your user to log in with a passkey. On success, the `authenticate` method will return a nonce.
3. Lastly, your app should send this nonce to your backend to verify the user has been authenticated successfully. At this point, your backend could return an access token.
Example:
```tsx
const onPressLogIn = async () => {
// 1. Get transaction id string from your backend.
const transactionId = await getLogInTransactionId("existinguser@email.com");
// 2. Prompt user to create a passkey and get a Passage nonce value on success.
const nonce = await passageFlex.passkey.authenticate(transactionId);
// 3. You can send this nonce to your backend to complete user authentication.
const accessToken = await getAccessToken(nonce);
};
```
### passageFlex.passkey.isSupported
You can check if a user’s device supports passkeys by calling `passageFlex.passkey.isSupported`:
```tsx
const deviceSupportsPasskeys = passageFlex.passkey.isSupported();
```
## Support & Feedback
We are here to help! Find additional docs, the best ways to get in touch with our team, and more within our [support resources](https://github.com/passageidentity/.github/blob/main/SUPPORT.md).
---
Passage is a product by 1Password, the global leader in access management solutions with nearly 150k business customers. This project is licensed under the MIT license. See the LICENSE file for more info.