# data-streams/osc-stream
A [readable-](https://streams.spec.whatwg.org/#rs-model) and [writable stream](https://streams.spec.whatwg.org/#ws-model) of [OSC Messages](http://opensoundcontrol.org/spec-1_0), wrapping an underlying [OSC Websocket client](https://github.com/adzialocha/osc-js/wiki/Websocket-Client-Plugin) (from the [@adzialocha/osc-js](https://github.com/adzialocha/osc-js/) library).
## Prequisites
Requires an _OSC bridge server_ running on your local network, to enable bi-directional messaging between the `OSCStream` class instance and a remote OSC controller. You can use the [@petitatelier/osc-bridge](https://github.com/petitatelier/data-streams/tree/master/packages/osc-bridge) command-line utility to start one. See _demo_ instructions hereafter.
## Usage
```html
```
## Demo
 Run following command and navigate to http://127.0.0.1:8081/demos/osc-stream.html:
$ npm run dev:osc
## Prerequisite
### OSC bridge server
The `npm run dev:osc` command will start an _OSC bridge server_, along with the local
dev HTTP server, enabling bi-directional messaging between a _remote OSC controller_
and the `OSCStream` class instance of the demo.
Before starting the _OSC bridge server_, you might want to tweak its configuration;
see the `config` section of the [package.json](../../package.json) at the root of
this monorepo.
```
{
…
"config": {
"http-server": {
"host": "0.0.0.0",
"port": "8081"
},
"osc-bridge": {
"udp-server": {
"host": "0.0.0.0",
"port": "7400"
},
"udp-client": {
"host": "192.168.178.29",
"port": "7500"
},
"ws-server": {
"host": "0.0.0.0",
"port": "8080"
}
}
},
…
}
```
### OSC remote controller
You will also need to configure your remote _OSC controller app_, to send its
outgoing messages to the _OSC bridge server_.
Use the IP address of the network adapter listed by the _OSC bridge server_
upon start. For instance, if you get following output, your computer and
the _OSC bridge server_ will be reachable at IP `192.168.178.47`:
```
$ npm run dev:osc
> @petitatelier/data-streams@ dev:osc …
> osc-bridge & npm run dev && fg
OSC Websocket <-> UDP bridge server
Bridging OSC over Web Socket to/from `ws://0.0.0.0:8080`
Listening for OSC over UDP on `0.0.0.0:7400`
Broadcasting OSC over UDP to `192.168.178.29:7500`
Local host reachable at: [ en0: `192.168.178.47` ]
…
```
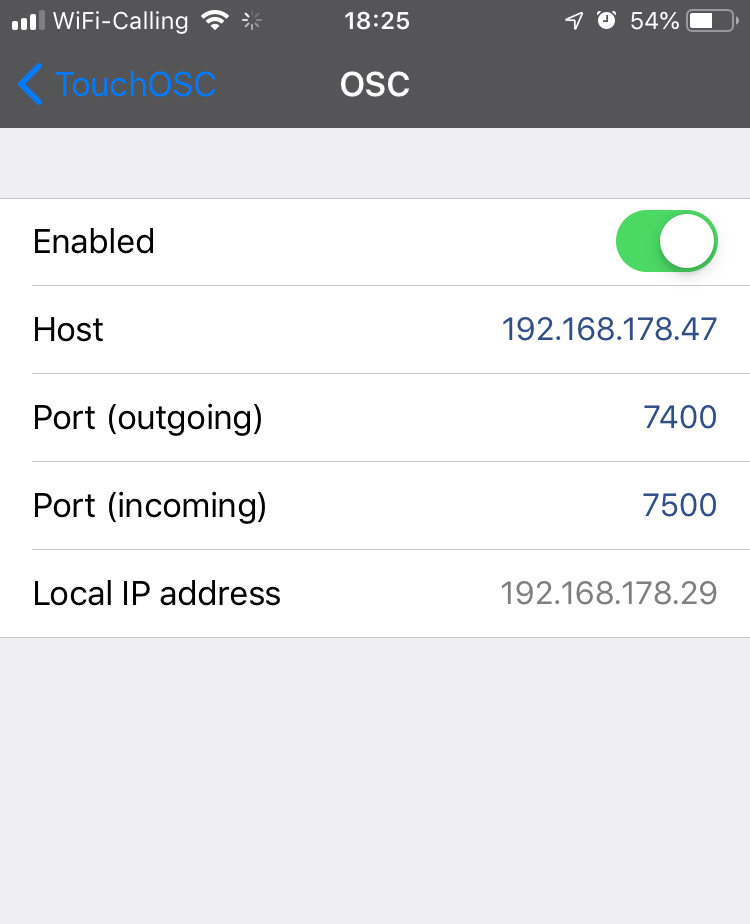
And if you were using the popular [TouchOSC](https://hexler.net/software/touchosc)
_remote OSC controller app_, you would consequently configure its _Host_ and
_Port (outgoing)_ fields with IP `192.168.178.47` and port `7400`, as shown
in screencopy hereafter:
Run following command and navigate to http://127.0.0.1:8081/demos/osc-stream.html:
$ npm run dev:osc
## Prerequisite
### OSC bridge server
The `npm run dev:osc` command will start an _OSC bridge server_, along with the local
dev HTTP server, enabling bi-directional messaging between a _remote OSC controller_
and the `OSCStream` class instance of the demo.
Before starting the _OSC bridge server_, you might want to tweak its configuration;
see the `config` section of the [package.json](../../package.json) at the root of
this monorepo.
```
{
…
"config": {
"http-server": {
"host": "0.0.0.0",
"port": "8081"
},
"osc-bridge": {
"udp-server": {
"host": "0.0.0.0",
"port": "7400"
},
"udp-client": {
"host": "192.168.178.29",
"port": "7500"
},
"ws-server": {
"host": "0.0.0.0",
"port": "8080"
}
}
},
…
}
```
### OSC remote controller
You will also need to configure your remote _OSC controller app_, to send its
outgoing messages to the _OSC bridge server_.
Use the IP address of the network adapter listed by the _OSC bridge server_
upon start. For instance, if you get following output, your computer and
the _OSC bridge server_ will be reachable at IP `192.168.178.47`:
```
$ npm run dev:osc
> @petitatelier/data-streams@ dev:osc …
> osc-bridge & npm run dev && fg
OSC Websocket <-> UDP bridge server
Bridging OSC over Web Socket to/from `ws://0.0.0.0:8080`
Listening for OSC over UDP on `0.0.0.0:7400`
Broadcasting OSC over UDP to `192.168.178.29:7500`
Local host reachable at: [ en0: `192.168.178.47` ]
…
```
And if you were using the popular [TouchOSC](https://hexler.net/software/touchosc)
_remote OSC controller app_, you would consequently configure its _Host_ and
_Port (outgoing)_ fields with IP `192.168.178.47` and port `7400`, as shown
in screencopy hereafter: