steal-tools
Version:
Futuristic build tools for ES6 Module applications.
292 lines (195 loc) • 10.2 kB
Markdown
StealJS.guides.optimized_builds Optimized Builds
StealJS.guides
In 1.4.0 StealTools added a new **optimize** API which aims to replace [stealTools.build](steal-tools.build)
as the default way of creating a build of a module and all of its dependencies; builds created by `stealTools.optimize` are smaller and load faster.
Unlike regular [builds](steal-tools.build), optimized builds don't need to load or bundle StealJS at all; a thin wrapper is added instead to the main bundle so the browser can load and execute the modules correctly.
> The **optimize** API is a work in progress, some StealJS features are not supported yet.
In this guide, we'll go through the steps required to create and use an optimized build. We'll be using the
`myhub` application created in the [Progressive Loading](./StealJS.guides.progressive_loading) guide.
## Install Prerequisites
### Window Setup
1. Install [NodeJS](https://nodejs.org/).
2. Install Chocolatey, Python, Windows SDK, and Visual Studio as described [here](http://stealjs.com/docs/guides.ContributingWindows.html).
### Linux / Mac Setup
1. Install [NodeJS](https://nodejs.org/).
## Setting up myhub
### Clone the Github repo
Run the following command:
```
> git clone git.com:stealjs/myhub.git
```
### Install dependencies
As mentioned before, the **optimize** API is still in its early days, for that reason
we need to use some pre-release packages.
Edit your `package.json` like:
```json
"devDependencies": {
...
"steal-css": "^1.3.0-pre.0",
"steal-tools": "^1.4.0"
}
```
Run `npm install` to install all the application dependencies.
### Make an optimize build script
Create _optimize.js_:
```js
var stealTools = require("steal-tools");
// use the defaults
stealTools.optimize();
```
> The [steal-tools.cmd.optimize] CLI can be used instead of NPM scripts.
Run the build script with:
```
> node optimize.js
```
Now, start an http server by running `npm start` and open `http://127.0.0.1:8080/`
in a web browser. You should see myhub's home page.
> One limitation of the optimized loader is that unlike StealJS' loader it does not normalize module identifiers on runtime. For static imports that's not a problem, but it's an issue for dynamic imports (through steal.import), the module identifier needs to match the name set in [config.bundle].
### Performance comparison
For most application builds where StealJS is not included in each of the main bundles, optimized builds will
have one fewer http request on the initial load which is already a win.
In this example, we are comparing how fast the load event is fired (this event is fired when a resource and its dependent resources have finished loading) when creating the build using `stealTools.build` (with `bundleSteal` set to `true`) and `stealTools.optimize`.
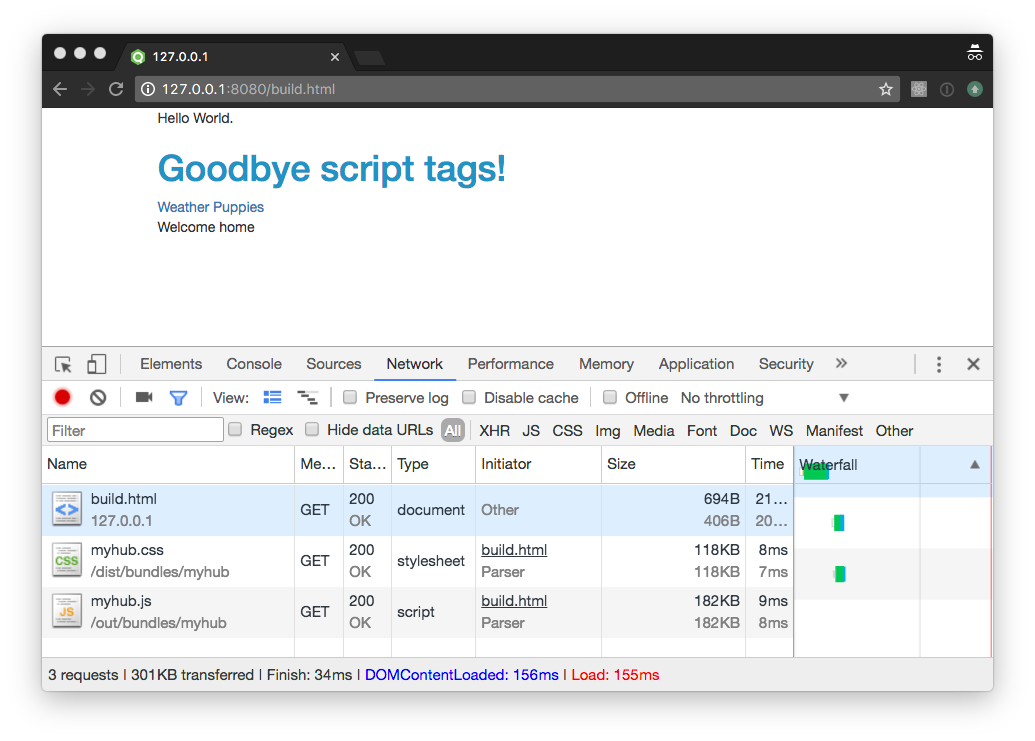
In the screenshot above, the build created by [stealTools.build](steal-tools.build) takes 157ms to
fire the load event, in contrast the optimized build takes 119ms (24% faster) to fire the load event, see the screenshot below.
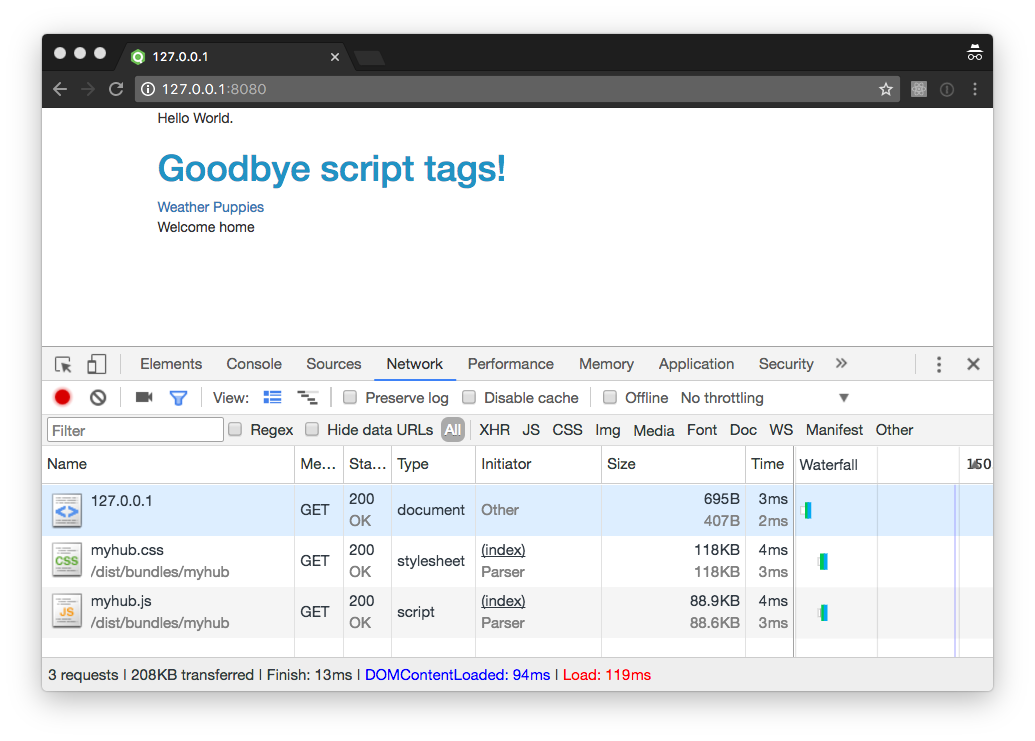
It's also worth noting that the optimized bundles are smaller; the gzip size of the optimized main bundle is 31.8 kB compared to the 59.5 kB bundle of the regular build (46% smaller!).
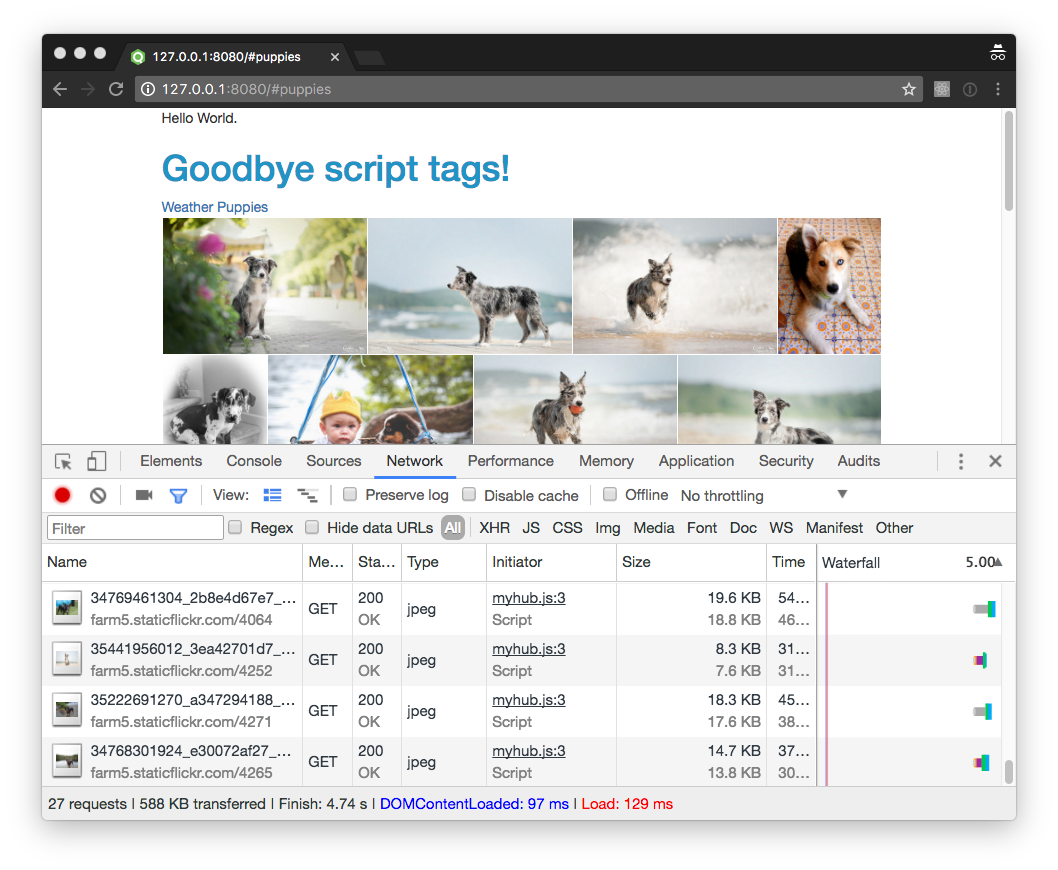
### Progressive loading and async script tags
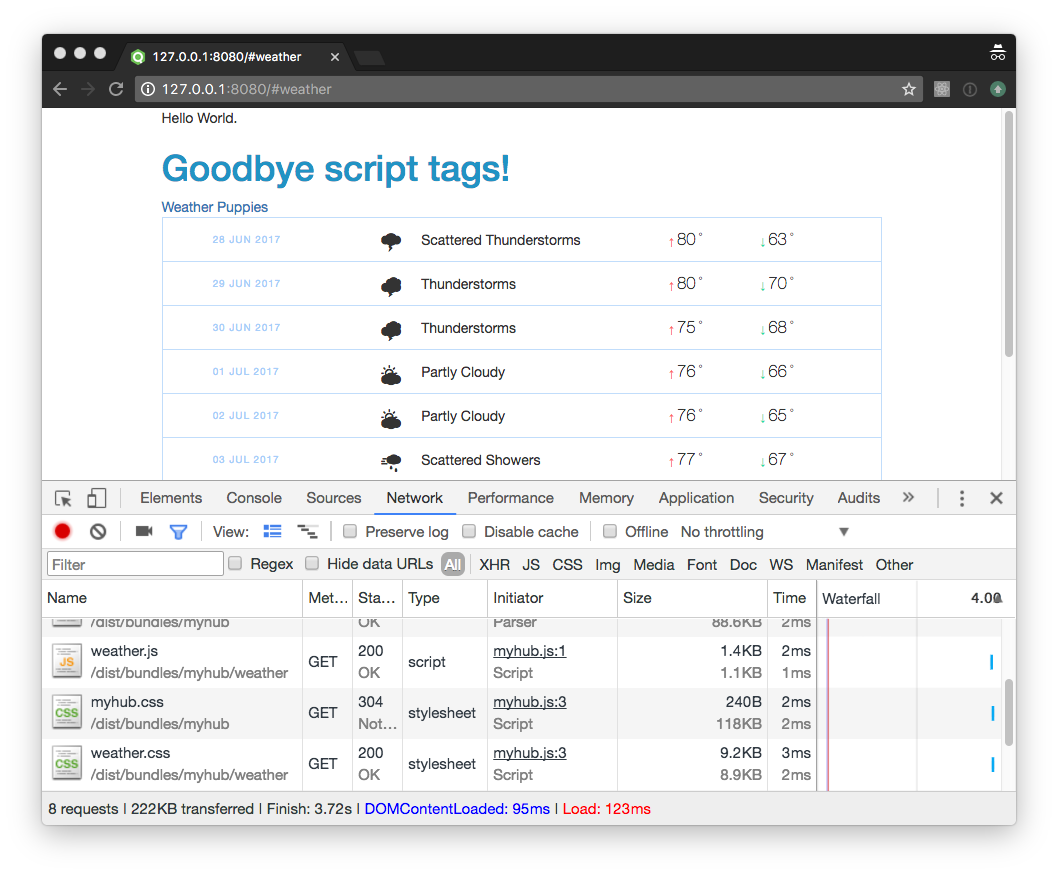
So far we have only loaded the main module of the `myhub` application; one of the features of this application is that it progressively loads the modules needed to render the `weather` page and the `puppies` page only when the user navigates to any of these pages.
Once again, the optimized bundle is smaller than the regular one (although the difference is less that 1 kB); but unlike regular bundles loaded with StealJS, the optimized loader can handle bundles loaded using script tags; which means we can take advantage of the browser capability to download the bundle and parse its code without blocking the main thread and without waiting for the user to click any of the navigation links.
Edit `index.html` to asynchronously load the bundles of the other two pages like this:
```html
<body>
<div class="container">Hello World.</div>
<script async src="./dist/bundles/myhub/myhub.js"></script>
<script async src="./dist/bundles/myhub/weather/weather.js"></script>
<script async src="./dist/bundles/myhub/puppies/puppies.js"></script>
</body>
```
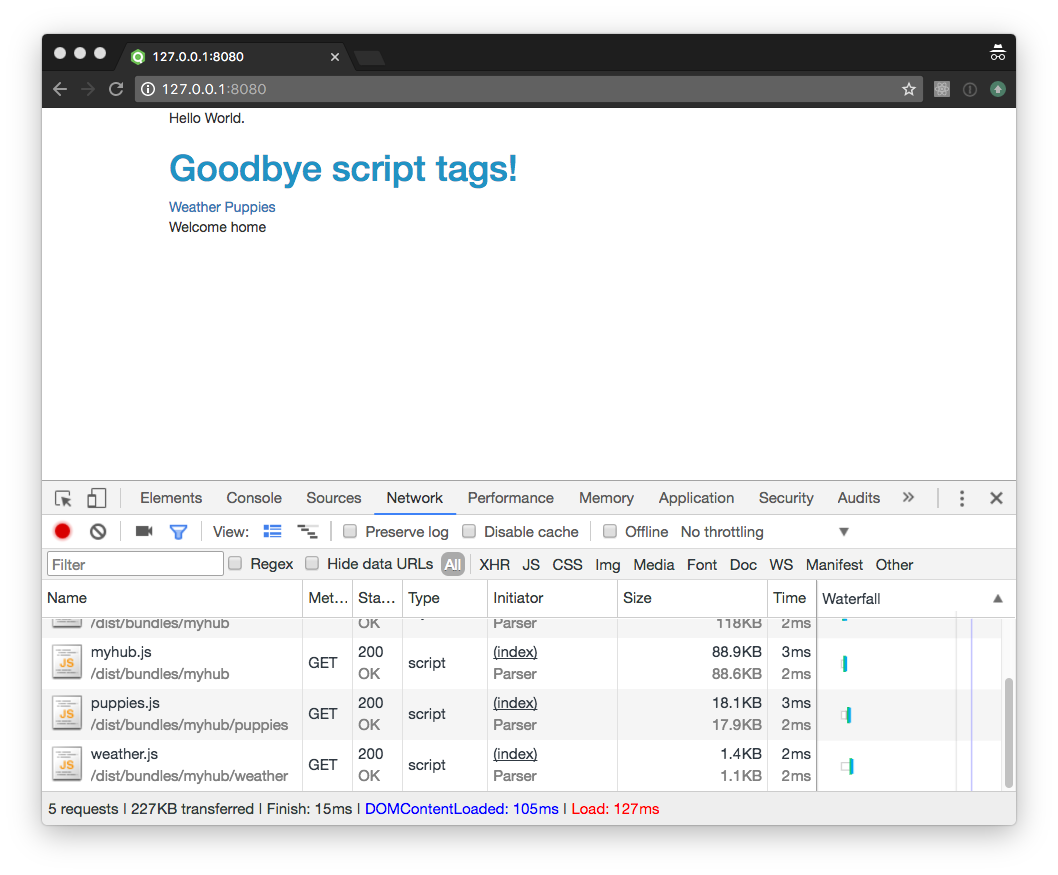
If you reload your browser, you'd notice that there are two extra requests and the load event takes more or less the same time to fire as before. The browser downloaded and parsed the bundles without blocking the main thread, instead of waiting for the user to navigate away from the home page, which results in smoother transitions.
Navigate to the puppies page and see it for yourself!
## iOS builds using Apache Cordova
In this part of the guide we will turn the `myhub` application into an iOS application that can be tested in the iOS simulator using [Apache Cordova](https://cordova.apache.org/).
> This guide is targeted to macOS users, please download and install Xcode from the [AppStore](https://developer.apple.com/xcode/) before moving forward.
To set up the Cordova build, we have to install a couple of packages, run:
```
npm install --save-dev steal-cordova
npm install --global ios-sim
```
### Update the optimize build script
Once `steal-cordova` is installed and saved in your `package.json` file, update _optimize.js_ with the following code:
```js
var path = require("path");
var stealTools = require("steal-tools");
var stealCordova = require("steal-cordova")({
buildDir: "./build/cordova",
id: "com.myhub",
name: "MyHub",
platforms: ["ios"],
index: path.join(__dirname, "index.html")
});
stealTools
.optimize()
.then(stealCordova.build)
.then(function() {
// launch the iOS simulator automatically
stealCordova.ios.emulate();
});
```
> Read [steal-cordova](https://github.com/stealjs/steal-cordova) documentation to get familiar with all the available options.
Run the build script with:
```
> node optimize.js
```

Congrats! you just created an iOS application!
> If you receive the error "Error: Cannot read property 'replace' of undefined", you can work around it by running `cd build/cordova/platforms/ios/cordova/ && npm install ios-sim@6` then cd back into the `myhub` root folder and run the optimize build script again.
### Optimized build targets and Cordova builds
The `optimize` API can be passed a [target](steal-tools.BuildOptions) option to generate code specific to certain platforms, you can read more about it in the [steal-tools](https://stealjs.com/docs/steal-tools.BuildOptions.html) documentation.
The Cordova build requires the web target output to be passed in, first, make sure your `target` array includes the "web" option.
Assuming you're creating a build to load on Web Workers as a second target, _optimize.js_ should look like this:
```js
// The code up to this point remains the same
stealTools
.optimize({}, { target: ["web", "worker"] })
.then(function(buildResult) {
return stealCordova.build(buildResult.web);
})
.then(function() {
stealCordova.ios.emulate();
});
```
and that's it!
### Desktop builds using Electron
In the last part of this guide we will make a desktop build of our `myhub` application using [Electron](https://electron.atom.io/).
To set up the desktop build, we have to install `steal-electron` by running:
```
npm install --save-dev steal-electron
```
### Electron main module
We will need a different entry point for our Electron application, this module will take care of creating windows and handling system events.
Create _electron-main.js_ with the following code:
```js
const url = require("url");
const path = require("path");
const { app, BrowserWindow } = require("electron");
let win;
function createWindow() {
win = new BrowserWindow({ width: 800, height: 600 });
win.loadURL(
url.format({
pathname: path.join(__dirname, "index.html"),
protocol: "file:",
slashes: true
})
);
win.on("closed", () => {
win = null;
});
}
app.on("ready", createWindow);
app.on("window-all-closed", () => {
if (process.platform !== "darwin") {
app.quit();
}
});
app.on("activate", () => {
if (win === null) {
createWindow();
}
});
```
> This code was taken from Electron's [quick start guide](https://electron.atom.io/docs/tutorial/quick-start/), read their documentation to get familiar with the available APIs and options.
### Update the optimize build script
Once `steal-electron` is installed and saved in your `package.json` file, update _optimize.js_ with the following code:
```js
var stealTools = require("steal-tools");
var stealElectron = require("steal-electron");
var electronOptions = {
buildDir: "./build",
platforms: ["darwin"],
main: "electron-main.js",
electronVersion: "1.6.11",
files: ["dist/**/*", "index.html"]
};
stealTools
.optimize()
.then(function(buildResult) {
return stealElectron(electronOptions, buildResult);
});
```
> Read [steal-electron](https://github.com/stealjs/steal-electron) documentation to get familiar with all the available options.
Run the build script with:
```
> node optimize.js
```
Then open the generated application file by running the following command:
```
open build/myhub-darwin-x64/myhub.app
```

Congrats, you just created a desktop application!