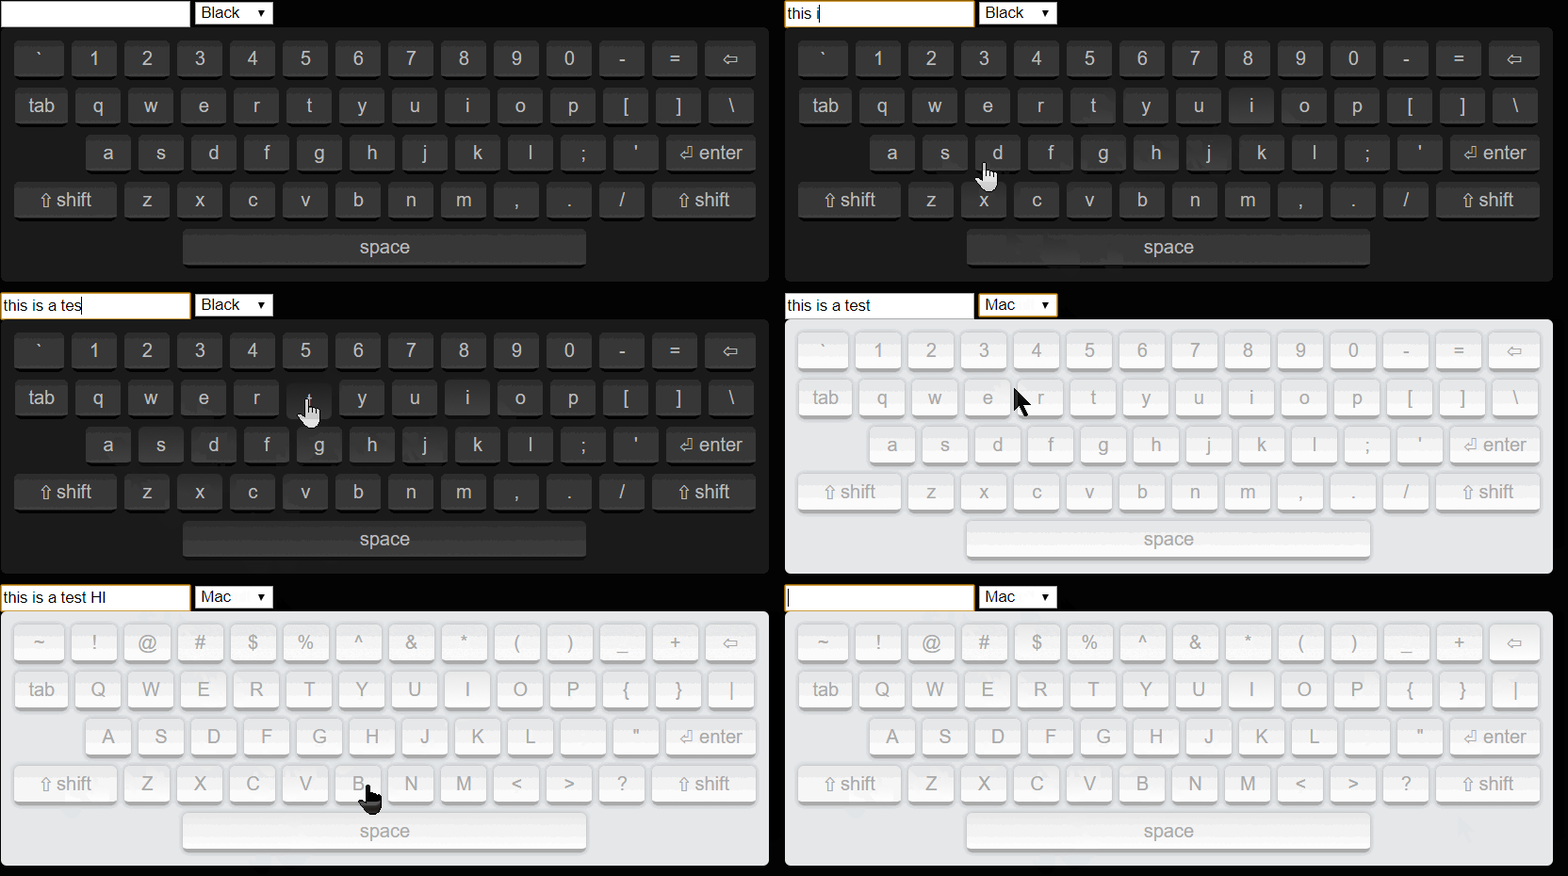
# Electron Secure Virtual Keyboard

<img src="https://raw.githubusercontent.com/th317erd/electron-secure-virtual-keyboard/master/assets/electron-virtual-keyboard-demo.gif" height="200" />

This is a secure version of [electron-virtual-keyboard](https://www.npmjs.com/package/electron-virtual-keyboard) by [DigiThinkIT](https://github.com/DigiThinkIT) and Felipe Orellana.

**Many thanks to the original authors for their work!**

A themable JQuery virtual keyboard built to use Electron's webContent.sendInputEvent() API which minimizes input field event fighting with other libraries that might require modifying the input fields on the fly.

This project takes inspiration from https://github.com/Mottie/Keyboard

# Installation

Through npm

```bash
npm install electron-secure-virtual-keyboard
```
Through yarn

```bash
yarn add electron-secure-virtual-keyboard
```

# Run the demo

This will only work if you have cloned the repository locally.

Through npm:
```bash
npm i && npm run demo
```

or through yarn:
```bash
yarn install && yarn demo
```

# Imports

`./node_modules/electron-secure-virtual-keyboard/dist/client.js` - Built browser distrubution for use with `<script>` tags.

`./node_modules/electron-secure-virtual-keyboard/browser.js` - Browser import, for use with build systems, like Webpack or browserify.

`./node_modules/electron-secure-virtual-keyboard/node.js` - Node import, for direct use within node (i.e. jsdom), or for use with build systems. With this import is is required that you supply `jQuery` directly:

```javascript
const jQuery = require('jquery');
const VirtualKeyboardClient = require('electron-secure-virtual-keyboard/node')(jQuery);
```

# Upgrading from [electron-virtual-keyboard](https://www.npmjs.com/package/electron-virtual-keyboard)

If you are coming from [electron-virtual-keyboard](https://www.npmjs.com/package/electron-virtual-keyboard) then the update steps to use this library instead are simple. There are only a few things that need to change.

## In Main Electron process

First, the way you import this module has changed. Instead of:

From:

`./public/main.js`
```javascript
const VirtualKeyboard = require('electron-virtual-keyboard');
```

Change To:

`./public/main.js`
```javascript
const { setupVirtualKeyboard } = require('electron-secure-virtual-keyboard');
```

Next, the way you initialze the virtual keyboard has changed slightly. This change was to enable this virtual keyboard to be re-used across many BrowserWindows or BrowserViews, and also to allow the API to be more flexible so it can be used inside another framework (instead of relying on Electron).

From:

`./public/main.js`
```javascript
var virtualKeyboard = new VirtualKeyboard(mainWindow.webContents);
```

Change To:
`./public/main.js`
```javascript
const { ipcMain } = require('electron');
const { setupVirtualKeyboard } = require('electron-secure-virtual-keyboard');

...
// webContents is retreived from the IPC events, so is no longer needed
var virtualKeyboard = setupVirtualKeyboard(ipcMain);
```

Next, you must have a `preload.js` script for your Electron process. Inside the `preload.js` script, you will want the following code to setup the secure keyboard bridge:

`./public/preload.js`
```javascript
const { contextBridge, ipcRenderer }  = require('electron');
const { setupSecureBridge } = require('electron-secure-virtual-keyboard');

// This establishes the secure bridge with the main process
setupSecureBridge(contextBridge, ipcRenderer);
```

That is all that is needed for the changes to the main process! Now onto the changes for the client.

## In client renderer

You must first have jQuery loaded, and exposed as a global named `jQuery`. How you accomplish this is up to you. If you aren't sure how to do this, just pull jQuery from the CDN. You can see how to do this here: https://releases.jquery.com/. Make certain that jQuery is loaded BEFORE you load the `electron-secure-virtual-keyboard/client.js` script.

`require('electron-secure-virtual-keyboard')` is only for the main process.

`require('electron-secure-virtual-keyboard/client')` is only for the client renderer.

Unless you have a build process (i.e. Webpack, or browserify), then you will need to copy the client script to your `./public/` root so it can be loaded via a `<script>` element:

```bash
$ cp ./node_modules/electron-secure-virtual-keyboard/dist/client.js ./public/virtual-keyboard-client.js
$ cp ./node_modules/electron-secure-virtual-keyboard/virtual-keyboard.css ./public/
```

After you have done this, then you can simply include the script in your `index.html`:

```html
<html>
  <head>
    ...

    <!-- Load jQuery from the CDN first -->
    <script
      src="https://code.jquery.com/jquery-3.6.0.min.js"
      integrity="sha256-/xUj+3OJU5yExlq6GSYGSHk7tPXikynS7ogEvDej/m4="
      crossorigin="anonymous"
    ></script>

    <!-- Load client virtual keyboard script -->
    <script type="text/javascript" src="virtual-keyboard-client.js"></script>

    <!-- Don't forget to load the virtual keyboard CSS!!! -->
    <link rel="stylesheet" href="virtual-keyboard.css">

    ...
  </head>

  ...
</html>
```

That is it! You are now ready to rock n' roll with virtual keyboards in your application!

# Usage

The keyboard requires passing keys over the secure bridge to the main process to mimic key input events. Therefore, you must set your main process to handle these requests.

## Main Process

Somewhere in you main electron process after you have created your window, pass the `ipcMain` argument to the `setupVirtualKeyboard` method. This will intialize the virtual keyboard handler in the main process.

*Note: Only one virtual keyboard handler is needed for the entire process. It will correctly handle virtual keyboard communication for all BrowserWindows and BrowserViews. The `webContents` needed for each window is retreived from the IPC events. The `setupSecureBridge` method still needs to be called in the preload script of every BrowserWindow or BrowserView.*

```javascript
const { ipcMain } = require('electron');
const { setupVirtualKeyboard } = require('electron-virtual-keyboard');

var virtualKeyboard; // keep virtual keyboard reference around to reuse.
app.on('ready', () => {
  createWindow();
  virtualKeyboard = setupVirtualKeyboard(ipcMain);
});
```

## Preload script

Inside your preload script, you will need the following code to setup the secure bridge with Electron:

```javascript
const { contextBridge, ipcRenderer }  = require('electron');
const { setupSecureBridge } = require('electron-secure-virtual-keyboard');

// This establishes the secure bridge with the main process
setupSecureBridge(contextBridge, ipcRenderer);
```

## Render Process

Then on your renderer process you can setup any supported element to use the virtual keyboard as follows:

```html
<html>
  <head>
    <!-- Load jQuery from the CDN first (or however you want to load jQuery) -->
    <script
      src="https://code.jquery.com/jquery-3.6.0.min.js"
      integrity="sha256-/xUj+3OJU5yExlq6GSYGSHk7tPXikynS7ogEvDej/m4="
      crossorigin="anonymous"
    ></script>

    <!-- Load client virtual keyboard script -->
    <!-- Note: unless you are using a build environment, you will need to copy this file to your "public" folder. See above. -->
    <script type="text/javascript" src="virtual-keyboard-client.js"></script>

    <!-- Don't forget to load the virtual keyboard CSS!!! -->
    <!-- Note: unless you are using a build environment, you will need to copy this file to your "public" folder. See above. -->
    <link rel="stylesheet" href="virtual-keyboard.css">
  </head>

  <body>
    <input type="text">

    <script>
      // Instantiate a virtual keyboard on our input field
      var keyboard = $('input:text').keyboard();
    </script>
  </body>
</html>
```

# API

The API entry point:

```javascript
var keyboard = $('input:text').keyboard();
```

You can pass an object to further customize the keyboard behaviour. See the next section.

The keyboard plugin returns a VirtualKeyboard instance which you can use to trigger your own behaviours on the keyboard. Including sending key press events.

## Configuration

```javascript
var keyboard = $('input:text').keyboard({
    // Your config object //
});
```

| key    | default | type   | description |
|:------:|:-------:|:------:|:------------|
| theme | null | string | A theme class to apply to a keyboard. Available themes are "theme-black", "theme-mac" |
| layout | "us-en"| string | The predefined layout id to use |
| container | null | DomElement, JQueryElement or function($el) | A container to embed the virtual keyboard |
| show | false | bool | When true, displays keyboard after setup |
| displayOnFocus | true | bool | When true, auto displays/hides keyboard when the input field is in or out of focus. |
| autoPosition | true | bool or function($el, $kb) | When true, snaps the keyboard below the input field. If a function is passed, this function will be called to calculate the snap position instead. |
| keyTemplate | ```<span class="key"></span>``` | string | The default keyboard key container template to use. |
| customKeys | null | Object | An object defining custom keys to use in your keyouts or redefine existing ones |

## show()

Displays the keyboard

## hide()

Hides the keyboard

## toggleLayout()

Displays the next layout state

## showLayout(name)

| arg | type | description |
|:---:|:----:|:------------|
| name | string | The name identifier of the state to display |

Displays a layout state by name

## keyPress(key)

| arg | type | description |
|:---:|:----:|:------------|
| key | string | The group of character keys to simulate |

Sends a keypress to the electron main process to simulate a key input event.

# Customizations

## Custom Keys

There are two ways to add custom keys:

1) By adding a new key/value entry in ```$.fn.keyboard_custom_keys```
2) by adding a custom_keys object to the keyboard config setup.

For either option the setup is identical:

```javascript
$.fn.keyboard_custom_keys['^mykey$'] = {
    render: function(kb, $key, modifier) {
        // You can override the key dom element to display anything you
        // want on the key. On this case, we just replace the key text.
        $key.text('Special Key');
    },
    handler: function(kb, $key) {
        // This key simply switche the keyboard keyout to a custom one
        // called 'special'.
        kb.showLayout('special');
    }
}
```

Custom keys are thus tied to keyboard layouts. Notice that the keys on ```$.fn.keyboard_custom_keys``` are regular expression patterns.

## Keyboard Layouts

There are 4 built in keyboard layouts to use, plus you can setup your own custom layouts.

### us-en
<img src="https://raw.githubusercontent.com/th317erd/electron-secure-virtual-keyboard/master/assets/electron-virtual-keyboard-us-en.gif" height="200" />

### us-en:with-numpad
<img src="https://raw.githubusercontent.com/th317erd/electron-secure-virtual-keyboard/master/assets/electron-virtual-keyboard-us-en-with-numpad.gif" height="200" />

### us-en:mobile
<img src="https://raw.githubusercontent.com/th317erd/electron-secure-virtual-keyboard/master/assets/electron-virtual-keyboard-us-en-mobile.gif" height="200" />

### us-en:mobile-with-numpad
<img src="https://raw.githubusercontent.com/th317erd/electron-secure-virtual-keyboard/master/assets/electron-virtual-keyboard-us-en-mobile-with-numpad.gif" height="200" />

### Custom Layouts

Defining layouts is straight forward, see the following example:

Below is a copy/paste of the us-en keyboard layout defined as a one use layout:
```javascript
var keyboard = $('input:text').keyboard({
    layout: {
        'normal': [
            '` 1 2 3 4 5 6 7 8 9 0 - = {backspace:*}',
            ['{tab} q w e r t y u i o p [ ] \\', '7 8 9'],
            ['{sp:2} a s d f g h j k l ; \' {enter}', '4 5 6'],
            ['{shift:*} z x c v b n m , . / {shift:*}', '1 2 3'],
            ['{space}', '0']
        ],
        'shift': [
            '~ ! @ # $ % ^ & * ( ) _ + {backspace:*}',
            ['{tab} Q W E R T Y U I O P { } |', '7 8 9'],
            ['{sp:2} A S D F G H J K L : " {enter}', '4 5 6'],
            ['{shift:*} Z X C V B N M < > ? {shift:*}', '1 2 3'],
            ['{space}', '0']
    }
})
```

You can also define reusable layouts this way:
```javascript
$.fn.keyboard_layouts['en-us:with-numpad'] = {
    'normal': [
        '` 1 2 3 4 5 6 7 8 9 0 - = {backspace:*}',
        ['{tab} q w e r t y u i o p [ ] \\', '7 8 9'],
        ['{sp:2} a s d f g h j k l ; \' {enter}', '4 5 6'],
        ['{shift:*} z x c v b n m , . / {shift:*}', '1 2 3'],
        ['{space}', '0']
    ],
    'shift': [
        '~ ! @ # $ % ^ & * ( ) _ + {backspace:*}',
        ['{tab} Q W E R T Y U I O P { } |', '7 8 9'],
        ['{sp:2} A S D F G H J K L : " {enter}', '4 5 6'],
        ['{shift:*} Z X C V B N M < > ? {shift:*}', '1 2 3'],
        ['{space}', '0']
}

var keyboard = $('input:text')
        .keyboard({ layout: 'en-us:with-numpad'});
```

Here is how layouts work:

1) A layout object can contain multiple key/value pairs to define keyboard layouts used to swap display states.
2) Layout objects require at least one layout key "normal" which is the default layout displayed.
3) Custom key behaviours can be setup with squigly identifiers {custom-key}
4) Each key row may be a string or an array of strings. If using the array version, the keyboard turn them into columns to group keys horizontally.
5) Custom keys can be defined in ```$.fn.keyboard_custom_keys```

# Using in an alternate framework that isn't Electron

This library uses the Electron secure bridge, via the `ipcMain.handle` method, and the `ipcRenderer.invoke` method. Read the Electron docs about these methods, and then simply mock them to fit into your non-Electron framework.