### Links
[View demo](https://promosis.github.io/file-upload-with-preview/)
[View on npm](https://www.npmjs.com/package/file-upload-with-preview)
[View on GitHub](https://github.com/promosis/file-upload-with-preview#readme)
### About
This is a simple frontend utility to help the file-upload process on your website. It is written in pure JavaScript, has no dependencies, and is a small 13.55 kB (gzipped). You can check out the live demo [here](https://promosis.github.io/file-upload-with-preview/).
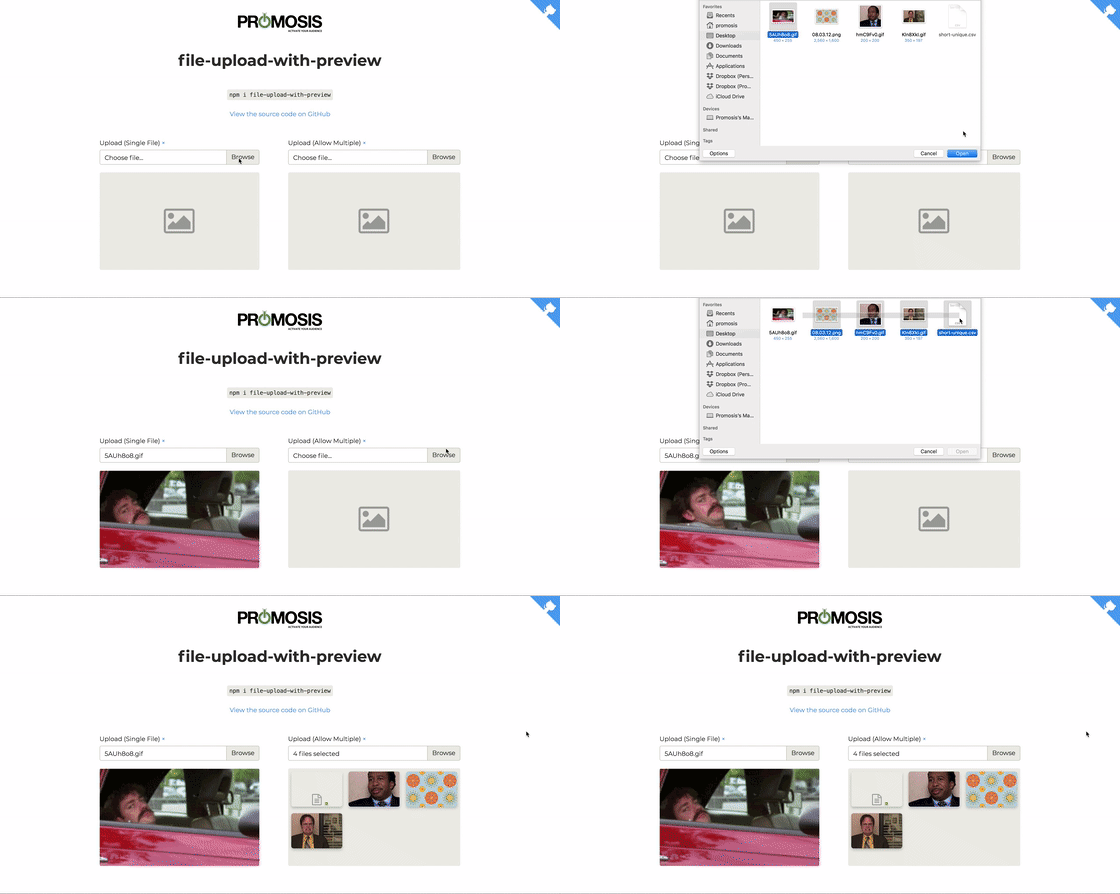
For the most part, browsers do a good job of handling image-uploads. That being said - we find that the ability to show our users a preview of their upload can go a long way in increasing the confidence in their upload.
**file-upload-with-preview** aims to address the issue of showing a preview of a user's uploaded image in a simple to use package.
### Features
- Shows the actual image preview in the case of a single uploaded .jpg, .jpeg, .gif, or .png image. Shows a *success-image* in the case of an uploaded .pdf file, uploaded video, or other unrenderable file - so the user knows their image was collected successfully. In the case of multiple selected files, the user's selected images will be shown in a grid.
- Shows the image name in the input bar. Shows the count of selected images in the case of multiple selections within the same input.
- Allows the user to clear their upload, and clear individual images in the `multiple` grid.
- Looks great - styling based on Bootstrap 4's [custom file-upload](https://getbootstrap.com/docs/4.0/components/forms/#file-browser) style.
- Framework agnostic - to access the uploaded file/files just use the `cachedFileArray` (always will be an array) property of your `FileUploadWithPreview` object.
- For every file-group you want just initialize another `FileUploadWithPreview` object with its own `uniqueId` - this way you can have multiple file-uploads on the same page. You also can just use a single input designated with a `multiple` property to allow multiple files on the same input.
### Installation
```bash
# npm
npm i file-upload-with-preview
# yarn
yarn add file-upload-with-preview
```
Or you can include it through the browser at the bottom of your page. When using the browser version make sure update your target version as needed.
```html
```
### Usage
When installed through npm or yarn:
```javascript
// using require
const FileUploadWithPreview = require('file-upload-with-preview')
// using import
import FileUploadWithPreview from 'file-upload-with-preview'
// initialize a new FileUploadWithPreview object
const upload = new FileUploadWithPreview('myUniqueUploadId')
```
...or through the browser:
```html
```
You'll also want to include the css:
```javascript
// JavaScript
import 'file-upload-with-preview/dist/file-upload-with-preview.min.css'
```
Or in your `` if you're in the browser:
```html
```
The JavaScript looks for a specific set of HTML elements to display the file input, label, image preview, and clear-button. Make sure to populate the `custom-file-container` element with the uniqueId:
```html
```
Then when you're ready to use the user's file for an API call or whatever, just access the user's uploaded file/files in the `cachedFileArray` property of your initialized object like this:
```javascript
upload.cachedFileArray
```
You can optionally trigger image browser and clear selected images by script code:
```javascript
upload.emulateInputSelection() // to open image browser
upload.clearPreviewPanel() // clear all selected images
```
You may also want to capture the event when an image is selected:
```javascript
window.addEventListener('fileUploadWithPreview:imagesAdded', function(e) {
// e.detail.uploadId
// e.detail.cachedFileArray
// e.detail.addedFilesCount
// Use e.detail.uploadId to match up to your specific input
if (e.detail.uploadId === 'mySecondImage') {
console.log(e.detail.cachedFileArray)
console.log(e.detail.addedFilesCount)
}
})
```
#### Note
The `cachedFileArray` property is always an array. So if you are only allowing the user to upload a single file, you can access that file at `cachedFileArray[0]` - otherwise just send the entire array to your backend to handle it normally.
Make sure to set `multiple` on your input if you want to allow the user to select multiple images.
### Properties
| name | type | description |
|---|---|---|
| el | Element | The main container for the instance |
| input | Element | The main container for the instance |
| inputLabel | Element | The label for the image name/count |
| uploadId | String | The id you set for the instance |
| cachedFileArray | Array | The current selected files |
| currentFileCount | Number | The count of the currently selected files |
| clearButton | Element | The button to reset the instance |
| imagePreview | Element | The display panel for the images |
| options.images.baseImage | String | Replace placeholder image. |
| options.images.backgroundImage | String | Replace background image for image grid. |
| options.images.successFileAltImage | String | Replace successful alternate file upload image. |
| options.images.successPdfImage | String | Replace successful PDF upload image. |
| options.images.successVideoImage | String | Replace successful video upload image. |
| options.presetFiles | Array | Provide an array of image paths to be automatically uploaded and displayed on page load (can be images hosted on server or URLs) |
| options.showDeleteButtonOnImages | Boolean | Show a delete button on images in the grid. Default `true` |
| options.text.browse | String | Edit button text. Default `'Browse'`|
| options.text.chooseFile | String | Edit input placeholder text. Default `'Choose file...'`|
| options.text.selectedCount | String | Edit input text when multiple files have been selected in one input. Default `${ n } 'files selected'` |
### Methods
| method | parameters | description |
|---|---|---|
| addFiles | array of File objects | Populate the `cachedFileArray` with images as File objects |
| processFile | file object | Take a single File object and append it to the image preview panel |
| addImagesFromPath | array of image paths | Take an array of image paths, convert them to File objects, and display them in the image preview panel (can be paths to images on the server or urls) |
| replaceFiles | array of File objects | Replace files in `cachedFileArray` and image preview panel with array of File objects |
| replaceFileAtIndex | file object, index (Number) | Take a single file object and index, replace existing file at that index |
| deleteFileAtIndex | index (Number) | Delete specified file from `cachedFileArray` |
| refreshPreviewPanel | none | Refresh image preview panel with current `cachedFileArray` |
| addBrowseButton | text | Appends browse button to input with custom button text |
| emulateInputSelection | none | Open the image browser programmatically |
| clearPreviewPanel | none | Clear the `cachedFileArray` |
### Events
| event | value | description |
|---|---|---|
| fileUploadWithPreview:imagesAdded | `e` (e.detail.uploadId, e.detail.cachedFileArray, e.detail.addedFilesCount) | Triggered each time file/files are selected. Delivers the `uploadId`, updated `cachedFilesArray`, and `addedFilesCount` for the event. |
| fileUploadWithPreview:imageDeleted | `e` (e.detail.uploadId, e.detail.cachedFileArray, e.detail.currentFileCount) | Triggered each time a file is deleted. Delivers the `uploadId`, updated `cachedFilesArray`, and `currentFileCount` for the event. |
### Full Example
```html
...
...
...
...
```
In this example we set the `MAX_FILE_SIZE` value to `10485760` (10MB), the accepted images to `*` (everything), and designate `multiple` to allow the user to select multiple files - you can adjust those settings to whatever you like. For example, if you'd like to limit uploads to only images and pdf's and only allow a single file upload use the following:
```html
```
### Browser Example
[See on CodePen](https://codepen.io/johndatserakis/pen/PLdYEa)
### Vue Example
[See on CodePen](https://codepen.io/johndatserakis/pen/vMRPwa)
### Browser Support
If you are supporting a browser like IE11, you'll need a polyfill for `fetch` and `promise` at the bottom of your `index.html`:
```html
```
Or, you can install babel-polyfill and import that in the main script of your app. You can read more about babel-polyfill [here](https://babeljs.io/docs/en/babel-polyfill). In the example folder, we use the external script method.
### Testing
Use `npm run test` to run the tests.
### Development
Clone the repo, then use the following to work on the project locally:
```bash
# Install dependencies
npm install
# Watch changes
npm run watch
# When done working
npm run build
```
### Other
Go ahead and fork the project! Submit an issue if needed. Have fun!
### License
Copywrite 2017 [Promosis](https://promosis.com)
[MIT](http://opensource.org/licenses/MIT)