🤖
frontengineerplugin





Translations: 🇨🇳 汉语
 ## Quickstart
begin
```shell
npm install frontengineerplugin -g
# 第一种方法,推荐:
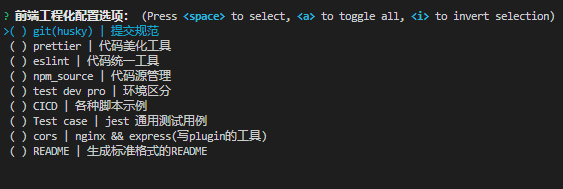
npm run engineer
# 第二种方法:不推荐 项目根目录的package.json中输入
frontengineerplugin install prettier husky env eslint npm
# 第三种方法:命令行下面 输入
frontengineerplugin gui
```
## Quesion
- 如果你遇到Error [ERR_REQUIRE_ESM]: require() of ES Module 的报错。在你的package.json中加入
```json
"type": "module",
```
- This file is being treated as an ES module because it has a '.js' file extension and 'D:\cicd-test\package.json' contains "type": "module"
```json
删掉 "type": "module", 加入 "type": "commonjs"
```
- 暂时没有适配pnpm的自动script写入,如果你是用这个你需要
```shell
# 项目根目录的package.json中添加
{
"engineer":"frontengineerplugin gui "
}
# 然后运行 npm run engineer
```
## Contain
### husky
```shell
限制了只能用如下参数进行提交
```
- feat: 新功能 (feature)
- fix:修补bug
- docs:文档 (documentation)
- style:格式(不影响代码运行的变动)
- refactor: 重构(即不是新增功能,也不是修改bug的代码变动)
- chore:构建过程或辅助工具的变动revert: 撤销,版本回退
- perf:性能优化
- test:测试
- improvement:改进
- update:
- build: 打包
- ci: 持续集成
### prettier
```js
module.exports = {
printWidth: 80,
// 使用单引号而非双引号;
singleQuote: true,
tabWidth: 2,
proseWrap: 'never',
// 在语句末尾添加分号;
Semicolons: true,
overrides: [{ files: '.prettierrc', options: { parser: 'json' } }],
};
```
more refer:https://www.prettier.cn/
### env
```js
cross-env ENV=production max dev
var proEnv = require('./config/production.env'); // 生产环境
var testEnv = require('./config/test.env'); // 测试环境
var devEnv = require('./config/development.env'); // 本地环境
const env = process.env.ENV;//当前环境
let URL_COMMON = '';//路径
let URL_RESOURCE = '';//路径
// 默认是本地环境
if (env === 'production') { // 生产环境
console.log("----------生产环境----------");
URL_COMMON = proEnv.URL_COMMON;
URL_RESOURCE = proEnv.URL_RESOURCE
} else if (env === 'test') { // 测试环境
console.log("----------测试环境----------");
URL_COMMON = testEnv.URL_COMMON;
URL_RESOURCE = testEnv.URL_RESOURCE
} else if( env ==='development') { // 开发环境
console.log("----------开发环境----------");
URL_COMMON = devEnv.URL_COMMON;
URL_RESOURCE = devEnv.URL_RESOURCE
}
```
### eslint
```js
// npm install babel-eslint --save
module.exports = {
root: true,
env: {
browser: true,
node: true,
},
extends: [
// 额外添加的规则可查看 https://vuejs.github.io/eslint-plugin-vue/rules/
// 'plugin:vue/essential', //加了这个才能当作vue来进行解析,不然只会当成js来进行解析 eslint-plugin-react
],
//不加这个会报错Parsing error: The keyword 'import' is reserved
parserOptions: {
// 指定解析器 parser
ecmaVersion: 8,
sourceType: 'module',
// "parser": 'babel-eslint',
// sourceType: 'module',
// ecmaVersion: 12,
// allowImportExportEverywhere: true, // 不限制eslint对import使用位置
},
settings: {},
// 取消没必要的校验 0 是 不报错 , 1是warn 2 是punishing
// "off"或者0 //关闭规则关闭
// "warn"或者1 //在打开的规则作为警告(不影响退出代码)
// "error"或者2 //把规则作为一个错误(退出代码触发时为1)
rules: {
// "camelcase": ["error", { "allow": ["aa_bb"] }], // 属性名
// "max-lines": ["error", {"max": 20, "skipComments": true}], // 每一个文件最多的行数
// "no-console": 2,//禁止使用console
// "no-mixed-spaces-and-tabs": [2, false],//禁止混用tab和空格
// "no-multiple-empty-lines": [1, {"max": 2}],//空行最多不能超过2行
// "no-multi-spaces": 1,//不能用多余的空格
// "indent": [1, 4],//缩进风格 缩进四个空格
// "max-lines-per-function": [0, { "max": 2 }], // 指定每个function最多多少行
'no-unused-vars': 2, //没被使用
'consistent-return': 0, // 有函数返回值
'no-underscore-dangle': 0, // 不允许有下划线
'no-plusplus': 1, // 不能用++
'no-eval': 0, // 不能用eval
'linebreak-style': [0, 'error', 'window'], // 换行风格
camelcase: 'warn', //像是xx_xx这种会报错
},
// 这里可以配置具体后缀的规则
overrides: [
{
files: ['*.js'],
// extends: ['alloy'],
rules: {
'no-unused-vars': 0, //没被使用
},
},
],
};
```
more refer:http://eslint.cn/
### npm
```js
指定.npmrc
```
### cicd
```
目前这个文件夹是放置一些脚本的。
包括部署和项目结构优化的脚本
```
### test
```
里面分成两个文件夹.主要使用jest做的
主要是有工具类js ,ts 的测试。
以及web-component之类的测试
```
### node_proxy
```
集成了三种方法来做跨域。一般如果你做脚本的话,可以下载下来做插件的端口转发
```
### standard_readme
```json
帮助你生成标准 README.md 的 东西。
注意。提前要填写好你package.json 的name version homepage 三个字段
然后注意 如果项目中有 README.md 需要先删掉
默认会生成 author 和 packageName 的label(就是一开始下面并列的牌子)
如果你想要添加自己的label 可以在package.json中添加 如下格式字段
"label": [
{
"frontName": "Gitee",
"behindName": "Electrolux",
"src": "https://gitee.com/Electrolux",
"color": "red"
},
{
"frontName": "Bili",
"behindName": "Electrolux",
"src": "https://space.bilibili.com/286773126",
"color": "Pink"
}
],
```
## Developer
```js
一开始安装的时候会通过package.json的bin字段执行 install.js
如果你想添加你自己工程化的东西
--1.首先将你的文件放进file 文件夹
--2.修改project.js的 guiFn 方法和 增加 util/handleEvent.js导出的方法
--3.接下来的测试阶段请输入npm link
然后 npm run engineer
```
## Example
### COMMIT and CHANGELOG
```SHELL
# first
npm install frontengineerplugin -g
npm run engineer
# THEN
select CICD and husky
# THEN
GO to dir .husky/commit-msg
然后把 os.system("node CICD/CHANGELOG/changeLogAdd.js " + line) 前面的判断符号改成 true
# THEN
GO to dir CICD/CHANGELOG/changeLogAdd
然后 把 isAutoUpDate 改成 true
```
### COMMIT and Update Readme.md
if you allow my readme.md script ,then you can
```SHELL
# first
npm install frontengineerplugin -g
npm run engineer
# THEN
select CICD
# THEN
GO to dir .husky/commit-msg
然后把 os.system("node CICD/readmeUpdate/readmeUpdate.js") 前面的判断符号改成 true
# THEN
GO to dir CICD/readmeUpdate/readmeUpdate.js
然后 把 line 和 resText 进行 替换
```
## Badge
[](https://gitee.com/Electrolux)
```
[](https://gitee.com/Electrolux)
```
## Support
frontEngineerPlugin is developed by me. Please use frontEngineerPlugin, star it on gitee or even become a [sponsor](https://gitee.com/Electrolux) to support us!
## Quickstart
begin
```shell
npm install frontengineerplugin -g
# 第一种方法,推荐:
npm run engineer
# 第二种方法:不推荐 项目根目录的package.json中输入
frontengineerplugin install prettier husky env eslint npm
# 第三种方法:命令行下面 输入
frontengineerplugin gui
```
## Quesion
- 如果你遇到Error [ERR_REQUIRE_ESM]: require() of ES Module 的报错。在你的package.json中加入
```json
"type": "module",
```
- This file is being treated as an ES module because it has a '.js' file extension and 'D:\cicd-test\package.json' contains "type": "module"
```json
删掉 "type": "module", 加入 "type": "commonjs"
```
- 暂时没有适配pnpm的自动script写入,如果你是用这个你需要
```shell
# 项目根目录的package.json中添加
{
"engineer":"frontengineerplugin gui "
}
# 然后运行 npm run engineer
```
## Contain
### husky
```shell
限制了只能用如下参数进行提交
```
- feat: 新功能 (feature)
- fix:修补bug
- docs:文档 (documentation)
- style:格式(不影响代码运行的变动)
- refactor: 重构(即不是新增功能,也不是修改bug的代码变动)
- chore:构建过程或辅助工具的变动revert: 撤销,版本回退
- perf:性能优化
- test:测试
- improvement:改进
- update:
- build: 打包
- ci: 持续集成
### prettier
```js
module.exports = {
printWidth: 80,
// 使用单引号而非双引号;
singleQuote: true,
tabWidth: 2,
proseWrap: 'never',
// 在语句末尾添加分号;
Semicolons: true,
overrides: [{ files: '.prettierrc', options: { parser: 'json' } }],
};
```
more refer:https://www.prettier.cn/
### env
```js
cross-env ENV=production max dev
var proEnv = require('./config/production.env'); // 生产环境
var testEnv = require('./config/test.env'); // 测试环境
var devEnv = require('./config/development.env'); // 本地环境
const env = process.env.ENV;//当前环境
let URL_COMMON = '';//路径
let URL_RESOURCE = '';//路径
// 默认是本地环境
if (env === 'production') { // 生产环境
console.log("----------生产环境----------");
URL_COMMON = proEnv.URL_COMMON;
URL_RESOURCE = proEnv.URL_RESOURCE
} else if (env === 'test') { // 测试环境
console.log("----------测试环境----------");
URL_COMMON = testEnv.URL_COMMON;
URL_RESOURCE = testEnv.URL_RESOURCE
} else if( env ==='development') { // 开发环境
console.log("----------开发环境----------");
URL_COMMON = devEnv.URL_COMMON;
URL_RESOURCE = devEnv.URL_RESOURCE
}
```
### eslint
```js
// npm install babel-eslint --save
module.exports = {
root: true,
env: {
browser: true,
node: true,
},
extends: [
// 额外添加的规则可查看 https://vuejs.github.io/eslint-plugin-vue/rules/
// 'plugin:vue/essential', //加了这个才能当作vue来进行解析,不然只会当成js来进行解析 eslint-plugin-react
],
//不加这个会报错Parsing error: The keyword 'import' is reserved
parserOptions: {
// 指定解析器 parser
ecmaVersion: 8,
sourceType: 'module',
// "parser": 'babel-eslint',
// sourceType: 'module',
// ecmaVersion: 12,
// allowImportExportEverywhere: true, // 不限制eslint对import使用位置
},
settings: {},
// 取消没必要的校验 0 是 不报错 , 1是warn 2 是punishing
// "off"或者0 //关闭规则关闭
// "warn"或者1 //在打开的规则作为警告(不影响退出代码)
// "error"或者2 //把规则作为一个错误(退出代码触发时为1)
rules: {
// "camelcase": ["error", { "allow": ["aa_bb"] }], // 属性名
// "max-lines": ["error", {"max": 20, "skipComments": true}], // 每一个文件最多的行数
// "no-console": 2,//禁止使用console
// "no-mixed-spaces-and-tabs": [2, false],//禁止混用tab和空格
// "no-multiple-empty-lines": [1, {"max": 2}],//空行最多不能超过2行
// "no-multi-spaces": 1,//不能用多余的空格
// "indent": [1, 4],//缩进风格 缩进四个空格
// "max-lines-per-function": [0, { "max": 2 }], // 指定每个function最多多少行
'no-unused-vars': 2, //没被使用
'consistent-return': 0, // 有函数返回值
'no-underscore-dangle': 0, // 不允许有下划线
'no-plusplus': 1, // 不能用++
'no-eval': 0, // 不能用eval
'linebreak-style': [0, 'error', 'window'], // 换行风格
camelcase: 'warn', //像是xx_xx这种会报错
},
// 这里可以配置具体后缀的规则
overrides: [
{
files: ['*.js'],
// extends: ['alloy'],
rules: {
'no-unused-vars': 0, //没被使用
},
},
],
};
```
more refer:http://eslint.cn/
### npm
```js
指定.npmrc
```
### cicd
```
目前这个文件夹是放置一些脚本的。
包括部署和项目结构优化的脚本
```
### test
```
里面分成两个文件夹.主要使用jest做的
主要是有工具类js ,ts 的测试。
以及web-component之类的测试
```
### node_proxy
```
集成了三种方法来做跨域。一般如果你做脚本的话,可以下载下来做插件的端口转发
```
### standard_readme
```json
帮助你生成标准 README.md 的 东西。
注意。提前要填写好你package.json 的name version homepage 三个字段
然后注意 如果项目中有 README.md 需要先删掉
默认会生成 author 和 packageName 的label(就是一开始下面并列的牌子)
如果你想要添加自己的label 可以在package.json中添加 如下格式字段
"label": [
{
"frontName": "Gitee",
"behindName": "Electrolux",
"src": "https://gitee.com/Electrolux",
"color": "red"
},
{
"frontName": "Bili",
"behindName": "Electrolux",
"src": "https://space.bilibili.com/286773126",
"color": "Pink"
}
],
```
## Developer
```js
一开始安装的时候会通过package.json的bin字段执行 install.js
如果你想添加你自己工程化的东西
--1.首先将你的文件放进file 文件夹
--2.修改project.js的 guiFn 方法和 增加 util/handleEvent.js导出的方法
--3.接下来的测试阶段请输入npm link
然后 npm run engineer
```
## Example
### COMMIT and CHANGELOG
```SHELL
# first
npm install frontengineerplugin -g
npm run engineer
# THEN
select CICD and husky
# THEN
GO to dir .husky/commit-msg
然后把 os.system("node CICD/CHANGELOG/changeLogAdd.js " + line) 前面的判断符号改成 true
# THEN
GO to dir CICD/CHANGELOG/changeLogAdd
然后 把 isAutoUpDate 改成 true
```
### COMMIT and Update Readme.md
if you allow my readme.md script ,then you can
```SHELL
# first
npm install frontengineerplugin -g
npm run engineer
# THEN
select CICD
# THEN
GO to dir .husky/commit-msg
然后把 os.system("node CICD/readmeUpdate/readmeUpdate.js") 前面的判断符号改成 true
# THEN
GO to dir CICD/readmeUpdate/readmeUpdate.js
然后 把 line 和 resText 进行 替换
```
## Badge
[](https://gitee.com/Electrolux)
```
[](https://gitee.com/Electrolux)
```
## Support
frontEngineerPlugin is developed by me. Please use frontEngineerPlugin, star it on gitee or even become a [sponsor](https://gitee.com/Electrolux) to support us!