# Elections Poll
## Election Script
`index.js` is the voting server.
Run it using `node index.js`.
A demo of this script may be available running here: Poll: Canadian Federal Elections (2019) (http://canadianelections.janglehost.com). This script could be run on a standalone voting machine, a web server, or maybe even your application.
## Build
`npm install` & `npm start` will build and host the project at `http://localhost:8080/`
Build in `./dist` when built for production by running: `ng b --aot --prod`.
The build will appear at http://localhost:8080/ and can be opened directly with a browser or routed to a domain with a webserver.
## Create the Candidates
Open `index.js`.
Modify the name, title, and voting screen prompt as needed.
const poll = 'canadian_election_2019';
const title = 'Federal Election';
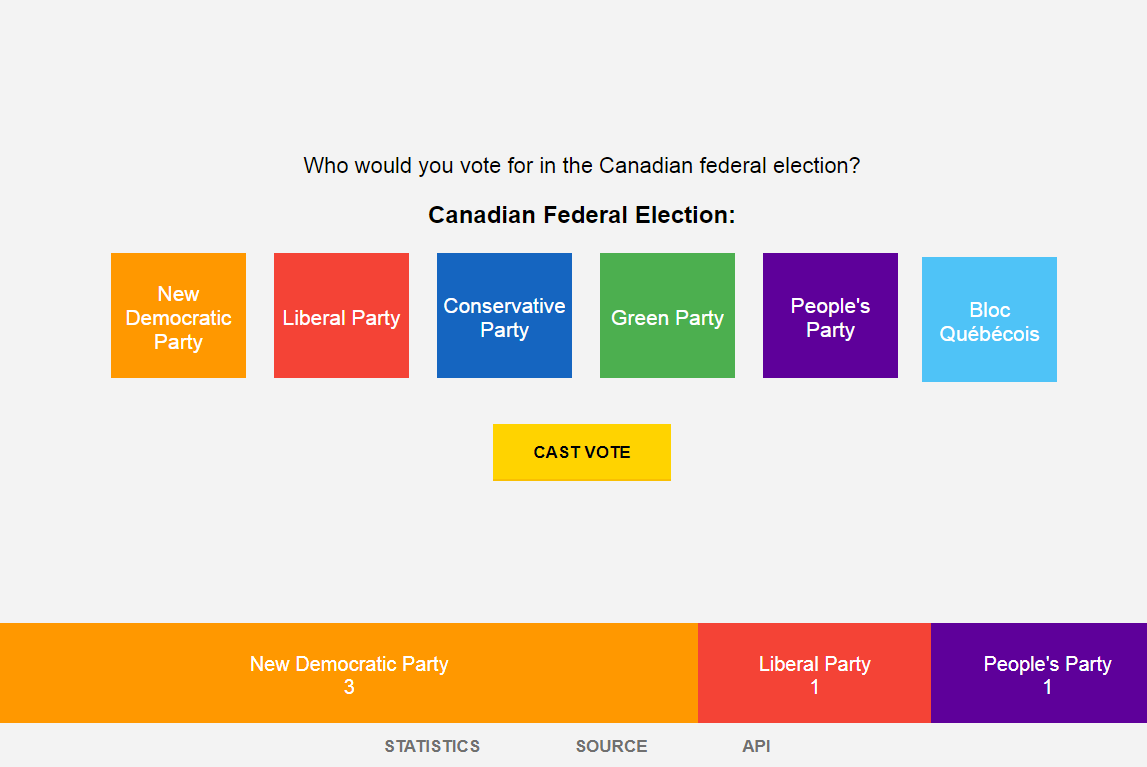
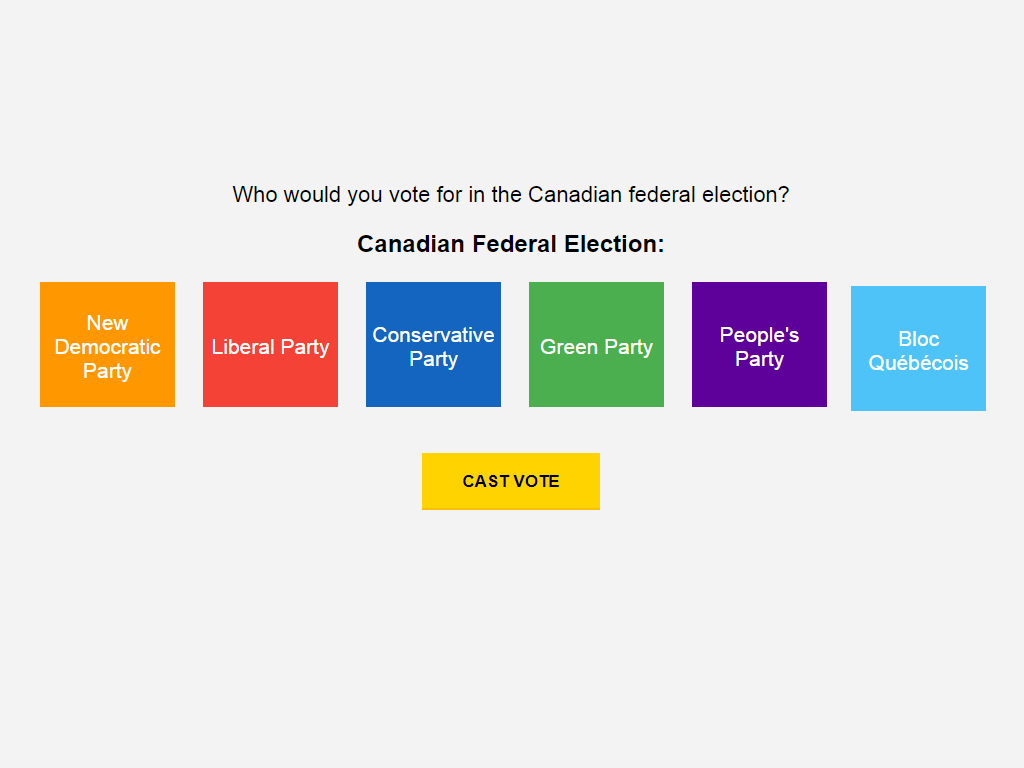
const prompt = 'Who would you vote for in the Canadian federal elections?';
Add all candidates to an object defining their id, name, and color ( a CSS property ).
let candidates = [
{id: 'ndp', name: 'New Democratic Party', color:'orange'},
{id: 'bloc', name: 'Bloc Québécois', color:'skyblue'},
{id: 'green', name: 'Green Party', color:'green'},
{id: 'liberal', name: 'Liberal Party', color:'red'},
{id: 'conservative', name: 'Conservative Party', color:'blue'},
{id: 'peoples', name: "People's Party", color:"purple"},
## Creating a Database
Create a user and grant the following privileges to the user: **Alter, Create, Insert, Select**
Customize the MySQL URI in the `increments.setup("mysql://username:pwd@127.0.0.1/vote")` in `index.js`.
## Modifing Settings
Additional settings are available in `index.js`, allowing you to create a voting server with an IP address filter to prevent double voting, decide if to add a cookie to the browser, allow the analization of resulting statistics, allow viewing of source code, and allow users access to direct JSON output. You may also customize the web port and websocket port. Refer to the Back-end section on how to use it on port 80 / 443.
let IPAddressProtection = true; // Stop double-voting by IP Addr?
let CookieProtection = true; // Stop double-voting using browser cookies?
let AllowStatistics = true; // Allow users to view the live statistics
let AllowViewSource = true; // Allow users to view the application source code.
let AllowDataExport = true; // Allow users to view exported JSON data.
let SecureSocket = true; // Allow users to view exported JSON data.
let WebPort = 8080; // Web port to connect a browser to. Like http://localhost:8080
let WebSocketPort = 3300; // Web socket port used to connect to any browsers.
## Connect the Web Server
- Create a new hostname in Apache and make it's primary www directory point to the `dist` folter.
- Update the `socket` values in the Environment Variable files: `./src/environments/environment.prod.ts` & `./src/environments/environment.ts`
- Run or create a cron job to autorun: `./start_elections.sh`
## Back-end
Usiually Angular 2 routes requests to a PHP or Ruby backend using HTTP requests. This project forgoes the need of a seperate program and instead creates a small Express server. Spawning a client `ng build` process to render the application and using Socket.IO to communicate with Angular in the browser makes for a stellar team of serve and delivery.