# jsDOMIoT: Document Object Model for IoT, a Node.js implementation.
**jsdomiot** is a Node.js library that extends the popular `jsdom` library to support Internet of Things (IoT) elements and hardware bindings. It creates a virtual DOM environment where you can interact with physical IoT devices using familiar HTML/DOM APIs.
The DOM for IoT (DOMIoT) fully preserves the original DOM API, exposing exactly the same methods as those used in web development such as `getElementById`, `setAttribute` and `addEventListener`.
## Installation
### DOMIoT packages
```bash
npm install jsdomiot iot-bindings-node
```
*Note: `iot-elements-node` is automatically installed as a dependency of `jsdomiot`.*
### Testing drivers
You will also need to install drivers, you can test using drivers for testing.
This drivers will simulate button inputs and outputs to a relay controling lights.
```
git clone git@github.com:domiot-io/drivers.git
```
```
cd linux/ihubx24-sim
make clean
make
make load
ls /dev/ihubx24-sim0
```
and
```
cd linux/ohubx24-sim
make clean
make
make load
ls /dev/ihubx24-sim0
```
You are ready to run the example.
## Usage
You can find the full example code in the [examples](https://github.com/domiot-io/jsdomiot/tree/main/examples/0-retail-buttons-shelving-units) of jsdomiot.
```
// collection of factories for domain-specific IoT elements.
import { retailElementFactoryCollection } from 'iot-elements-node';
// collection of factories for binding elements.
import { linuxBindingFactoryCollection } from 'iot-bindings-node';
// DOM for IoT
import { DOMIoT } from 'jsdomiot';
const html = `
`;
// Create virtual IoT DOM
const domiot = new DOMIoT(html, [retailElementFactoryCollection, linuxBindingFactoryCollection]);
const document = domiot.window.document;
// Use standard DOM APIs
const button = document.getElementById('product1Button');
const shelvingUnit = document.GetElementById('a6L1`);
button.addEventListener('press', (ev) => {
// physical button press triggers this:
console.log(`Button ${ev.target.id} pressed, change color of the ${shelvingUnit.id} shelving unit to blue`);
shelvingUnit.style.setProperty('color','blue'); // changes physical lights.
});
button.addEventListener('release', (ev) => {
// physical button release triggers this:
console.log(`Button ${ev.target.id} released, change color of the ${shelvingUnit.id} shelving unit to white`);
shelvingUnit.style.setProperty('color','white'); // changes physical lights.
});
```
Run the code:
```
node main.mjs
```
Then you can see how the simulated buttons' inputs trigger `press` and `realease` events, how the color of the shelving-units is updated accordingly (logs) and how these color changes translate into outputs:
```
watch -n 1 cat /tmp/ohubx24-output0
```
## Key Components
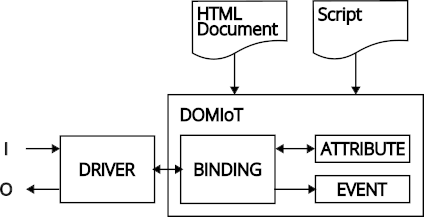
- **DOMIoT: DOM for IoT**: Wraps jsdom and adds IoT functionality.
- **Elements**: Domain-specific HTML elements for real-world objects (``, ``, ``, ``, etc.). You can find element collections on [GitHub: iot-elements-node](https://github.com/domiot-io/iot-elements-node) and on [npm: iot-elements-node](https://www.npmjs.com/package/iot-elements-node).
- **Bindings**: HTML elements that connect virtual DOM elements to physical hardware devices. You can find binding collections on [GitHub: iot-bindings-node](https://github.com/domiot-io/iot-bindings-node) and on [npm: iot-bindings-node](https://www.npmjs.com/package/iot-bindings-node).
- **Drivers**: Drivers are programs that enable communication with physical I/O components. The DOM for IoT uses bindings to allow communication between the DOM elements and the drivers. You can find drivers for testing on [GitHub: drivers](https://github.com/domiot-io/drivers).
jsDOMIoT provides **high-level, semantic abstractions** that represent real-world objects and concepts.
## Website
[domiot.org](https://domiot.org)
## License
MIT.