Whilst getting input from a potentiometer can be useful
for human controlled experiments, what do we use
when we want an environmentally controlled
experiment? We use exactly the same principles but instead
of a potentiometer (twist based resistance) we use a photo resistor (light based resistance). The Arduino cannot directly sense resistance (it senses voltage) so we set up a voltage divider (http://ardx.org/VODI). The exact voltage at the sensing pin is calculable, but for our purposes (just sensing relative light) we can experiment with the values and see what works for us. A low value will occur when the sensor is well lit while a high value will occur when it is in darkness.
## Parts
* 2 pin header x 4
* 5mm LED
* 330 ohm resistor (orange-orange-brown)
* 10k Ohm Resistor (brown-black-orange)
* Photo resistor
* jumper wires
## Circuit Layout
[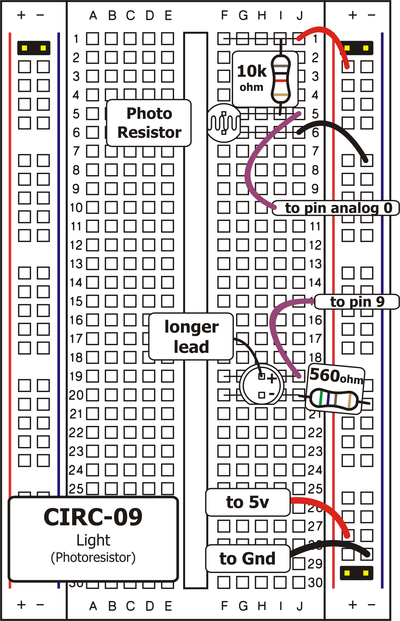 ](../../images/circ/CIRC09-sheet.png)
## Circuit Assembly

Assembly video: http://ardx.org/VIDE09
## Code
You can find this code in `code/CIRC-09-code-photoresistor.js`
var five = require("johnny-five"),
board, myPhotoresistor, myLed;
board = new five.Board();
board.on("ready", function() {
myLed = new five.Led(9);
myPhotoresistor = new five.Sensor({
pin: "A0",
freq: 250
});
myPhotoresistor.on("read", function( err, value ) {
// range of led brightness is 0 - 255
var brightnessValue = five.Fn.constrain(five.Fn.map(value, 0, 900, 0, 255), 0, 255);
myLed.brightness(brightnessValue);
});
});
## Troubleshooting
### LED Remains Dark
This is a mistake we continue to make time and time again, if only they could make an LED that worked both ways. Pull it up and rotate it.
### It Isn't Responding to Changes in Light.
Given that the spacing of the wires on the photo-resistor is
not standard, it is easy to misplace it. Double check it's in
the right place.
### Still not quite working?
You may be in a room which is either too bright or dark. Try turning the lights on or off to see if this helps. Or if you have a flashlight near by give that a try.
## Extending the Code
### Reverse the response:
Perhaps you would like the opposite response. Don't worry we can easily reverse this response just add:
brightnessValue = 255 - brightnessValue;
Run the program again and watch the response change
### Night light:
Rather than controlling the brightness of the LED in
response to light, let's instead turn it on or off based on
a threshold value. Change the code in the photoresistor's read handler to:
myPhotoresistor.on("read", function( err, value ) {
var threshold = 300;
if (value > threshold) {
myLed.on();
} else {
myLed.off();
}
});
### Light controlled servo
Let's use our newly found light sensing skills to control a servo. Wire up a servo connected to pin 9 (like in [Exercise 4](/exercises/4)). Then open the code you wrote for controlling a servo in [Exercise 8](/exercises/8#extending) and satch as it works unmodified.
### Using the full range of your servo:
You'll notice that the servo will only operate over a limited portion of its range. This is because with the voltage dividing circuit we use the voltage on analog pin 0 will not range from 0 to 5 volts but instead between two lesser values (these values will change based on your setup). To fix this play with the `five.Fn.constrain(five.Fn.map(value, 0, 1023, 0, 179), 0, 255);` line.
## More
For more details on this circuit, see http://ardx.org/CIRC09
](../../images/circ/CIRC09-sheet.png)
## Circuit Assembly

Assembly video: http://ardx.org/VIDE09
## Code
You can find this code in `code/CIRC-09-code-photoresistor.js`
var five = require("johnny-five"),
board, myPhotoresistor, myLed;
board = new five.Board();
board.on("ready", function() {
myLed = new five.Led(9);
myPhotoresistor = new five.Sensor({
pin: "A0",
freq: 250
});
myPhotoresistor.on("read", function( err, value ) {
// range of led brightness is 0 - 255
var brightnessValue = five.Fn.constrain(five.Fn.map(value, 0, 900, 0, 255), 0, 255);
myLed.brightness(brightnessValue);
});
});
## Troubleshooting
### LED Remains Dark
This is a mistake we continue to make time and time again, if only they could make an LED that worked both ways. Pull it up and rotate it.
### It Isn't Responding to Changes in Light.
Given that the spacing of the wires on the photo-resistor is
not standard, it is easy to misplace it. Double check it's in
the right place.
### Still not quite working?
You may be in a room which is either too bright or dark. Try turning the lights on or off to see if this helps. Or if you have a flashlight near by give that a try.
## Extending the Code
### Reverse the response:
Perhaps you would like the opposite response. Don't worry we can easily reverse this response just add:
brightnessValue = 255 - brightnessValue;
Run the program again and watch the response change
### Night light:
Rather than controlling the brightness of the LED in
response to light, let's instead turn it on or off based on
a threshold value. Change the code in the photoresistor's read handler to:
myPhotoresistor.on("read", function( err, value ) {
var threshold = 300;
if (value > threshold) {
myLed.on();
} else {
myLed.off();
}
});
### Light controlled servo
Let's use our newly found light sensing skills to control a servo. Wire up a servo connected to pin 9 (like in [Exercise 4](/exercises/4)). Then open the code you wrote for controlling a servo in [Exercise 8](/exercises/8#extending) and satch as it works unmodified.
### Using the full range of your servo:
You'll notice that the servo will only operate over a limited portion of its range. This is because with the voltage dividing circuit we use the voltage on analog pin 0 will not range from 0 to 5 volts but instead between two lesser values (these values will change based on your setup). To fix this play with the `five.Fn.constrain(five.Fn.map(value, 0, 1023, 0, 179), 0, 255);` line.
## More
For more details on this circuit, see http://ardx.org/CIRC09