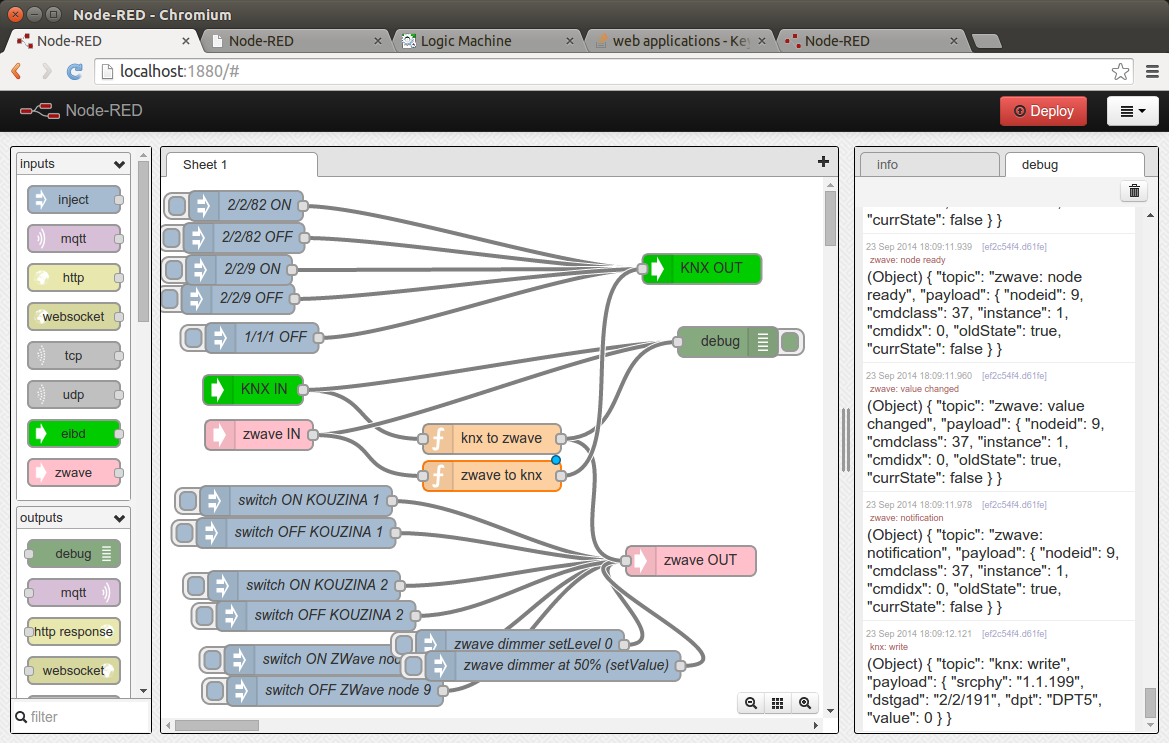
### Decription
*OpenZWave* nodes for Node-Red ( ). Uses the *shared* OpenZWave addon for Node.js ( ).
Integrating this node onto your Node-Red installation enables you to have **bidirectional integration with ZWave networks**, ie you can:
- *send commands* to ZWave devices by sending special command messages in Node-Red flows
- *have ZWave devices report their status* as messages injected into Node-Red flows as feedback
### Installation
This package has one sole dependency: [node-openzwave-shared](https://github.com/OpenZWave/node-openzwave-shared). This is a fork of node-openzwave *that links to OpenZWave as a shared library*, therefore you *need to have the OpenZWave library installed in your system beforehand*, using the operating system's package manager, or by compiling OpenZWave yourself.
So, first make sure you have the OpenZWave library installed on your system, [as outlined in the 'preprequisites' section on openzwave-shared README](https://github.com/OpenZWave/node-openzwave-shared#prerequisites), then use *npm install* within your Node-Red user folder:
```sh
$ cd ~/.node-red
$ npm install node-red-contrib-openzwave
```
#### Persisting ZWave configuration in zwcfg_xxx.xml files
Its more than probable that you have included *battery-powered* ZWave nodes in your installation.
When you include battery devices (using the 'addNode()' method), OpenZWave needs to *persist* their configuration to a file,
otherwise all metadata about them (make and model, available command classes etc) **will be lost** when you restart node.
Therefore you need to tell OpenZWave to *write out the known facts about the ZWave nodes* into a XML file. You can do that
by using `writeConfig()` to store that XML file whenever you add/edit/remove nodes.
This file is named `zwcfg_xxx.xml` where the xxx is a hex number corresponding to your ZWave controller's unique home ID.
The necessary config setting is **UserPath** and its value defines the location of that XML file. The value is printed out
upon loading up the NodeJS module:
```
Initialising OpenZWave 1.4.79 binary addon for Node.JS.
OpenZWave Security API is ENABLED
ZWave device db : /usr/etc/openzwave
User settings path : /home/pi/.node-red
```
In the example above, the [node-red-contrib-openzwave](https://github.com/OpenZWave/node-red-contrib-openzwave) plugin
is initialising the UserPath to be the user settings directory for NodeRed.
```js
ozwDriver = new OpenZWave({
Logging: (logging != "off"),
ConsoleOutput: (logging != "off"),
QueueLogLevel: ((logging == "full") ? 8 : 6),
UserPath: RED.settings.userDir,
DriverMaxAttempts: cfg.driverattempts
});
```
The value for `userDir` can be overridden in the settings.js file used by Node-Red.
#### Nodes added to Node-Red by this package
##### - **zwave-controller**
This is a [config node](http://nodered.org/docs/creating-nodes/config-nodes) whose job is to hold the necessary data for initializing OpenZWave and act as the encapsulator for access to the OpenZWave API. When you add a 'zwave-in' or 'zwave-out' into your flows, a singleton instance of this node is created in the background, and you need to click on the 'controller' icon, in order to *configure where your ZWave USB controller is connected to* (for example `/dev/ttyUSB0` in Linux) and define a logging level.
##### - **zwave-in**
A node that emits ZWave events as they are emitted from the ZWave controller. Use this node to get status feedback about what is happening in real time in your ZWave network. For example, the following message is injected into the NR flow when ZWave node #9, a binary switch, is turned on:
```
{ "topic":"zwave: value changed",
"payload":{
"nodeid":9,
"cmdclass":37,
"instance":1,
"cmdidx":0,
"oldState":false,
"currState":true}}
```
##### - **zwave-out**
Use this node to send arbitrary commands to the ZWave appliances. The four most common commands you're going to use are:
- `{topic: 'switchOn', payload: {"nodeid":2}}` ==> to switch on basic switch on ZWave node #2
- `{topic: 'switchOff', payload: {"nodeid":2}}` ==> to switch off basic switch on ZWave node #2
- `{topic: 'setLevel', payload: {"nodeid": 5, "value": 50}}` ==> set level on dimmer on ZWave node #5 to 50%
- `{topic: 'setValue', payload: {"nodeid":5, "cmdclass":38, "value":50}}` ==> same effect as above, set dimmer on ZWave node #5 to 50% using command class 38 (cmdClassSwitchMultilevel)
The `setValue` topic is the most flexible, as you can send arbitrary ZWave values to the unlderlying OpenZWave library. Currently only "plain/basic" datatypes are supported (ints, floats etc), more complex ones, eg values with units such as thermostat setpoints are not yet supported. Use this topic (setValue) to control multi-instance devices (such as the Fibaro FGS-221), where one single ZWave node controls multiple endpoints/relays. To control such devices, simply specify a valid instance (0 or 1 for the FGS-221):
- `{topic: 'setValue', payload: {"nodeid":8, "instance":1, "value":1}}` ==> switch on the 2nd relay of multiswitch #8
[Click here](http://wiki.micasaverde.com/index.php/ZWave_Command_Classes) for a full list of ZWave command classes.
*Important note*: You should wait for a message with topic of `scan complete` when booting up your flow, before you start sending commands to ZWave, otherwise your commands will be ignored.
### Support for the **full OpenZWave API**:
You can invoke the full `OpenZWave::Manager` API, as long as the command is supported by openzwave-shared (see [this source file for a list of supported commands](https://github.com/OpenZWave/node-openzwave-shared/blob/master/src/openzwave.cc#L59)). You should also consult the [official OpenZWave::Manager class documentation.](http://www.openzwave.com/dev/classOpenZWave_1_1Manager.html)
The Node-Red message should have
- **topic**: set to the OpenZWave::Manager method name (eg. `healNetwork`). Method names are the same as in the official API, except the first letter is in lower case.
- **payload**: an array of the command arguments **in the correct order**.
Some examples:
* to **add a new ZWave node** to your network, you need to prepend the ZWave Home ID to the `addNode()` management call as follows:
`{"topic": "addNode", "payload": {"prependHomeId": true}}`
* to **enable polling** for ZWave node #5 for the on-off command class (0x25 == decimal 37). Notice that the [EnablePoll() command](http://www.openzwave.com/dev/classOpenZWave_1_1Manager.html#a50d795cb20a0bea55ecfd4a02c9777f3) does **not** need a HomeId as an argument, hence we don't need to add `prependHomeId` to the message payload:
`{"topic": "enablePoll", "payload": {"args": [5, 37]}}`
* to get **statistics** from node 2 by using the `getNodeStatistics()` call:
`{"topic": "getNodeStatistics", "payload": {"args": [2]}}`
Most of the API calls in OpenZWave are *asynchronous*. This means that you don't get an immediate result value from the call itself, but you'll get notifications from their activity on the zwave-in input node. However, there are some direct API calls which *do return a value* (eg the `getNodeStatistics` is returning an object populated with the node's statistics: number of packets sent/received, transmission error counts etc).
In this case, the result is appended to the message payload and forwarded to the output of the ZWave-out node. This is the *only* message that the _zwave-out_ node is emitting.
#### Example
Here's an example flow, that uses its sibling KNX for Node-Red project ( ) to bind KNX and ZWave together as one happy home automation network: