# AmapLocation
## 高德地图react-native定位
集成了高德地图定位模块包含`android` 和 `Ios`
# 安装
```
npm i rn-amaplocation
```
```
react-native link rn-amaplocation
```
# android
```
// 打开: android/settings.gradle
...
include ':rn-amaplocation'
project(':rn-amaplocation').projectDir = new File(rootProject.projectDir, '../node_modules/rn-amaplocation/android')
```
```
// 打开:android/app/build.gradle
...
dependencies {
...
compile project(':rn-amaplocation')
}
```
```
// 打开:MainApplication.java
...
dependencies {
...
compile project(':rn-amaplocation')
}
```
```
...
import com.AmapLocation.AmapLocationPackage; // <-- Register package here
...
public class MainApplication extends Application implements ReactApplication {
private final ReactNativeHost mReactNativeHost = new ReactNativeHost(this) {
...
@Override
protected List getPackages() {
return Arrays.asList(
new MainReactPackage()
,new AmapLocationPackage() // <-- Register package here
);
}
...
}
```
## AndroidManifest.xml,填写申请的app的key
```
```
# IOS
1.XCode打开项目, 右边选择 `Libraries` 右击选择 `Add Files to "Your Project Name"` ,进入`node_modules/rn-AmapLocaltion` 添加 `RCTLocationModule.xcodeproj`.
2. 添加 `libRCTLocationModule.a` 到 `Build Phases -> Link Binary With Libraries`
3.需要引入的系统库文件 在 `TARGETS->General->Linked Frameworks and Libraries` 中点击`“+”`,依次查找上述文件,添加到工程中,如下如所示:
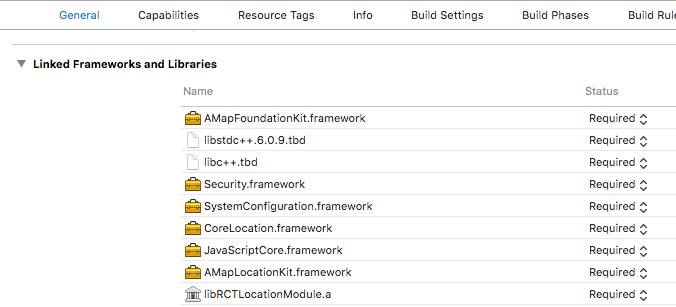
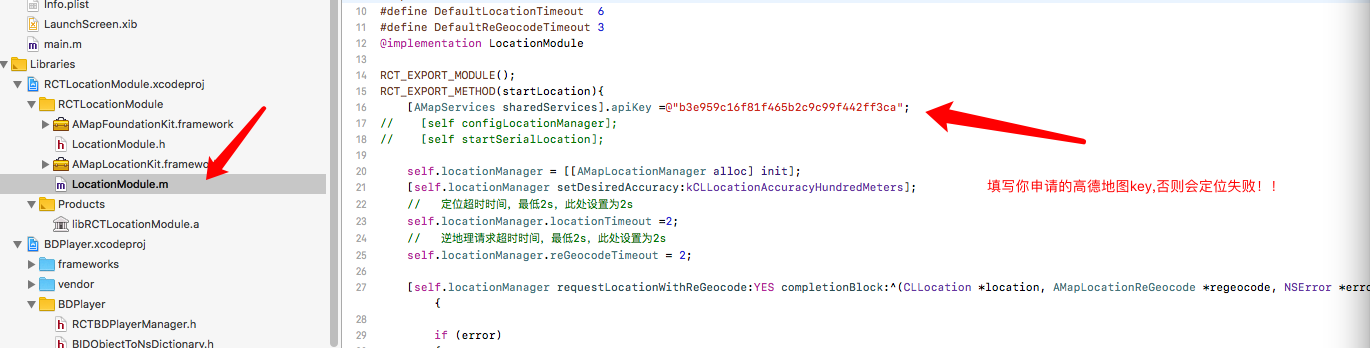
4.填写key
打开刚刚引入的文件 选择 LocationModule.m
5.点击项目 xxx.xcodeproj ->`Build Settings` ->`Header Search Paths` 添加 `$(SRCROOT)/../node_modules/rn-amaplocation/ios/RCTLocationModule`
同样 xxx.xcodeproj ->`Build Settings` ->`framework Search Paths` 添加 `$(SRCROOT)/../node_modules/rn-amaplocation/ios/RCTLocationModule`
6.需要申请的权限
定位权限
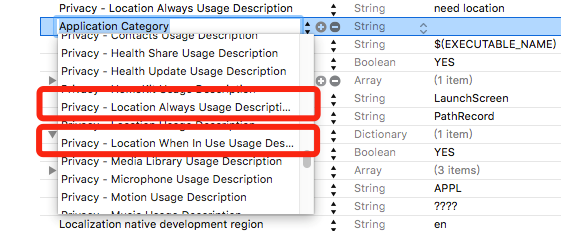
在项目的 Info.plist 添加定位权限申请,根据您的业务需求,选择下列方式设置。
注意:iOS 11 在权限上有更新,请参考。
其中:
iOS 8 - iOS 10 版本:
NSLocationWhenInUseUsageDescription 表示应用在前台的时候可以搜到更新的位置信息。
NSLocationAlwaysUsageDescription 申请Always权限,以便应用在前台和后台(suspend 或 terminated)都可以获取到更新的位置数据。
iOS 11 版本:
NSLocationAlwaysAndWhenInUseUsageDescription 申请Always权限,以便应用在前台和后台(suspend 或
terminated)都可以获取到更新的位置数据(NSLocationWhenInUseUsageDescription 也必须有)。
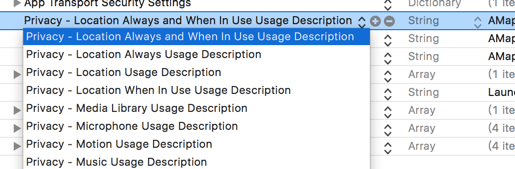
注意:如果需要同时支持在iOS8-iOS10和iOS11系统上后台定位,建议在plist文件中同时添加NSLocationWhenInUseUsageDescription、NSLocationAlwaysUsageDescription和NSLocationAlwaysAndWhenInUseUsageDescription权限申请。
# IOS提交AppStore必读
###基础 SDK V1.2.0 版本(包括其后版本)引入了 IDFA,可能会造成您的应用提交AppStore审核失败,请您认真阅读下文。[![高德地图官网说名]](http://lbs.amap.com/api/ios-location-sdk/guide/create-project/idfa-guide)
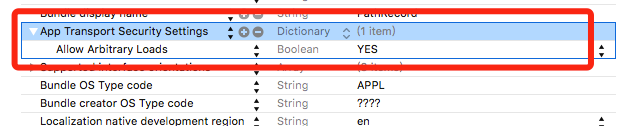
#### ATS设置
#示例
```
import React, { Component } from 'react';
import {
Platform,
StyleSheet,
Text,
View,
ScrollView,
TouchableOpacity,
NativeModules
} from 'react-native';
import AmapLocation from 'rn-amaplocation'
const instructions = Platform.select({
ios: 'Press Cmd+R to reload,\n' +
'Cmd+D or shake for dev menu',
android: 'Double tap R on your keyboard to reload,\n' +
'Shake or press menu button for dev menu',
});
type Props = {};
export default class App extends Component {
constructor(Props){
super(Props);
this.state = {
text:""
}
}
getlocaltion(){
new AmapLocation().startLocation((e)=>{
this.setState({text:JSON.stringify(e)});
});
}
render() {
return (
this.getlocaltion()}
style={{width:100,height:30,margin:100,backgroundColor:"rgba(0,0,0,0.2)"}}>
定位
{this.state.text}
);
}
}
```
```
返回JSON
{
"Street": "xxx",
"city": "成都市", //城市
"dress": "四川省成都市武侯区玉林东路xxxxx",
"successfun": true, //成功为true 失败为false
"Province": "四川省",
"CityCode": "028",
"Country": "中国",
"lng": 10x.061xxx,
"lat": 30.x937xx,
"District": "武侯区"
}
```