
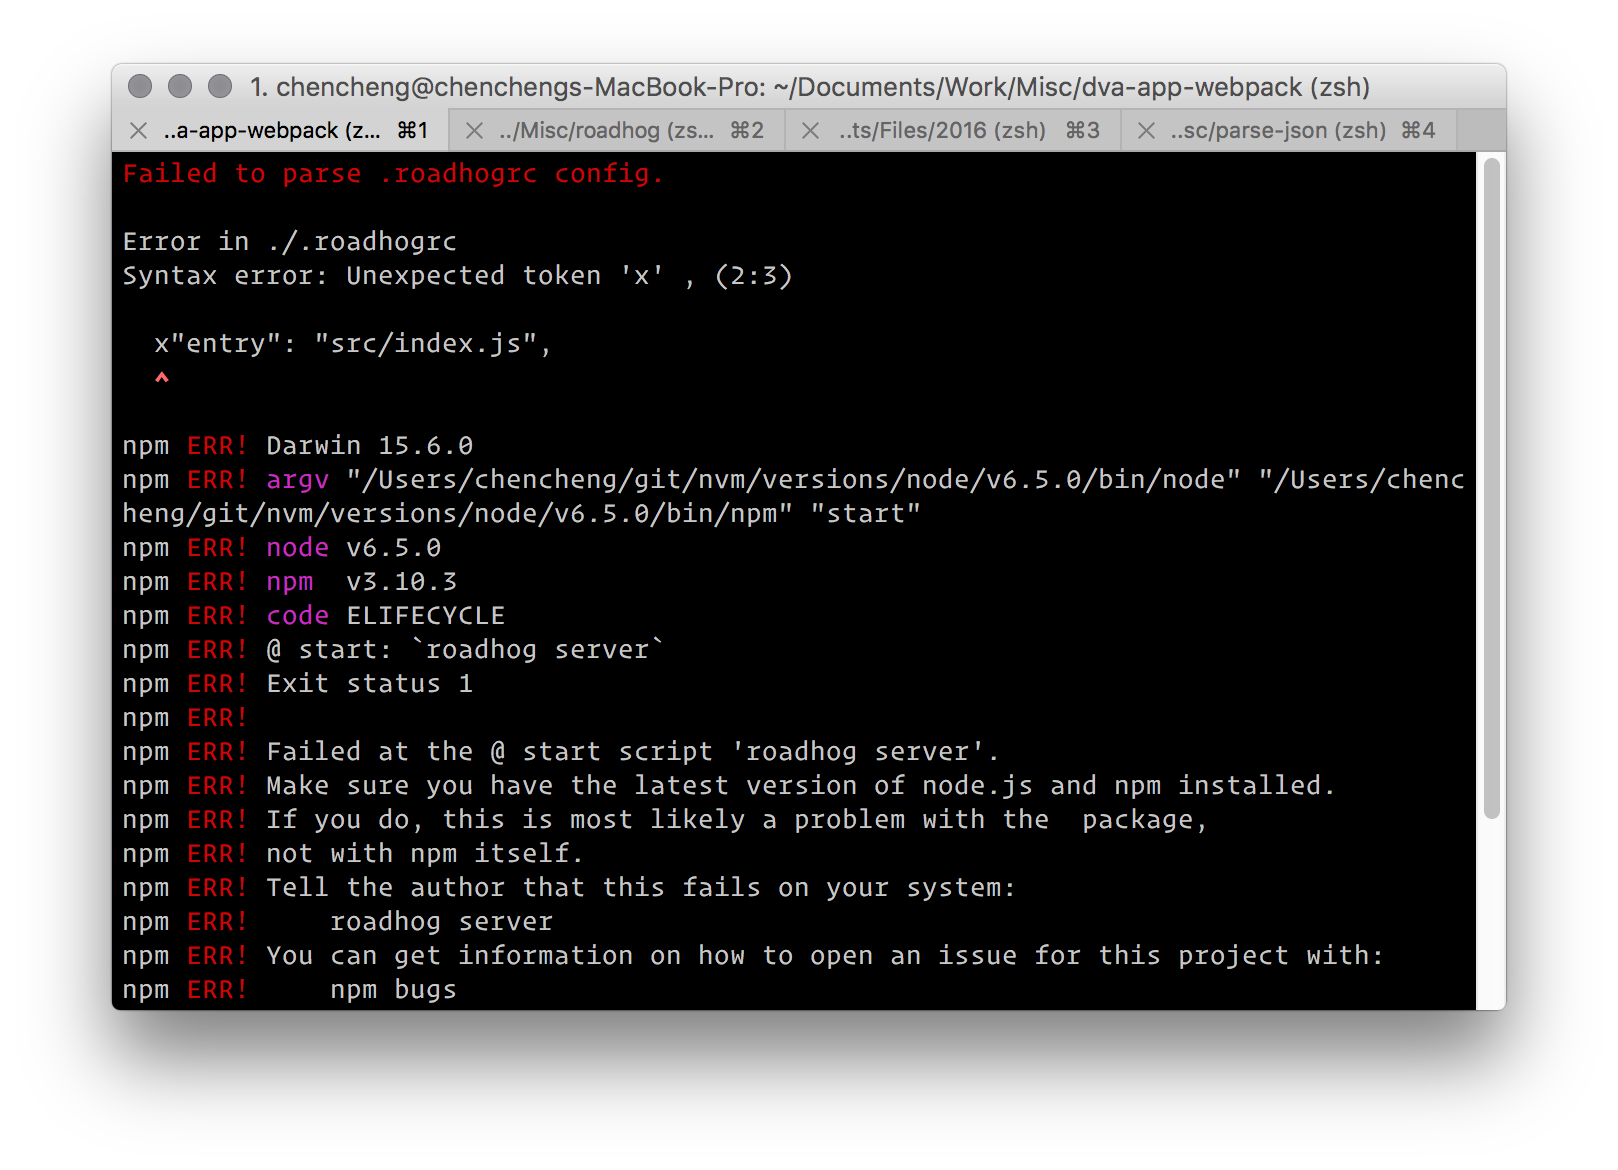
 #### 语法错误
控制台
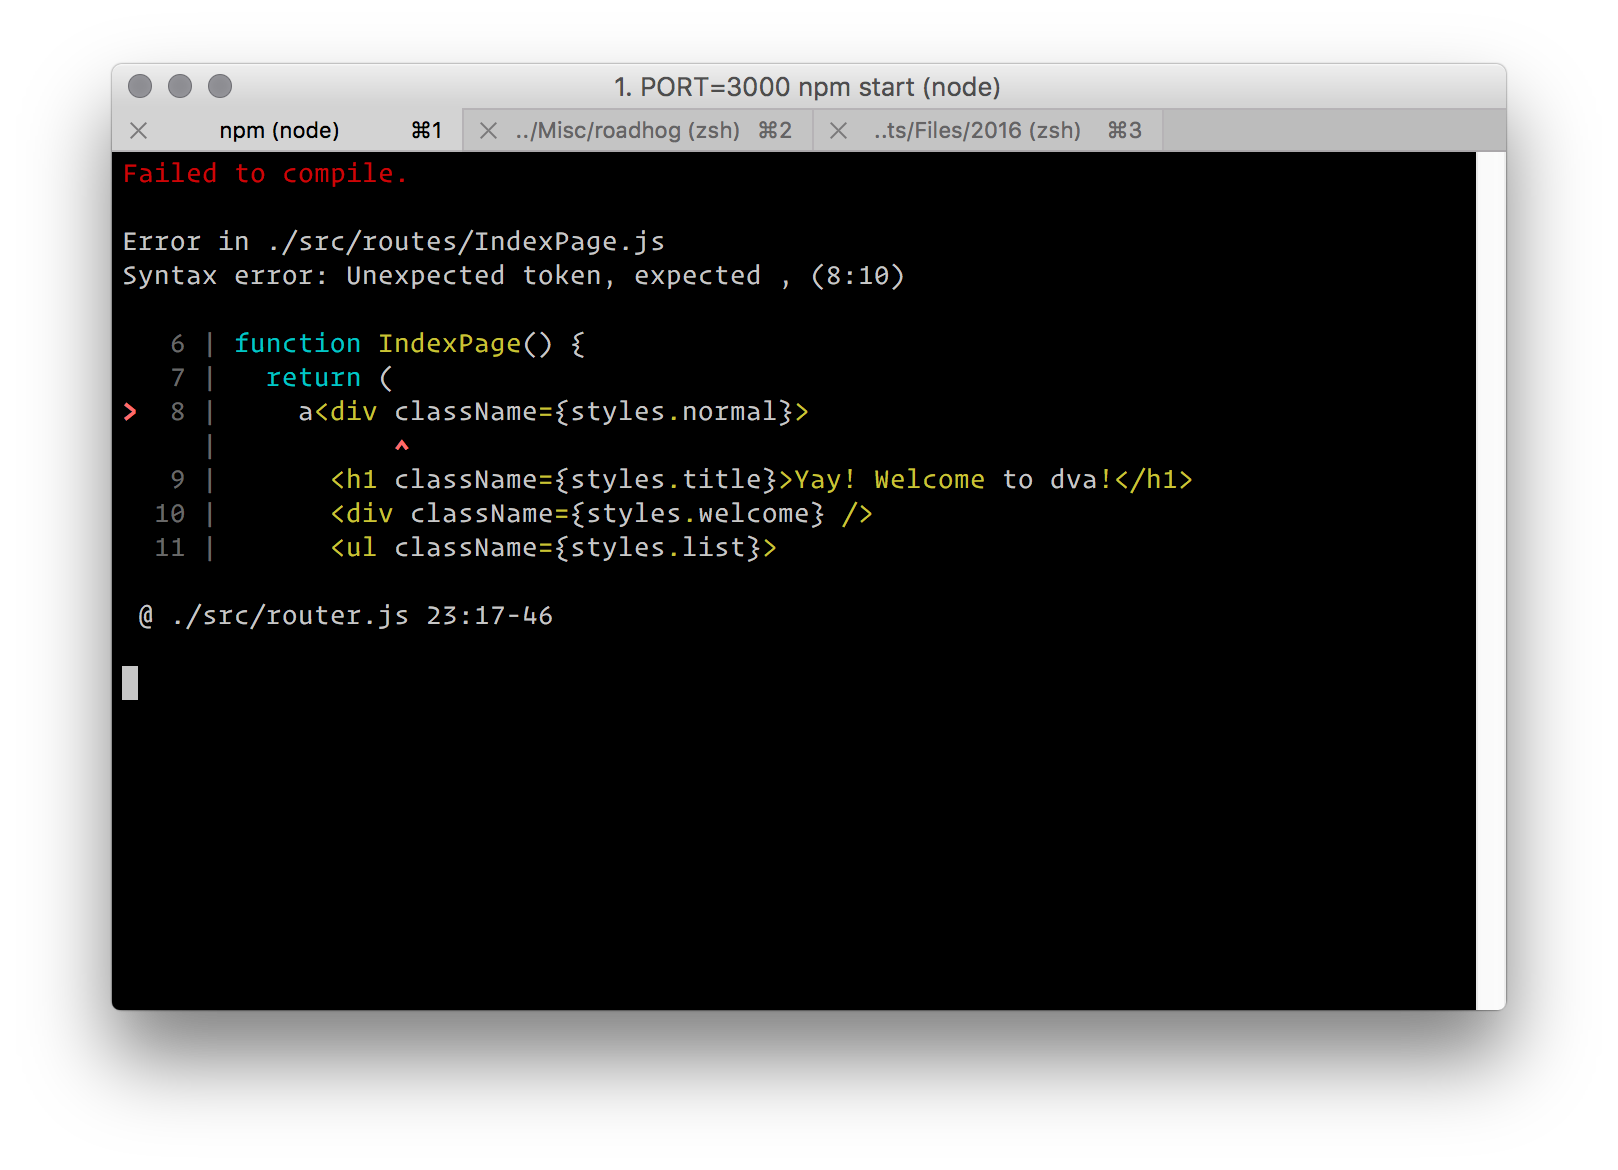
#### 语法错误
控制台
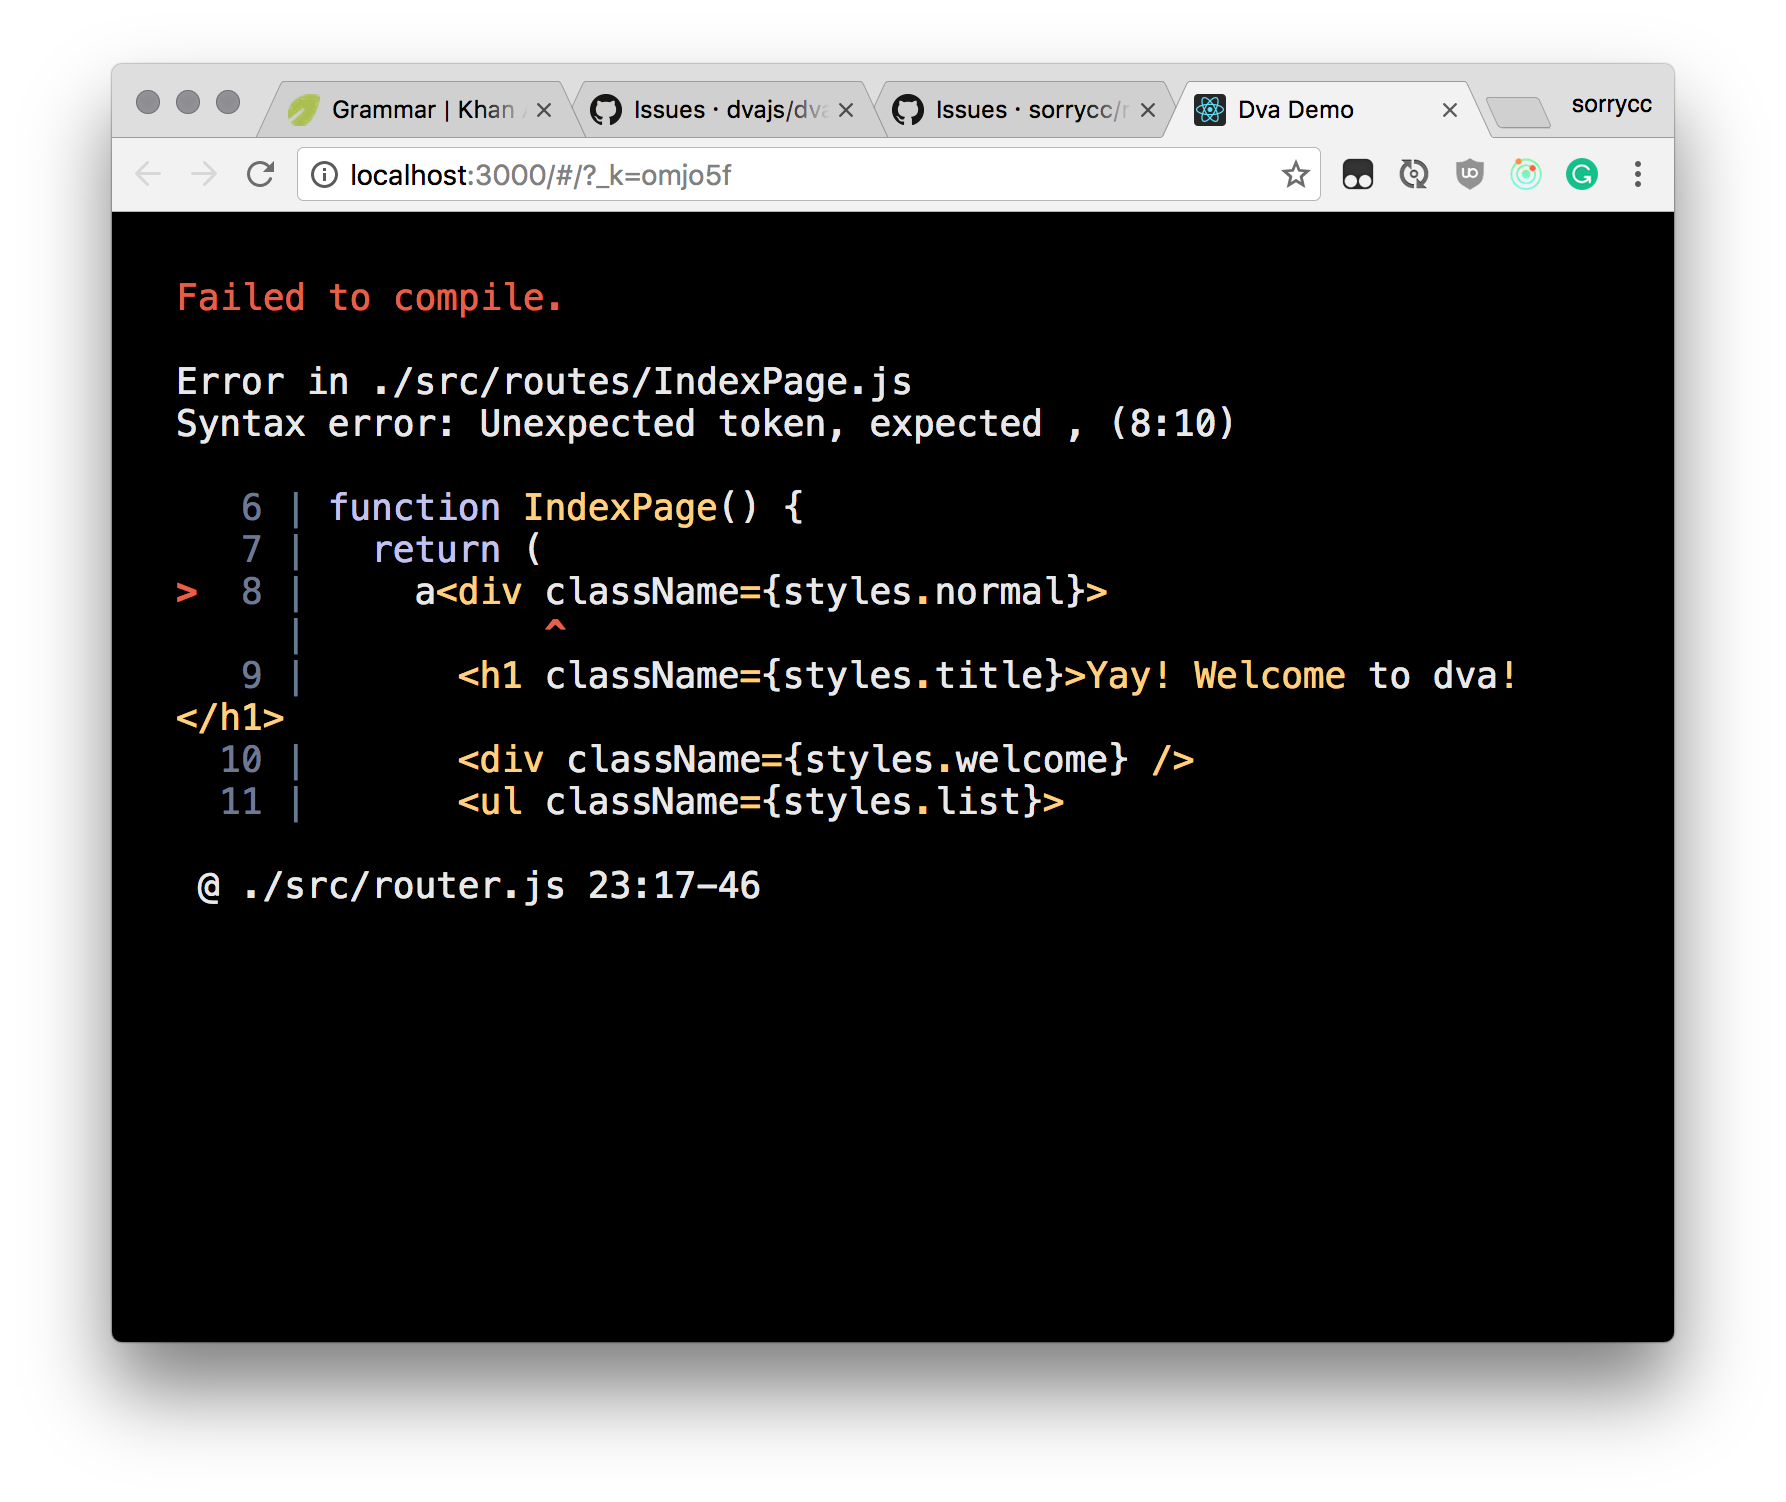
 浏览器
浏览器
 #### 运行时错误
没有捕获,在浏览器的控制台查看。
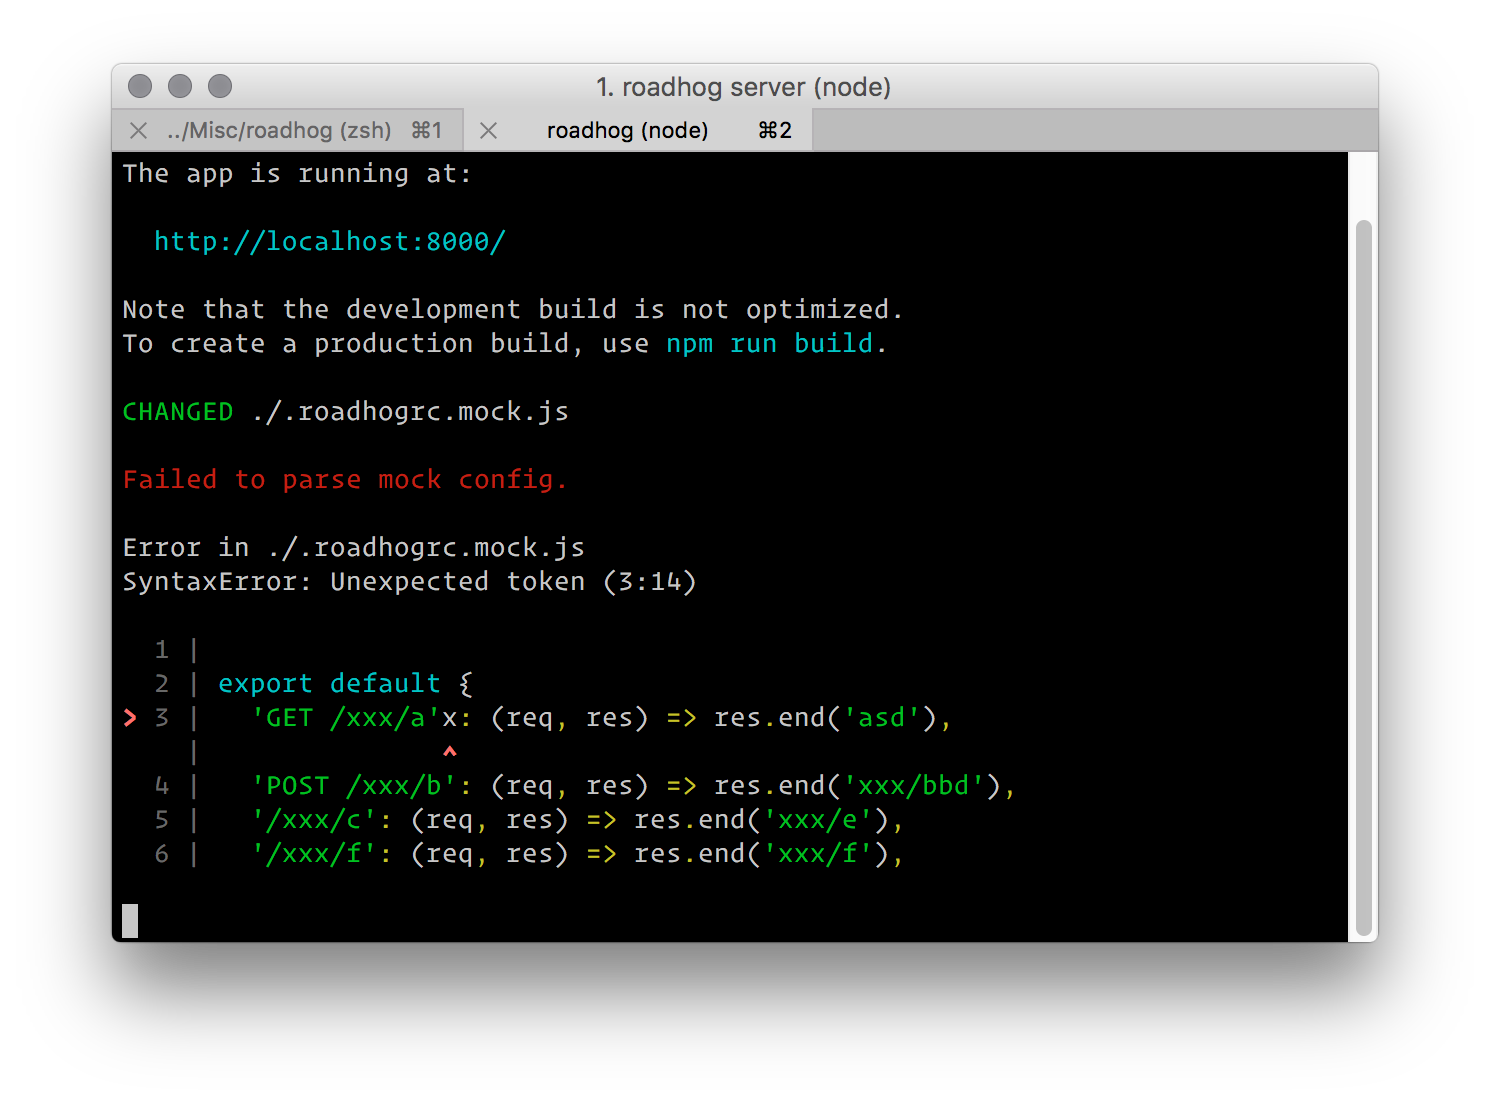
#### .roadhogrc.mock.js 解析错误
#### 运行时错误
没有捕获,在浏览器的控制台查看。
#### .roadhogrc.mock.js 解析错误
 ### HMR (热替换)
CSS 在开发模式下会走 style-loader (被内嵌在 JavaScript 文件中),所以只要保证 JavaScript 的热更新,即可实现 CSS 的热更新。
如果大家使用 [dva](https://github.com/dvajs/dva) ,配上 [babel-plugin-dva-hmr](https://github.com/dvajs/babel-plugin-dva-hmr) 即可实现 routes 和 components 以及相关 CSS 修改的热更新,其他修改会自动刷新页面。
```json
"env": {
"development": {
"extraBabelPlugins": ["dva-hmr"]
}
}
```
### Mock
roadhog server 支持 mock 功能,类似 [dora-plugin-proxy](https://github.com/dora-js/dora-plugin-proxy),在 `.roadhogrc.mock.js` 中进行配置,支持基于 require 动态分析的实时刷新,支持 ES6 语法,以及友好的出错提示。
比如:
```js
export default {
// 支持值为 Object 和 Array
'GET /api/users': { users: [1,2] },
// GET POST 可省略
'/api/users/1': { id: 1 },
// 支持自定义函数,API 参考 express@4
'POST /api/users/create': (req, res) => { res.end('OK'); },
// Forward 到另一个服务器
'GET /assets/*': 'https://assets.online/',
// Forward 到另一个服务器,并指定子路径
// 请求 /someDir/0.0.50/index.css 会被代理到 https://g.alicdn.com/tb-page/taobao-home, 实际返回 https://g.alicdn.com/tb-page/taobao-home/0.0.50/index.css
'GET /someDir/(.*)': 'https://g.alicdn.com/tb-page/taobao-home',
};
```
### 智能重启
配置文件修改的修改会触发 roadhog server 的自动重启,会触发重启的文件有:
* `.roadhogrc`
* `.roadhogrc.js`
* `.roadhogrc.mock.js`
* theme 配置指定的文件
## 配置
关于配置的一些基本概念:
* 配置存于 `.roadhogrc` 文件中(如果你不喜欢 JSON 配置,可以用 `.roadhogrc.js` 以 JS 的方式编写,支持 ES6)
* 格式为 `JSON`,允许注释
* 布尔类型的配置项默认值均为 `false`
* 支持通过 `webpack.config.js` 以编码的方式进行配置,但不推荐,因为 roadhog 本身的 major 或 minor 升级可能会引起兼容问题。使用时会给予警告⚠️⚠️⚠️,详见 [#36](https://github.com/sorrycc/roadhog/issues/36) 。(`webpack.config.js` 本身的编写支持 ES6,会通过 babal-register 做一层转换。)
默认配置:
```js
{
"entry": "src/index.js",
"disableCSSModules": false,
"cssModulesExclude": [],
"publicPath": "/",
"htmlTemplates": [],
"assetsPath": {
"media": "assets/media/",
"js": "assets/js/",
"css": "assets/css/",
"img": "assets/images/",
},
"copyConfig": [
{
"from": "./public",
"to": "./dist"
}
],
"babelExclude": [],
"outputPath": "./dist",
"extraBabelPlugins": [],
"extraPostCSSPlugins": [],
"sass": false,
"hash": false,
"autoprefixer": null,
"proxy": null,
"externals": null,
"library": null,
"libraryTarget": "var",
"multipage": false,
"define": null,
"env": null,
"theme": null,
"doneCallback": (config, paths) => {
console.log("all done")
},
}
```
查看更多[配置相关问题和改进](https://github.com/sorrycc/roadhog/issues?q=is%3Aissue+is%3Aopen+label%3Aconfig)。
### entry
指定 webpack 入口文件,支持 [glob](https://github.com/isaacs/node-glob) 格式。
如果你的项目是多页类型,会希望把 `src/pages` 的文件作为入口。可以这样配:
```
"entry": "src/pages/*.js"
```
### disableCSSModules
禁用 [CSS Modules](https://github.com/css-modules/css-modules)。最好别关,熟悉并使用他后,你会发现写样式简单了很多。
### cssModulesExclude
支持 CSSModules 混用,通过 cssModulesExclude 可指定不需要走 CSSModules 的文件列表。
```
"cssModulesExclude": [
'./src/a.css',
'./src/b.less',
]
```
### hash
使用 hash 文件名。
```
"hash": true
```
### publicPath
配置生产环境的 [publicPath](http://webpack.github.io/docs/configuration.html#output-publicpath),开发环境下永远为 `/`。
### htmlTemplates
配合多入口应用设置不同的页面,具体配置参考[html-webpack-plugin](https://github.com/jantimon/html-webpack-plugin)
示例:
```js
{
"htmlTemplates": [
{
inject: false,
template: require('html-webpack-template'),
appMountId: "root",
scripts: [
"http://res.wx.qq.com/open/js/jweixin-1.2.0.js"
],
lang: "zh-CN",
mobile: true,
title: 'title',
hash: false,
links: [
{
href: IMG_BASE + 'assets/favicon.ico',
rel: 'shortcut icon'
}
],
filename: DEBUG ? 'index.html' : "index.ftl",
bodyHtmlSnippet: '',
"window": windowVars,
chunks: ['index', 'common'],
minify: {
collapseWhitespace: true,
conservativeCollapse: true,
preserveLineBreaks: true,
removeComments: true
// more options:
// https://github.com/kangax/html-minifier#options-quick-reference
},
{
inject: true,
template: 'src/demo.ejs',
hash: false,
favicon: 'public/favicon.ico',
filename: 'demo.html',
chunks: ['demo', 'common'],
}
]
}
```
### assetsPath
资源输出路径,默认:
图片资源:assets/img
css文件:assets/css
js文件:assets/js
其他文件: assets/media
```js
{
"assetsPath": {
"media": 'assets/media/',
"js": 'assets/js/',
"css": 'assets/css/',
"img": 'assets/images/',
},
}
```
### copyConfig
执行文件的复制,详细配置请参考https://github.com/webpack-contrib/copy-webpack-plugin配置
注意这里使用的webpack-plugin所以是不能复制编译完毕的文件到其他目录中
如果想在编译完毕后做一些操作,请参考配置:doneCallback
```js
{
"copyConfig": [
{
"from": "./public",
"to": "./dist",
"force": true,
}
],
}
```
### doneCallback
在编译完毕后做一些操作(比如复制文件到指定的目录), doneCallback必须为回调函数
传递两个参数:
config:配置信息
paths:{
appBuild: resolveApp('dist'),
appPublic: resolveApp('public'),
appPackageJson: resolveApp('package.json'),
appSrc: resolveApp('src'),
appNodeModules: resolveApp('node_modules'),
ownNodeModules: resolveOwn('../../node_modules'),
dllNodeModule: resolveApp('node_modules/roadhog-dlls'),
dllManifest: resolveApp('node_modules/roadhog-dlls/roadhog.json'),
appBabelCache: resolveApp('node_modules/.cache/babel-loader'),
resolveApp,
appDirectory,
}
```js
import fs from 'fs-extra';
import path, {resolve} from 'path';
import glob from 'glob';
{
"doneCallback": (config, paths) => {
console.log("all done");
const appDirectory = paths.appDirectory;
const baseSrcPath = path.resolve(appDirectory, "./dist")
glob(baseSrcPath + "/**/*.ftl", function (er, files) {
// files is an array of filenames.
// If the `nonull` option is set, and nothing
// was found, then files is ["**/*.js"]
// er is an error object or null.
// console.log(files)
files.forEach((file) => {
const tmpDir = path.relative(baseSrcPath, file);
// console.log(baseSrcPath, file, tmpDir)
fs.copySync(file, path.resolve(appDirectory, "../webapp/", tmpDir) )
})
})
fs.copy(path.resolve(appDirectory, "./dist/assets"), path.resolve(appDirectory, "../webapp/") )
},
}
```
### babelExclude
用于babel排除文件配置,与extraBabelIncludes相互配合使用
### outputPath
配置[输出路径](http://webpack.github.io/docs/configuration.html#output-path),默认是 `./dist`。
### extraBabelPlugins
配置额外的 babel plugin。babel plugin 只能添加,不允许覆盖和删除。
比如,同时使用 antd, dva 时,通常需要这么配:
```
"extraBabelPlugins": [
"transform-runtime",
"dva-hmr",
["import", { "libraryName": "antd", "libraryDirectory": "lib", "style": "css" }]
]
```
同时安装相关依赖:
```bash
$ npm i babel-plugin-transform-runtime babel-plugin-import babel-plugin-dva-hmr --save-dev
$ npm i babel-runtime --save
```
注意:这么配还有个问题,`dva-hmr` 是开发环境的插件,如果 build 时也用上就会打出冗余代码。解决方案详见 [#env](#env)。
### extraPostCSSPlugins
配置额外的 postcss 插件。
注意:由于 postcss 的插件是以函数的方式进行配置的,所以这个配置只能在 `.roadhogrc.js` 里使用。
比如:
```
extraPostCSSPlugins: [
pxtorem({
rootValue: 100,
propWhiteList: [],
}),
],
```
### autoprefixer
配置 autoprefixer 参数,详见 [autoprefixer](https://github.com/postcss/autoprefixer) 和 [browserslist](https://github.com/ai/browserslist#queries)。
比如,如果是做移动端的开发,可以配成:
```
"autoprefixer": {
"browsers": [
"iOS >= 8", "Android >= 4"
]
}
```
### sass
支持 sass,值为 [node-sass](https://github.com/sass/node-sass#options) 的配置参数。
注意:开启 sass 支持需在项目代码中安装 node-sass 和 sass-loader 两个依赖。
### proxy
配置代理,详见 [webpack-dev-server#proxy](https://webpack.github.io/docs/webpack-dev-server.html#proxy)。
如果要代理请求到其他服务器,可以这样配:
```
"proxy": {
"/api": {
"target": "http://jsonplaceholder.typicode.com/",
"changeOrigin": true,
"pathRewrite": { "^/api" : "" }
}
}
```
然后访问 `/api/users` 就能访问到 http://jsonplaceholder.typicode.com/users 的数据。
如果要做数据 mock,可以考虑和 [json-server](https://github.com/typicode/json-server) 结合使用,把 `/api` 代理到 json-server 启动的端口。
### externals
配置 webpack 的 [externals](http://webpack.github.io/docs/configuration.html#externals) 属性。
### library
配置 webpack 的 [library](http://webpack.github.io/docs/configuration.html#output-library) 属性。
### libraryTarget
配置 webpack 的 [libraryTarget](http://webpack.github.io/docs/configuration.html#output-librarytarget) 属性。
### multipage
配置是否多页应用。多页应用会自动提取公共部分为 common.js 和 common.css 。
### define
配置 webpack 的 [DefinePlugin](http://webpack.github.io/docs/list-of-plugins.html#defineplugin) 插件,define 的值会自动做 `JSON.stringify` 处理。
### env
针对特定的环境进行配置。server 的环境变量是 `development`,build 的环境变量是 `production`。
比如:
```
"extraBabelPlugins": ["transform-runtime"],
"env": {
"development": {
"extraBabelPlugins": ["dva-hmr"]
}
}
```
这样,开发环境下的 extraBabelPlugins 是 `["transform-runtime", "dva-hmr"]`,而生产环境下是 `["transform-runtime"]`。
### theme
配置主题,实际上是配 less 的 `modifyVars`。支持 Object 和文件路径两种方式的配置。
比如:
```
"theme": {
"@primary-color": "#1DA57A"
}
```
或者,
```
"theme": "./node_modules/abc/theme-config.js"
```
这里有 [如何配置 antd theme 的例子](https://github.com/dvajs/dva-example-user-dashboard/commit/d6da33b3a6e18eb7f003752a4b00b5a660747c31) 。
### svgSpriteLoaderDirs
Notice:
- roadhog 版本必须 >= `0.6.0-beta1`。
- 因为 `.roadhogrc` 配置文件优先级大于 `.roadhogrc.js`, 请先删除 `.roadhogrc`。
配置一个路径数组, 该路径下的 svg 文件会全部交给 [svg-sprite-loader](https://github.com/kisenka/svg-sprite-loader) 处理
比如,使用 antd-mobile@1 的 [自定义 svg icon](https://mobile.ant.design/components/icon) 功能的用户,可以在 `.roadhogrc.js` 文件中做如下配置
```js
const path = require('path');
const svgSpriteDirs = [
require.resolve('antd-mobile').replace(/warn\.js$/, ''), // antd-mobile 内置svg
path.resolve(__dirname, 'src/my-project-svg-foler'), // 业务代码本地私有 svg 存放目录
];
export default {
// ...
svgSpriteLoaderDirs: svgSpriteDirs,
//...
}
```
## 环境变量
可环境变量临时配置一些参数,包括:
* `PORT`, 端口号,默认 8000
* `HOST`, 默认 localhost
* `HTTPS`,是否开启 https,默认关闭
* `BROWSER`,设为 none 时不自动打开浏览器
* `CLEAR_CONSOLE`,设为 none 时清屏
比如,使用 3000 端口开启服务器可以这样:
```bash
# OS X, Linux
$ PORT=3000 roadhog server
# Windows (cmd.exe)
$ set PORT=3000&&roadhog server
# Or use cross-env for all platforms
$ cross-env PORT=3000 roadhog server
```
## 命令行参数
### roadhog server
```bash
$ roadhog server -h
Usage: roadhog server [options]
Options:
-h Show help [boolean]
```
### roadhog build
```bash
$ roadhog build -h
Usage: roadhog build [options]
Options:
--debug Build without compress [boolean] [default: false]
--watch, -w Watch file changes and rebuild [boolean] [default: false]
--output-path, -o Specify output path [string] [default: null]
--analyze Visualize and analyze your Webpack bundle.
[boolean] [default: false]
-h Show help [boolean]
```
### roadhog test
```bash
$ roadhog test -h
Usage: roadhog test [options] [mocha-options]
Options:
--coverage Output coverage [boolean] [default: false]
-h Show help [boolean]
```
## 使用 `public` 目录
我们约定 `public` 目录下的文件会在 server 和 build 时被自动 copy 到输出目录(默认是 `./dist`)下。所以可以在这里存放 favicon, iconfont, html, html 里引用的图片等。
## FAQ
### 那么为什么提供 JSON 级别的约定型配置,而非类似 webpack.config.js 的编码型配置?
首先是 JSON 的方式比较简单,`true`/`false` 或是一些简单的字符串就可完成配置;另外,JSON 方式能有效控制使用场景,而编程式的非常不可控,roadhog 的一个简单改动都可能导致之前的配置不可用。
### 为什么叫 roadhog ?
roadhog 即路霸,和 [dva](https://github.com/dvajs/dva) 一样,是守望先锋中的另一名英雄,希望能为 dva 保驾护航。
### HMR (热替换)
CSS 在开发模式下会走 style-loader (被内嵌在 JavaScript 文件中),所以只要保证 JavaScript 的热更新,即可实现 CSS 的热更新。
如果大家使用 [dva](https://github.com/dvajs/dva) ,配上 [babel-plugin-dva-hmr](https://github.com/dvajs/babel-plugin-dva-hmr) 即可实现 routes 和 components 以及相关 CSS 修改的热更新,其他修改会自动刷新页面。
```json
"env": {
"development": {
"extraBabelPlugins": ["dva-hmr"]
}
}
```
### Mock
roadhog server 支持 mock 功能,类似 [dora-plugin-proxy](https://github.com/dora-js/dora-plugin-proxy),在 `.roadhogrc.mock.js` 中进行配置,支持基于 require 动态分析的实时刷新,支持 ES6 语法,以及友好的出错提示。
比如:
```js
export default {
// 支持值为 Object 和 Array
'GET /api/users': { users: [1,2] },
// GET POST 可省略
'/api/users/1': { id: 1 },
// 支持自定义函数,API 参考 express@4
'POST /api/users/create': (req, res) => { res.end('OK'); },
// Forward 到另一个服务器
'GET /assets/*': 'https://assets.online/',
// Forward 到另一个服务器,并指定子路径
// 请求 /someDir/0.0.50/index.css 会被代理到 https://g.alicdn.com/tb-page/taobao-home, 实际返回 https://g.alicdn.com/tb-page/taobao-home/0.0.50/index.css
'GET /someDir/(.*)': 'https://g.alicdn.com/tb-page/taobao-home',
};
```
### 智能重启
配置文件修改的修改会触发 roadhog server 的自动重启,会触发重启的文件有:
* `.roadhogrc`
* `.roadhogrc.js`
* `.roadhogrc.mock.js`
* theme 配置指定的文件
## 配置
关于配置的一些基本概念:
* 配置存于 `.roadhogrc` 文件中(如果你不喜欢 JSON 配置,可以用 `.roadhogrc.js` 以 JS 的方式编写,支持 ES6)
* 格式为 `JSON`,允许注释
* 布尔类型的配置项默认值均为 `false`
* 支持通过 `webpack.config.js` 以编码的方式进行配置,但不推荐,因为 roadhog 本身的 major 或 minor 升级可能会引起兼容问题。使用时会给予警告⚠️⚠️⚠️,详见 [#36](https://github.com/sorrycc/roadhog/issues/36) 。(`webpack.config.js` 本身的编写支持 ES6,会通过 babal-register 做一层转换。)
默认配置:
```js
{
"entry": "src/index.js",
"disableCSSModules": false,
"cssModulesExclude": [],
"publicPath": "/",
"htmlTemplates": [],
"assetsPath": {
"media": "assets/media/",
"js": "assets/js/",
"css": "assets/css/",
"img": "assets/images/",
},
"copyConfig": [
{
"from": "./public",
"to": "./dist"
}
],
"babelExclude": [],
"outputPath": "./dist",
"extraBabelPlugins": [],
"extraPostCSSPlugins": [],
"sass": false,
"hash": false,
"autoprefixer": null,
"proxy": null,
"externals": null,
"library": null,
"libraryTarget": "var",
"multipage": false,
"define": null,
"env": null,
"theme": null,
"doneCallback": (config, paths) => {
console.log("all done")
},
}
```
查看更多[配置相关问题和改进](https://github.com/sorrycc/roadhog/issues?q=is%3Aissue+is%3Aopen+label%3Aconfig)。
### entry
指定 webpack 入口文件,支持 [glob](https://github.com/isaacs/node-glob) 格式。
如果你的项目是多页类型,会希望把 `src/pages` 的文件作为入口。可以这样配:
```
"entry": "src/pages/*.js"
```
### disableCSSModules
禁用 [CSS Modules](https://github.com/css-modules/css-modules)。最好别关,熟悉并使用他后,你会发现写样式简单了很多。
### cssModulesExclude
支持 CSSModules 混用,通过 cssModulesExclude 可指定不需要走 CSSModules 的文件列表。
```
"cssModulesExclude": [
'./src/a.css',
'./src/b.less',
]
```
### hash
使用 hash 文件名。
```
"hash": true
```
### publicPath
配置生产环境的 [publicPath](http://webpack.github.io/docs/configuration.html#output-publicpath),开发环境下永远为 `/`。
### htmlTemplates
配合多入口应用设置不同的页面,具体配置参考[html-webpack-plugin](https://github.com/jantimon/html-webpack-plugin)
示例:
```js
{
"htmlTemplates": [
{
inject: false,
template: require('html-webpack-template'),
appMountId: "root",
scripts: [
"http://res.wx.qq.com/open/js/jweixin-1.2.0.js"
],
lang: "zh-CN",
mobile: true,
title: 'title',
hash: false,
links: [
{
href: IMG_BASE + 'assets/favicon.ico',
rel: 'shortcut icon'
}
],
filename: DEBUG ? 'index.html' : "index.ftl",
bodyHtmlSnippet: '',
"window": windowVars,
chunks: ['index', 'common'],
minify: {
collapseWhitespace: true,
conservativeCollapse: true,
preserveLineBreaks: true,
removeComments: true
// more options:
// https://github.com/kangax/html-minifier#options-quick-reference
},
{
inject: true,
template: 'src/demo.ejs',
hash: false,
favicon: 'public/favicon.ico',
filename: 'demo.html',
chunks: ['demo', 'common'],
}
]
}
```
### assetsPath
资源输出路径,默认:
图片资源:assets/img
css文件:assets/css
js文件:assets/js
其他文件: assets/media
```js
{
"assetsPath": {
"media": 'assets/media/',
"js": 'assets/js/',
"css": 'assets/css/',
"img": 'assets/images/',
},
}
```
### copyConfig
执行文件的复制,详细配置请参考https://github.com/webpack-contrib/copy-webpack-plugin配置
注意这里使用的webpack-plugin所以是不能复制编译完毕的文件到其他目录中
如果想在编译完毕后做一些操作,请参考配置:doneCallback
```js
{
"copyConfig": [
{
"from": "./public",
"to": "./dist",
"force": true,
}
],
}
```
### doneCallback
在编译完毕后做一些操作(比如复制文件到指定的目录), doneCallback必须为回调函数
传递两个参数:
config:配置信息
paths:{
appBuild: resolveApp('dist'),
appPublic: resolveApp('public'),
appPackageJson: resolveApp('package.json'),
appSrc: resolveApp('src'),
appNodeModules: resolveApp('node_modules'),
ownNodeModules: resolveOwn('../../node_modules'),
dllNodeModule: resolveApp('node_modules/roadhog-dlls'),
dllManifest: resolveApp('node_modules/roadhog-dlls/roadhog.json'),
appBabelCache: resolveApp('node_modules/.cache/babel-loader'),
resolveApp,
appDirectory,
}
```js
import fs from 'fs-extra';
import path, {resolve} from 'path';
import glob from 'glob';
{
"doneCallback": (config, paths) => {
console.log("all done");
const appDirectory = paths.appDirectory;
const baseSrcPath = path.resolve(appDirectory, "./dist")
glob(baseSrcPath + "/**/*.ftl", function (er, files) {
// files is an array of filenames.
// If the `nonull` option is set, and nothing
// was found, then files is ["**/*.js"]
// er is an error object or null.
// console.log(files)
files.forEach((file) => {
const tmpDir = path.relative(baseSrcPath, file);
// console.log(baseSrcPath, file, tmpDir)
fs.copySync(file, path.resolve(appDirectory, "../webapp/", tmpDir) )
})
})
fs.copy(path.resolve(appDirectory, "./dist/assets"), path.resolve(appDirectory, "../webapp/") )
},
}
```
### babelExclude
用于babel排除文件配置,与extraBabelIncludes相互配合使用
### outputPath
配置[输出路径](http://webpack.github.io/docs/configuration.html#output-path),默认是 `./dist`。
### extraBabelPlugins
配置额外的 babel plugin。babel plugin 只能添加,不允许覆盖和删除。
比如,同时使用 antd, dva 时,通常需要这么配:
```
"extraBabelPlugins": [
"transform-runtime",
"dva-hmr",
["import", { "libraryName": "antd", "libraryDirectory": "lib", "style": "css" }]
]
```
同时安装相关依赖:
```bash
$ npm i babel-plugin-transform-runtime babel-plugin-import babel-plugin-dva-hmr --save-dev
$ npm i babel-runtime --save
```
注意:这么配还有个问题,`dva-hmr` 是开发环境的插件,如果 build 时也用上就会打出冗余代码。解决方案详见 [#env](#env)。
### extraPostCSSPlugins
配置额外的 postcss 插件。
注意:由于 postcss 的插件是以函数的方式进行配置的,所以这个配置只能在 `.roadhogrc.js` 里使用。
比如:
```
extraPostCSSPlugins: [
pxtorem({
rootValue: 100,
propWhiteList: [],
}),
],
```
### autoprefixer
配置 autoprefixer 参数,详见 [autoprefixer](https://github.com/postcss/autoprefixer) 和 [browserslist](https://github.com/ai/browserslist#queries)。
比如,如果是做移动端的开发,可以配成:
```
"autoprefixer": {
"browsers": [
"iOS >= 8", "Android >= 4"
]
}
```
### sass
支持 sass,值为 [node-sass](https://github.com/sass/node-sass#options) 的配置参数。
注意:开启 sass 支持需在项目代码中安装 node-sass 和 sass-loader 两个依赖。
### proxy
配置代理,详见 [webpack-dev-server#proxy](https://webpack.github.io/docs/webpack-dev-server.html#proxy)。
如果要代理请求到其他服务器,可以这样配:
```
"proxy": {
"/api": {
"target": "http://jsonplaceholder.typicode.com/",
"changeOrigin": true,
"pathRewrite": { "^/api" : "" }
}
}
```
然后访问 `/api/users` 就能访问到 http://jsonplaceholder.typicode.com/users 的数据。
如果要做数据 mock,可以考虑和 [json-server](https://github.com/typicode/json-server) 结合使用,把 `/api` 代理到 json-server 启动的端口。
### externals
配置 webpack 的 [externals](http://webpack.github.io/docs/configuration.html#externals) 属性。
### library
配置 webpack 的 [library](http://webpack.github.io/docs/configuration.html#output-library) 属性。
### libraryTarget
配置 webpack 的 [libraryTarget](http://webpack.github.io/docs/configuration.html#output-librarytarget) 属性。
### multipage
配置是否多页应用。多页应用会自动提取公共部分为 common.js 和 common.css 。
### define
配置 webpack 的 [DefinePlugin](http://webpack.github.io/docs/list-of-plugins.html#defineplugin) 插件,define 的值会自动做 `JSON.stringify` 处理。
### env
针对特定的环境进行配置。server 的环境变量是 `development`,build 的环境变量是 `production`。
比如:
```
"extraBabelPlugins": ["transform-runtime"],
"env": {
"development": {
"extraBabelPlugins": ["dva-hmr"]
}
}
```
这样,开发环境下的 extraBabelPlugins 是 `["transform-runtime", "dva-hmr"]`,而生产环境下是 `["transform-runtime"]`。
### theme
配置主题,实际上是配 less 的 `modifyVars`。支持 Object 和文件路径两种方式的配置。
比如:
```
"theme": {
"@primary-color": "#1DA57A"
}
```
或者,
```
"theme": "./node_modules/abc/theme-config.js"
```
这里有 [如何配置 antd theme 的例子](https://github.com/dvajs/dva-example-user-dashboard/commit/d6da33b3a6e18eb7f003752a4b00b5a660747c31) 。
### svgSpriteLoaderDirs
Notice:
- roadhog 版本必须 >= `0.6.0-beta1`。
- 因为 `.roadhogrc` 配置文件优先级大于 `.roadhogrc.js`, 请先删除 `.roadhogrc`。
配置一个路径数组, 该路径下的 svg 文件会全部交给 [svg-sprite-loader](https://github.com/kisenka/svg-sprite-loader) 处理
比如,使用 antd-mobile@1 的 [自定义 svg icon](https://mobile.ant.design/components/icon) 功能的用户,可以在 `.roadhogrc.js` 文件中做如下配置
```js
const path = require('path');
const svgSpriteDirs = [
require.resolve('antd-mobile').replace(/warn\.js$/, ''), // antd-mobile 内置svg
path.resolve(__dirname, 'src/my-project-svg-foler'), // 业务代码本地私有 svg 存放目录
];
export default {
// ...
svgSpriteLoaderDirs: svgSpriteDirs,
//...
}
```
## 环境变量
可环境变量临时配置一些参数,包括:
* `PORT`, 端口号,默认 8000
* `HOST`, 默认 localhost
* `HTTPS`,是否开启 https,默认关闭
* `BROWSER`,设为 none 时不自动打开浏览器
* `CLEAR_CONSOLE`,设为 none 时清屏
比如,使用 3000 端口开启服务器可以这样:
```bash
# OS X, Linux
$ PORT=3000 roadhog server
# Windows (cmd.exe)
$ set PORT=3000&&roadhog server
# Or use cross-env for all platforms
$ cross-env PORT=3000 roadhog server
```
## 命令行参数
### roadhog server
```bash
$ roadhog server -h
Usage: roadhog server [options]
Options:
-h Show help [boolean]
```
### roadhog build
```bash
$ roadhog build -h
Usage: roadhog build [options]
Options:
--debug Build without compress [boolean] [default: false]
--watch, -w Watch file changes and rebuild [boolean] [default: false]
--output-path, -o Specify output path [string] [default: null]
--analyze Visualize and analyze your Webpack bundle.
[boolean] [default: false]
-h Show help [boolean]
```
### roadhog test
```bash
$ roadhog test -h
Usage: roadhog test [options] [mocha-options]
Options:
--coverage Output coverage [boolean] [default: false]
-h Show help [boolean]
```
## 使用 `public` 目录
我们约定 `public` 目录下的文件会在 server 和 build 时被自动 copy 到输出目录(默认是 `./dist`)下。所以可以在这里存放 favicon, iconfont, html, html 里引用的图片等。
## FAQ
### 那么为什么提供 JSON 级别的约定型配置,而非类似 webpack.config.js 的编码型配置?
首先是 JSON 的方式比较简单,`true`/`false` 或是一些简单的字符串就可完成配置;另外,JSON 方式能有效控制使用场景,而编程式的非常不可控,roadhog 的一个简单改动都可能导致之前的配置不可用。
### 为什么叫 roadhog ?
roadhog 即路霸,和 [dva](https://github.com/dvajs/dva) 一样,是守望先锋中的另一名英雄,希望能为 dva 保驾护航。
 ### 报 `Unexpected token` 错误,类似下面这样
```
Error in ./index.js
Module parse failed: /Users/chencheng/Documents/Work/Misc/dva-cli/boilerplates/demo/index.js Unexpected token (15:23)
You may need an appropriate loader to handle this file type.
SyntaxError: Unexpected token (15:23)
@ multi index
```
把源码放到 src 目录下,因为非 src 目录下的文件不会走 babel 编译。
### Windows/Ubuntu 下每次启动后打开新 Tab 比较烦
```bash
# Mac, Ubuntu
$ BROWSER=none roadhog server
# Windows
$ set BROWSER=none&&roadhog server
# Or use cross-env for all platforms
$ cross-env BROWSER=none roadhog server
```
## LICENSE
MIT
## CHANGE LOG
1. doneCallback 参数
用于编译完成后的文件复制等操作
1. copyConfig 参数
用于拷贝其他一些多余的文件,再webpack执行的时候,使用插件https://github.com/webpack-contrib/copy-webpack-plugin,注意,此参数是在webpack执行中间执行的,上面的doneCallback参数实在webpack执行完毕后执行的
1. htmlTemplates 参数
使用[html-webpack-plugin](https://github.com/jantimon/html-webpack-plugin)来支持多文件
包括不同的文件切割,自定义模板,具体请参考 htmlTemplates配置
1. assetsPath 参数
配置各类型文件目录结构,用于归类
资源输出路径,默认:
图片资源:assets/img
css文件:assets/css
js文件:assets/js
其他文件: assets/media
### 报 `Unexpected token` 错误,类似下面这样
```
Error in ./index.js
Module parse failed: /Users/chencheng/Documents/Work/Misc/dva-cli/boilerplates/demo/index.js Unexpected token (15:23)
You may need an appropriate loader to handle this file type.
SyntaxError: Unexpected token (15:23)
@ multi index
```
把源码放到 src 目录下,因为非 src 目录下的文件不会走 babel 编译。
### Windows/Ubuntu 下每次启动后打开新 Tab 比较烦
```bash
# Mac, Ubuntu
$ BROWSER=none roadhog server
# Windows
$ set BROWSER=none&&roadhog server
# Or use cross-env for all platforms
$ cross-env BROWSER=none roadhog server
```
## LICENSE
MIT
## CHANGE LOG
1. doneCallback 参数
用于编译完成后的文件复制等操作
1. copyConfig 参数
用于拷贝其他一些多余的文件,再webpack执行的时候,使用插件https://github.com/webpack-contrib/copy-webpack-plugin,注意,此参数是在webpack执行中间执行的,上面的doneCallback参数实在webpack执行完毕后执行的
1. htmlTemplates 参数
使用[html-webpack-plugin](https://github.com/jantimon/html-webpack-plugin)来支持多文件
包括不同的文件切割,自定义模板,具体请参考 htmlTemplates配置
1. assetsPath 参数
配置各类型文件目录结构,用于归类
资源输出路径,默认:
图片资源:assets/img
css文件:assets/css
js文件:assets/js
其他文件: assets/media