# Storybook Chrome Screenshot Addon
[storybook]: https://github.com/storybooks/storybook
[puppeteer]: https://github.com/GoogleChrome/puppeteer
[](https://www.npmjs.com/package/storybook-chrome-screenshot)
[](https://circleci.com/gh/tsuyoshiwada/storybook-chrome-screenshot)
[](https://david-dm.org/tsuyoshiwada/storybook-chrome-screenshot)
> A [Storybook][storybook] Addon, Save the screenshot image of your stories :camera: via [Puppeteer][puppeteer].
`storybook-chrome-screenshot` takes a screenshot and saves it.
It is primarily responsible for image generation necessary for Visual Testing such as `reg-viz`.
## Table of Contents
- [Features](#features)
- [How it works](#how-it-works)
- [Getting Started](#getting-started)
- [Installation](#installation)
- [Register Addon](#register-addon)
- [Register initialization process](#register-initialization-process)
- [Setup your stories](#setup-your-stories)
- [React](#react)
- [Angular](#angular)
- [Vue.js](#vuejs)
- [Run `storybook-chrome-screenshot` Command](#run-storybook-chrome-screenshot-command)
- [Support for addDecorator](#support-for-adddecorator)
- [API](#api)
- [initScreenshot()](#initscreenshot)
- [withScreenshot(options = {})](#withscreenshotoptions--)
- [setScreenshotOptions(options = {})](#setscreenshotoptionsoptions--)
- [getScreenshotOptions()](#getscreenshotoptions)
- [Command Line Options](#command-line-options)
- [Tips](#tips)
- [Disable component animation](#disable-component-animation)
- [Examples](#examples)
- [TODO](#todo)
- [Contribute](#contribute)
- [Development](#development)
- [`npm run test`](#npm-run-test)
- [`npm run build`](#npm-run-build)
- [License](#license)
## Features
- :camera: Take screenshots of each stories. via [Puppeteer][puppeteer].
- :rocket: Provide flexible screenshot shooting options.
- :tada: Supports the following framework / View framework.
- [React](https://github.com/facebook/react/)
- [Angular](https://github.com/angular/angular)
- [Vue.js](https://github.com/vuejs/vue)
## How it works
`storybook-chrome-screenshot` executes [Storybook][storybook] in a child process and accesses the launched page using [Puppeteer][puppeteer]. It is a very simple mechanism.
For that reason, you can easily shoot screenshots by simply creating a story that works with the browser.
## Getting Started
It is very easy to introduce `storybook-chrome-screenshot` in your project.
### Installation
First install `storybook-chrome-screenshot`.
```bash
$ npm install --save-dev storybook-chrome-screenshot
```
> **Note:** Please do not use globally but let it operate locally.
### Register Addon
Next, register Addon.
**.storybook/addons.js**
```javascript
// Other addons...
import 'storybook-chrome-screenshot/register';
```
### Register initialization process
Add [initScreenshot](#initscreenshot) decorator. It has to be **before** the first [withScreenshot](#withscreenshotoptions--) decorator. Addon uses it to catch the finish of the components' rendering.
**Example: .storybook/config.js**
```javascript
import { addDecorator } from '@storybook/react';
import { initScreenshot } from 'storybook-chrome-screenshot';
addDecorator(initScreenshot());
```
### Setup your stories
Create a story with [withScreenshot](#withscreenshotoptions--).
#### React
```javascript
import React from 'react';
import { storiesOf } from '@storybook/react';
import { withScreenshot } from 'storybook-chrome-screenshot';
import Button from './Button';
storiesOf('Button', module).add('with text', withScreenshot()(() => ));
```
#### Angular
This function works well even if you use Angular:
```javascript
import { storiesOf } from '@storybook/angular';
import { withScreenshot } from 'storybook-chrome-screenshot';
import { MyButtonComponent } from '../src/app/my-button/my-button.component';
storiesOf('Button', module).add(
'with custom label',
withScreenshot()(() => ({
component: MyButtonComponent,
props: {
text: 'Text'
}
}))
);
```
#### Vue.js
Of course, Vue.js works the same way:
```javascript
import { storiesOf } from '@storybook/vue';
import { withScreenshot } from 'storybook-chrome-screenshot';
import MyButton from './Button.vue';
storiesOf('MyButton', module)
.add(
'pre-registered component',
withScreenshot()(() => ({
template: 'A Button with rounded edges'
}))
)
.add(
'template + component',
withScreenshot()(() => ({
components: { MyButton },
template: 'Button rendered in a template'
}))
)
.add(
'render + component',
withScreenshot()(() => ({
render: (h) => h(MyButton, { props: { color: 'pink' } }, ['renders component: MyButton'])
}))
);
```
### Run `storybook-chrome-screenshot` Command
Open `package.json` and add a `screenshot` script for run `storybook-chrome-screenshot` command.
```json
{
"scripts": {
"screenshot": "storybook-chrome-screenshot -p 9001 -c .storybook"
}
}
```
> **Note:** Parameters such as ports and configuration files should match the parameters of the `Storybook` you are currently using.
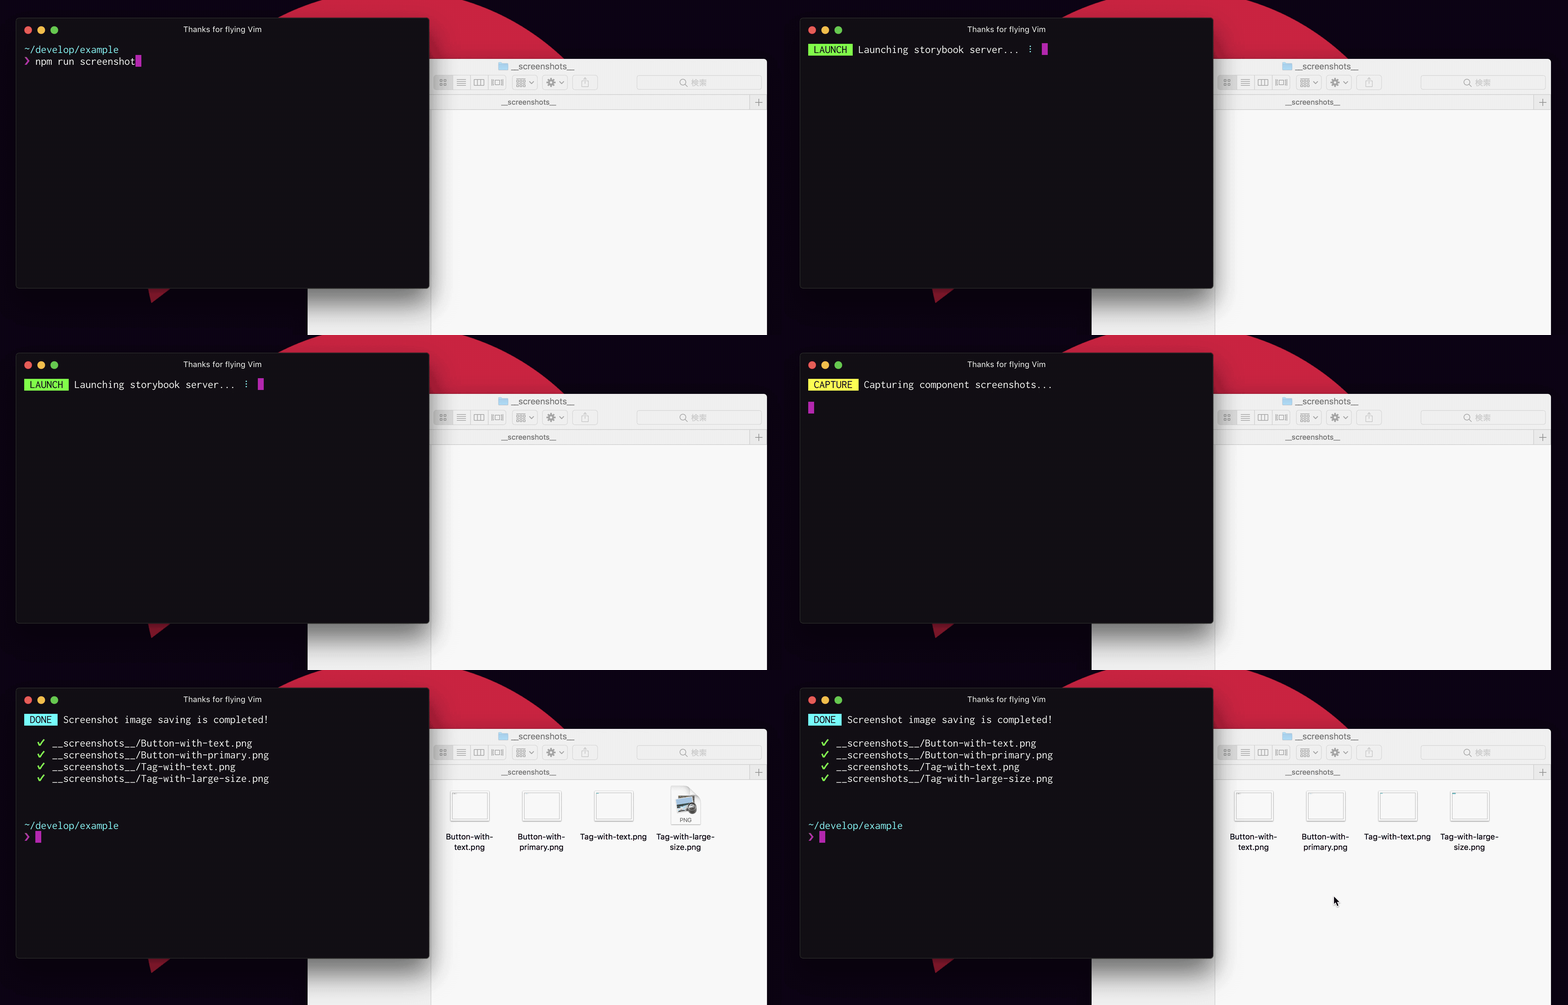
After that, just run the `npm run screenshot` command, shotting a component wrapped with [withScreenshot](#withscreenshotoptions--) and save the images.
```bash
$ npm run screenshot
```
### Support for addDecorator
Or by using `addDecorator()`, it is possible to shotting all the decorated stories.
```javascript
import { storiesOf } from '@storybook/react';
import { withScreenshot } from 'storybook-chrome-screenshot';
storiesOf('Button', module)
.addDecorator(
withScreenshot({
/* ...options */
})
)
.add('with primary', () => )
.add('with secondary', () => );
```
## API
### initScreenshot()
This decorator has to be added to every story. Addon uses it to understand when story's rendering is finished.
**Important!.** `initScreenshot` has to be added before the first [withScreenshot](#withscreenshotoptions--).
**Example: .storybook/config.js**
```javascript
import { addDecorator } from '@storybook/react';
import { initScreenshot } from 'storybook-chrome-screenshot';
addDecorator(initScreenshot());
```
### withScreenshot(options = {})
Notify [Puppeteer][puppeteer] of the story wrapped in this function and let it recognize it as the target of the screenshot.
The following objects of `options` can be specified.
```javascript
{
namespace: 'global', // namespace for your screenshots. It is using in the filenames, e.g. Button-with-primary_global.png
delay: 0, // Delay milliseconds when shooting screenshots
waitFor: '', // User defined trigger function name to shoot screenshots. See "Full control the screenshot timing" section below.
viewport: { // Browser's viewport when shooting screenshots. (See: https://github.com/GoogleChrome/puppeteer/blob/master/docs/api.md#pagesetviewportviewport)
width: 1024,
height: 768,
deviceScaleFactor: 1,
isMobile: false,
hasTouch: false,
isLandscape: false,
},
filePattern: '{kind}-{story}-{knobs}_{ns}-{vp}' // file pattern, combined from kind, story name, used knobs, namespace and viewport
}
```
Also, By passing the `array` to `viewport`, you can easily shoot multiple Viewports.
```javascript
{
viewport: [
// Mobile
{
width: 300,
height: 420,
isMobile: true,
hasTouch: true,
},
// Tablet
{
width: 768,
height: 800,
isMobile: true,
hasTouch: true,
},
// Desktop
{
width: 1024,
height: 768,
},
],
}
```
### setScreenshotOptions(options = {})
Sets the default value of the option used with [withScreenshot()](#withscreenshotoptions--).
It is useful for changing Viewport of all stories.
**Example: .storybook/config.js**
```javascript
import { setScreenshotOptions } from 'storybook-chrome-screenshot';
setScreenshotOptions({
viewport: {
width: 768,
height: 400,
deviceScaleFactor: 2
}
});
```
### getScreenshotOptions()
Get the current option used with [withScreenshot()](#withscreenshotoptions--).
```javascript
import { getScreenshotOptions } from 'storybook-chrome-screenshot';
console.log(getScreenshotOptions());
// => Current screenshot options...
```
## Command Line Options
```bash
$ $(npm bin)/storybook-chrome-screenshot --help
Usage: storybook-chrome-screenshot [options]
Options:
-V, --version output the version number
-p, --port [number] Storybook server port. (default: 9001)
-h, --host [string] Storybook server host. (default: localhost)
-s, --static-dir Directory where to load static files from.
-c, --config-dir [dir-name] Directory where to load Storybook configurations from. (default: .storybook)
-o, --output-dir [dir-name] Directory where screenshot images are saved. (default: __screenshots__)
--parallel [number] Number of Page Instances of Puppeteer to be activated when shooting screenshots. (default: 4)
--filter-kind [regexp] Filter of kind with RegExp. (example: "Button$")
--filter-story [regexp] Filter of story with RegExp. (example: "^with\s.+$")
--inject-files Path to the JavaScript file to be injected into frame. (default: )
--browser-timeout [number] Timeout milliseconds when Puppeteer opens Storybook. (default: 30000)
--puppeteer-launch-config [json] JSON string of launch config for Puppeteer. (default: {"args":["--no-sandbox","--disable-setuid-sandbox", "--disable-dev-shm-usage"]})
--silent Suppress standard output.
--debug Enable debug mode.
-h, --help output usage information
```
## Tips
### Disable component animation
When shooting screenshots, you may want to disable component animation. In this case it is easiest to inject Script using the `--inject-files` option.
You can create `./disable-animation.js` and disable CSS Animation with the next snippet.
```javascript
(() => {
const $iframe = document.getElementById('storybook-preview-iframe');
const $doc = $iframe.contentDocument;
const $style = $doc.createElement('style');
$style.innerHTML = `* {
transition: none !important;
animation: none !important;
}`;
$doc.body.appendChild($style);
})();
```
Pass the created file to the `--inject-files` option.
```bash
$ $(npm bin)/storybook-chrome-screenshot --inject-files ./disable-animation.js [...more options]
```
### Full control the screenshot timing
Sometimes you may want to full-manage the timing of performing screenshot.
Use the `waitFor` option if you think so. This string parameter should points a global function to return `Promise`.
For example, the following setting makes the screenshot function wait for firing of `fontLoading`:
```html
```
```javascript
import { setScreenshotOptions } from 'storybook-chrome-screenshot';
setScreenshotOptions({
waitFor: 'fontLoading',
});
```
## Examples
- [tsuyoshiwada/scs-with-reg-viz](https://github.com/tsuyoshiwada/scs-with-reg-viz) : A example repository of visual regression test using storybook-chrome-screenshot and reg-suit.
- [Quramy/angular-sss-demo](https://github.com/Quramy/angular-sss-demo) : Storybook, Screenshot, and Snapshot testing for Angular
- [viswiz-io/viswiz-tutorial-storybook](https://github.com/viswiz-io/viswiz-tutorial-storybook) : A tutorial repository for setting up visual regression testing with VisWiz.io
## TODO
The following tasks remain. Contributes are welcome :smiley:
- [x] Global Options.
- [x] ~~Shooting at an arbitrary timing.~~ (No plan for support)
- [x] Support for [Angular](https://angular.io).
- [x] Support for [Vue.js](https://github.com/vuejs/vue).
- [ ] More unit testing.
## Contribute
1. Fork it!
1. Create your feature branch: `git checkout -b my-new-feature`
1. Commit your changes: `git commit -am 'Add some feature'`
1. Push to the branch: `git push origin my-new-feature`
1. Submit a pull request :muscle:
Bugs, feature requests and comments are more than welcome in the [issues](https://github.com/tsuyoshiwada/storybook-chrome-screenshot/issues).
### Development
We will develop using the following npm scripts.
#### `npm run test`
We will run Lint, unit test, E2E test in order.
Each test can also be executed individually with the following command.
```bash
# Run TSLint
$ npm run test:lint
# Run unit test using Jest
$ npm run test:unit
# Run E2E test
$ npm run test:e2e
# Run unit tests in watch mode
$ npm run test:watch
```
#### `npm run build`
Compile the source code written in TypeScript.
## License
[MIT © tsuyoshiwada](./LICENSE)