## 关于腾讯云即时通信 IM
腾讯云即时通信(Instant Messaging,IM)基于 QQ 底层 IM 能力开发,仅需植入 SDK 即可轻松集成聊天、会话、群组、资料管理能力,帮助您实现文字、图片、短语音、短视频等富媒体消息收发,全面满足通信需要。
## 关于 chat-uikit-vue
chat-uikit-vue 是基于腾讯云 Web IM SDK 的一款 VUE UI 组件库,它提供了一些通用的 UI 组件,包含会话、聊天、音视频通话、关系链、资料、群组等功能。基于 UI 组件您可以像搭积木一样快速搭建起自己的业务逻辑。
chat-uikit-vue 中的组件在实现 UI 功能的同时,会调用 IM SDK 相应的接口实现 IM 相关逻辑和数据的处理,因而开发者在使用 chat-uikit-vue 时只需关注自身业务或个性化扩展即可。
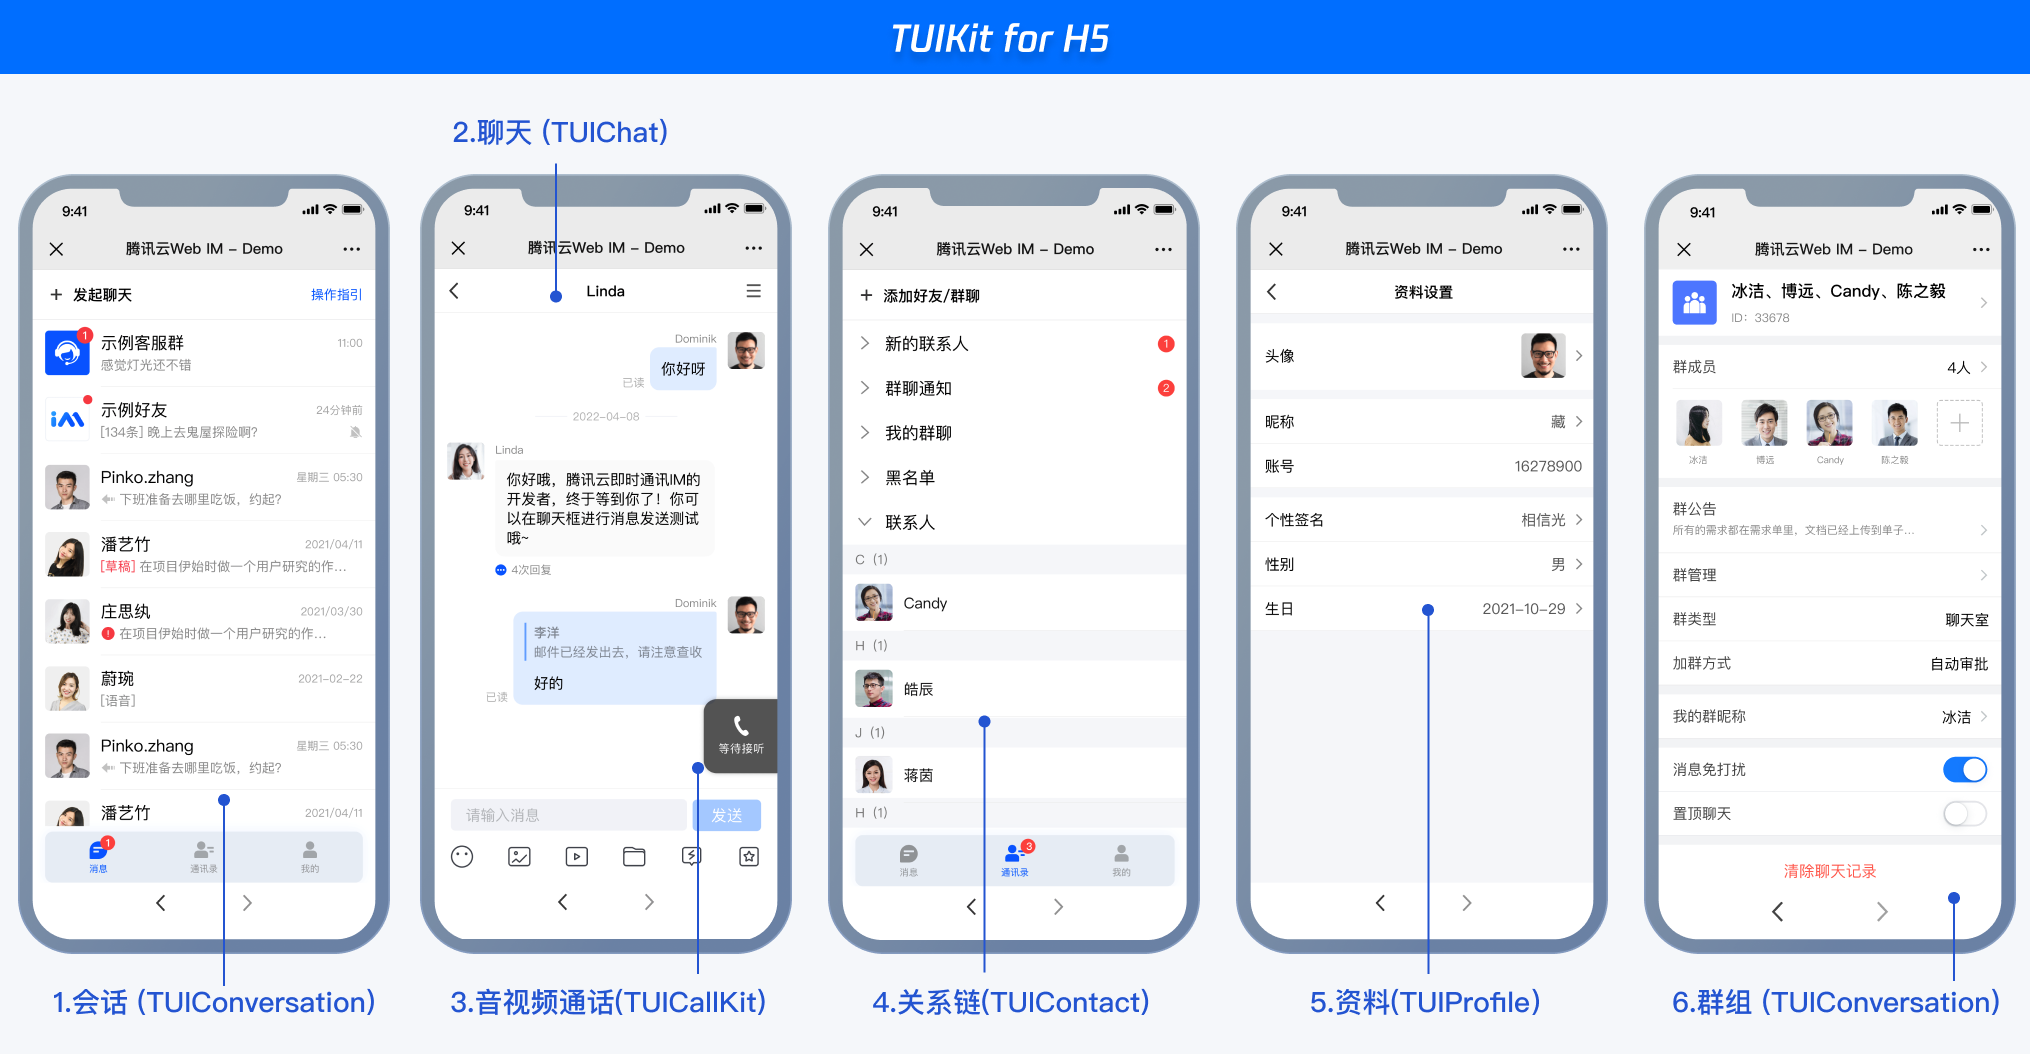
chat-uikit-vue Web 端 和 H5 端界面效果如下图所示:
 ## 发送您的第一条消息
### 开发环境要求
- Vue 3
- TypeScript
- sass(sass-loader 版本 <= 10.1.1)
- node(12.13.0 <= node 版本 <= 17.0.0, 推荐使用 Node.js 官方 LTS 版本 16.17.0)
- npm(版本请与 node 版本匹配)
### TUIKit 源码集成
#### 步骤 1:创建项目
推荐使用 vue-cli 方式创建项目, 配置 Vue3 + TypeScript + sass。
如果您尚未安装 vue-cli ,可以在 terminal 或 cmd 中采用如下方式进行安装:
```shell
npm install -g @vue/cli@4.5.0 sass sass-loader@10.1.1
```
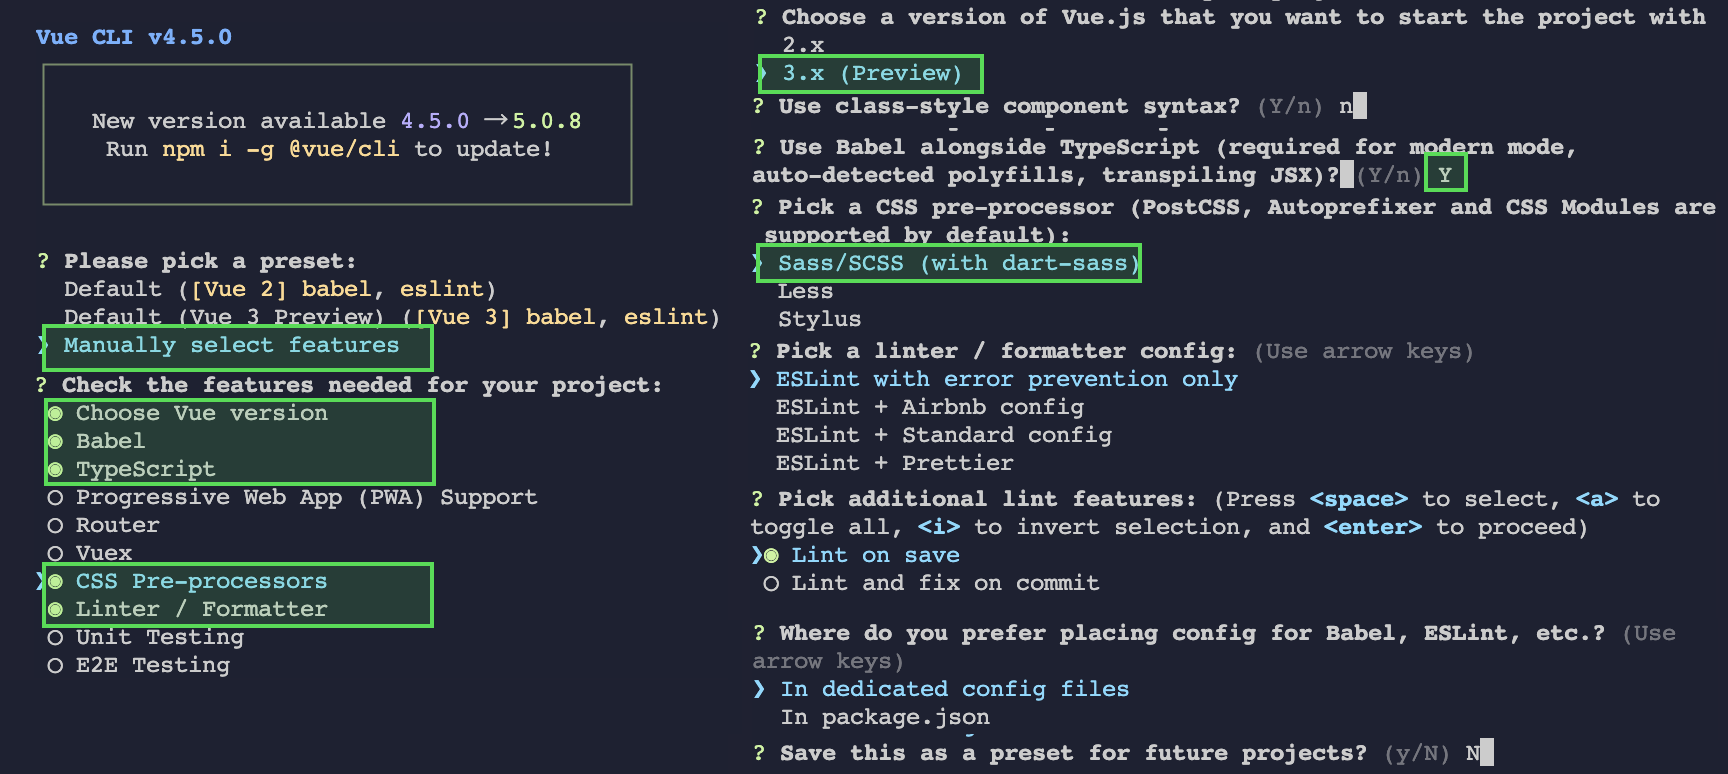
通过 vue-cli 创建项目,并选择下图中所选配置项。
```shell
vue create chat-example
```
创建完成后,切换到项目所在目录
```shell
cd chat-example
```
#### 步骤 2:下载 TUIKit 组件
通过 [npm](https://www.npmjs.com/package/@tencentcloud/chat-uikit-vue) 方式下载 TUIKit 组件,为了方便您后续的拓展,建议您将 TUIKit 组件复制到自己工程的 src 目录下:
```shell
# macOS
npm i @tencentcloud/chat-uikit-vue
mkdir -p ./src/TUIKit && cp -r ./node_modules/@tencentcloud/chat-uikit-vue/ ./src/TUIKit
# windows
npm i @tencentcloud/chat-uikit-vue
xcopy .\node_modules\@tencentcloud\chat-uikit-vue .\src\TUIKit /i /e
```
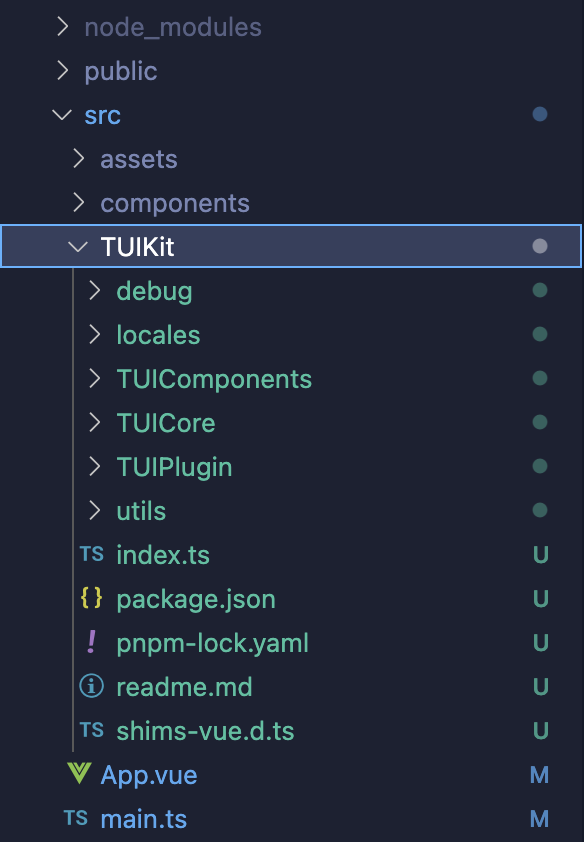
成功后目录结构如图所示:
## 发送您的第一条消息
### 开发环境要求
- Vue 3
- TypeScript
- sass(sass-loader 版本 <= 10.1.1)
- node(12.13.0 <= node 版本 <= 17.0.0, 推荐使用 Node.js 官方 LTS 版本 16.17.0)
- npm(版本请与 node 版本匹配)
### TUIKit 源码集成
#### 步骤 1:创建项目
推荐使用 vue-cli 方式创建项目, 配置 Vue3 + TypeScript + sass。
如果您尚未安装 vue-cli ,可以在 terminal 或 cmd 中采用如下方式进行安装:
```shell
npm install -g @vue/cli@4.5.0 sass sass-loader@10.1.1
```
通过 vue-cli 创建项目,并选择下图中所选配置项。
```shell
vue create chat-example
```

创建完成后,切换到项目所在目录
```shell
cd chat-example
```
#### 步骤 2:下载 TUIKit 组件
通过 [npm](https://www.npmjs.com/package/@tencentcloud/chat-uikit-vue) 方式下载 TUIKit 组件,为了方便您后续的拓展,建议您将 TUIKit 组件复制到自己工程的 src 目录下:
```shell
# macOS
npm i @tencentcloud/chat-uikit-vue
mkdir -p ./src/TUIKit && cp -r ./node_modules/@tencentcloud/chat-uikit-vue/ ./src/TUIKit
# windows
npm i @tencentcloud/chat-uikit-vue
xcopy .\node_modules\@tencentcloud\chat-uikit-vue .\src\TUIKit /i /e
```
成功后目录结构如图所示:
 #### 步骤 3:引入 TUIKit 组件
在 main.ts 中,引入 TUIKit,并注册到 Vue 项目实例中:
```javascript
import { createApp } from 'vue';
import App from './App.vue';
import { TUIComponents, TUICore, genTestUserSig } from './TUIKit';
const SDKAppID = 0; // Your SDKAppID
const secretKey = ''; //Your secretKey
const userID = ''; // User ID
// init TUIKit
const TUIKit = TUICore.init({
SDKAppID,
});
// TUIKit add TUIComponents
TUIKit.use(TUIComponents);
// login TUIKit
TUIKit.login({
userID: userID,
userSig: genTestUserSig({
SDKAppID,
secretKey,
userID,
}).userSig, // The password with which the user logs in to IM. It is the ciphertext generated by encrypting information such as userID.For the detailed generation method, see Generating UserSig
});
createApp(App).use(TUIKit).mount('#app');
```
#### 步骤 4: 获取 SDKAppID 、密钥与 userID
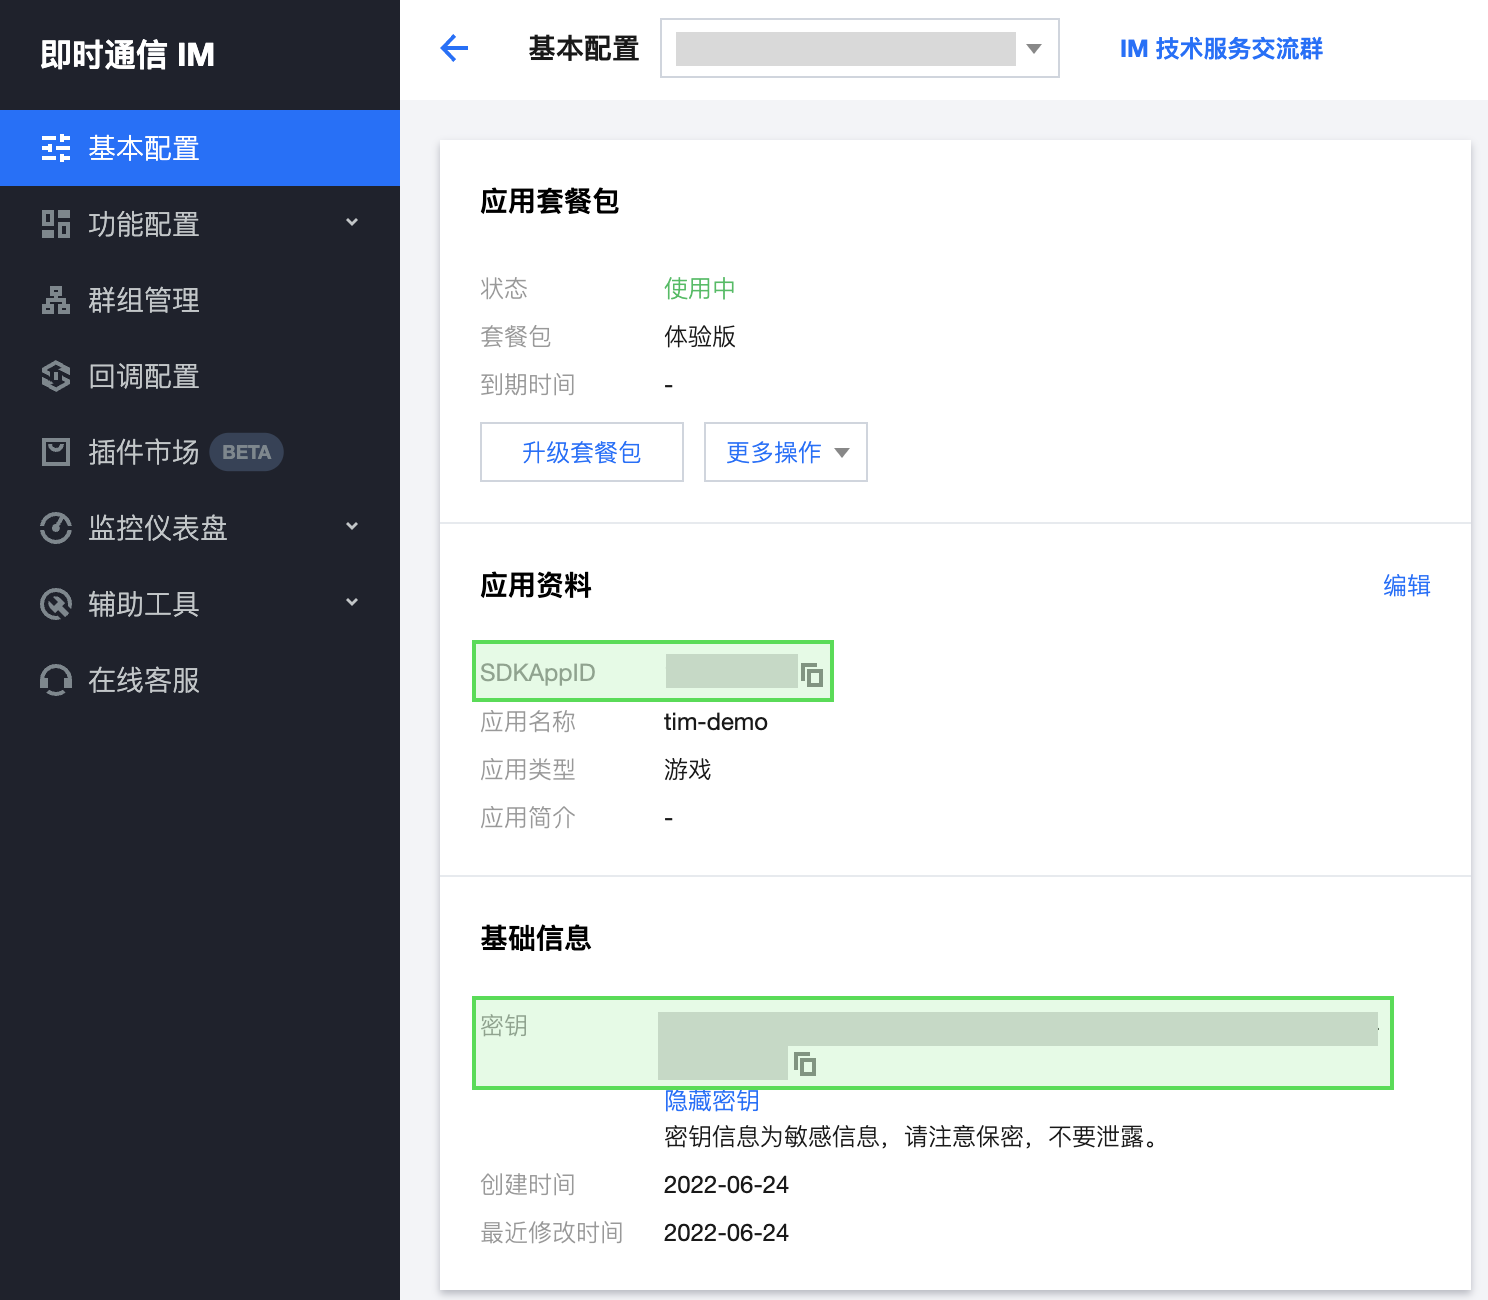
设置 main.ts 文件示例代码中的相关参数 SDKAppID、secretKey 以及 userID ,其中 SDKAppID 和密钥等信息,可通过 [即时通信 IM 控制台](https://console.cloud.tencent.com/im) 获取,单击目标应用卡片,进入应用的基础配置页面。例如:
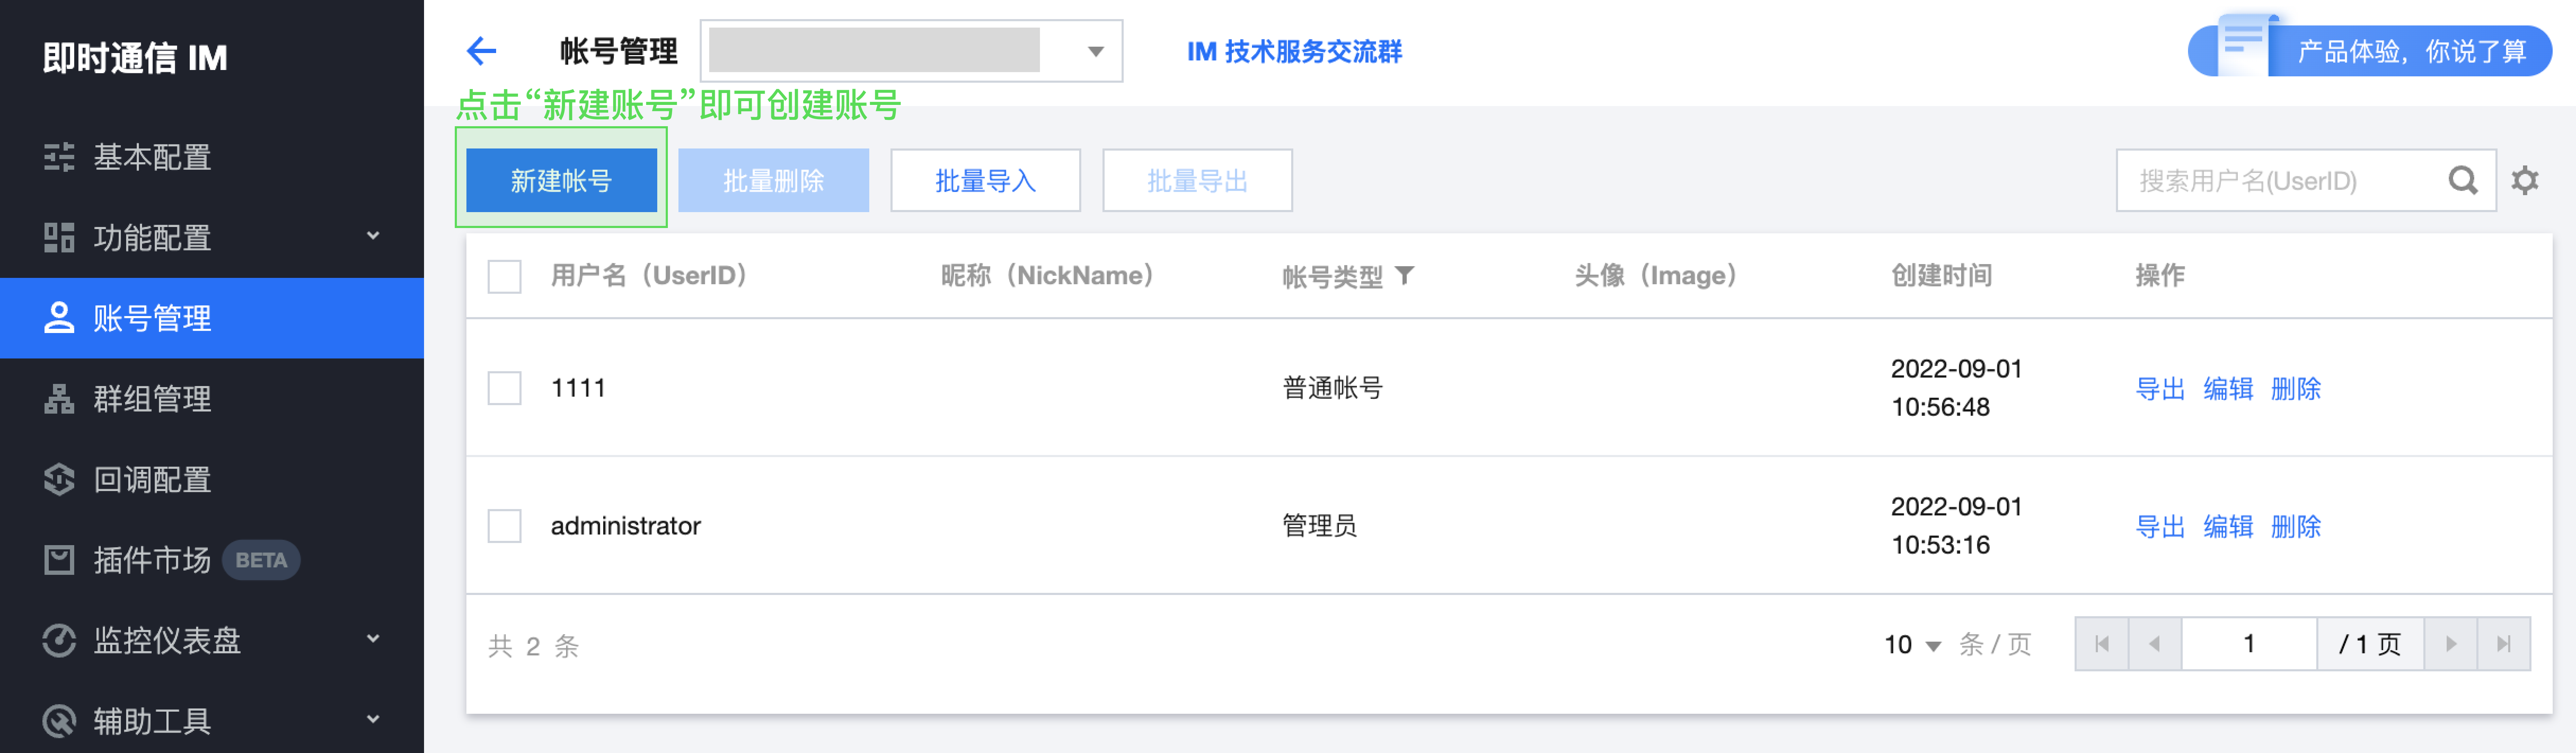
userID 信息,可通过 [即时通信 IM 控制台](https://console.cloud.tencent.com/im) 进行创建和获取,单击目标应用卡片,进入应用的账号管理页面,即可创建账号并获取 userID。例如:
#### 步骤 5:调用 TUIKit 组件
在需要展示的页面,调用 TUIKit 的组件即可使用。
例如:在 App.vue 页面中,使用 TUIConversation、TUIChat、TUISearch 快速搭建聊天界面。
```javascript
```
#### 步骤 6:启动项目
```javascript
npm run serve
```
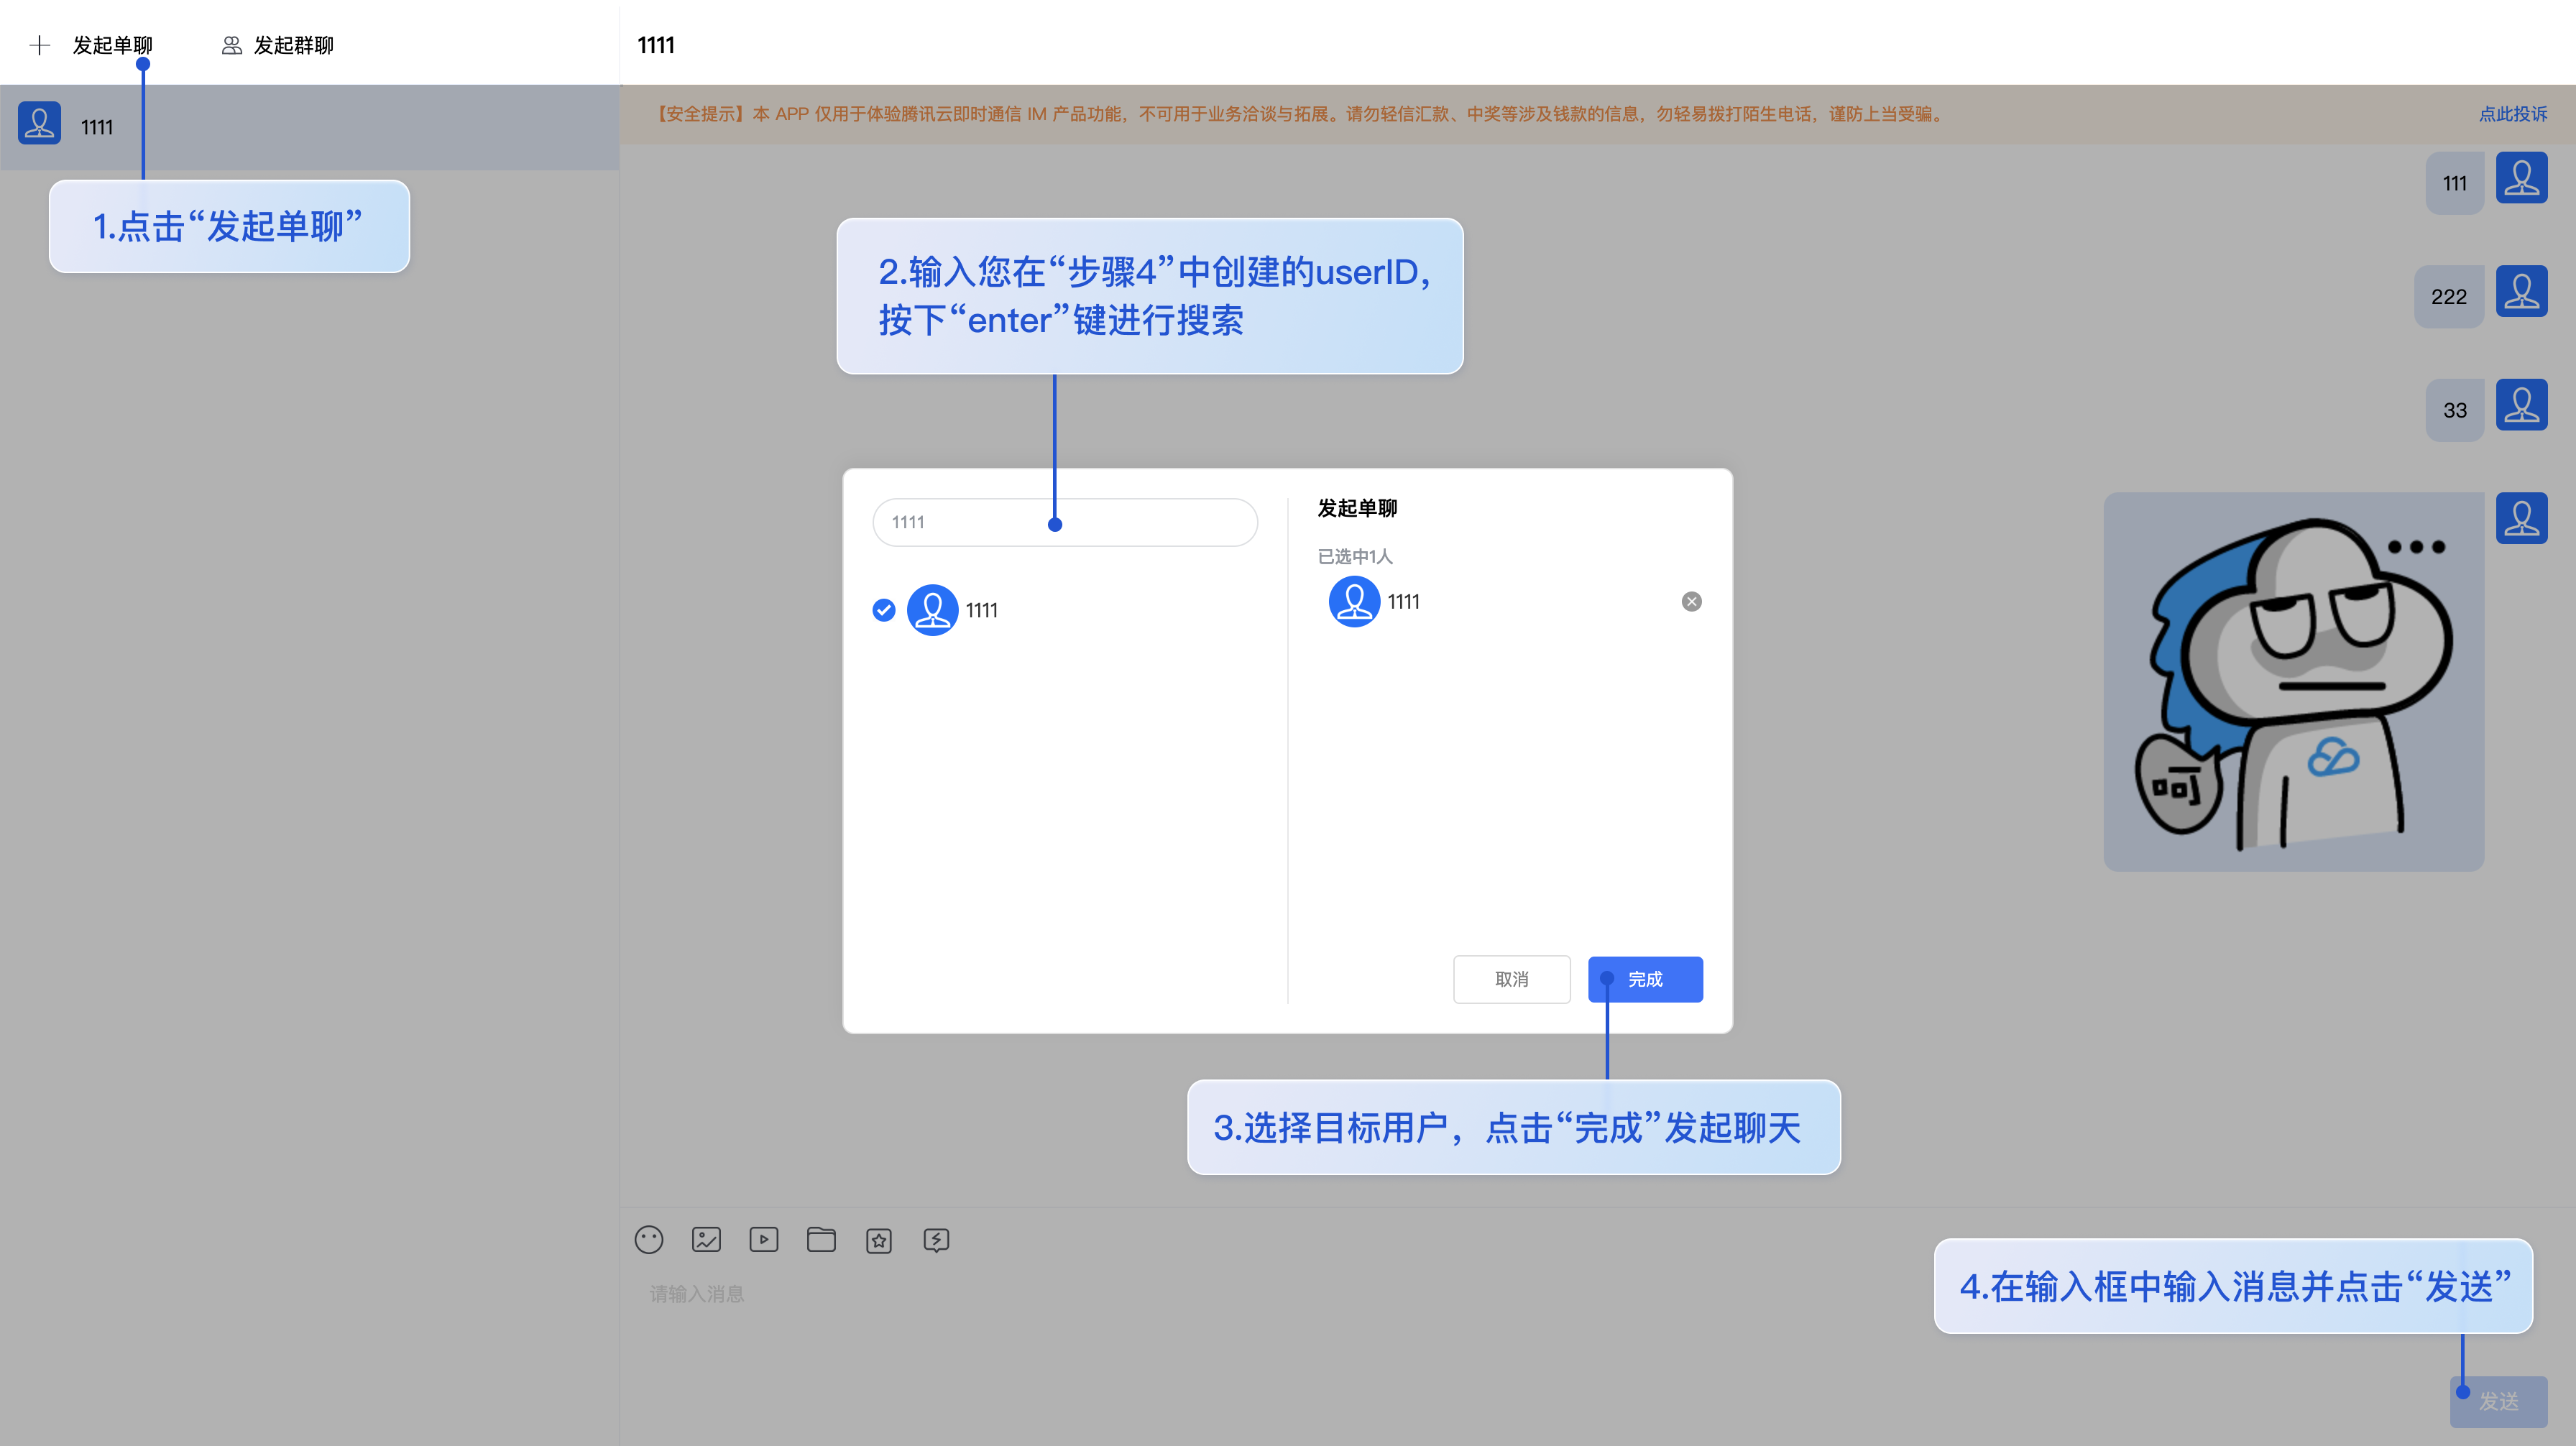
#### 步骤 7:发送您的第一条消息
## 拨打您的第一通电话
在您成功完成“发送您的第一条消息”后,可以通过接入 call-uikit-vue 体验通话功能。
#### 步骤 1:开通服务
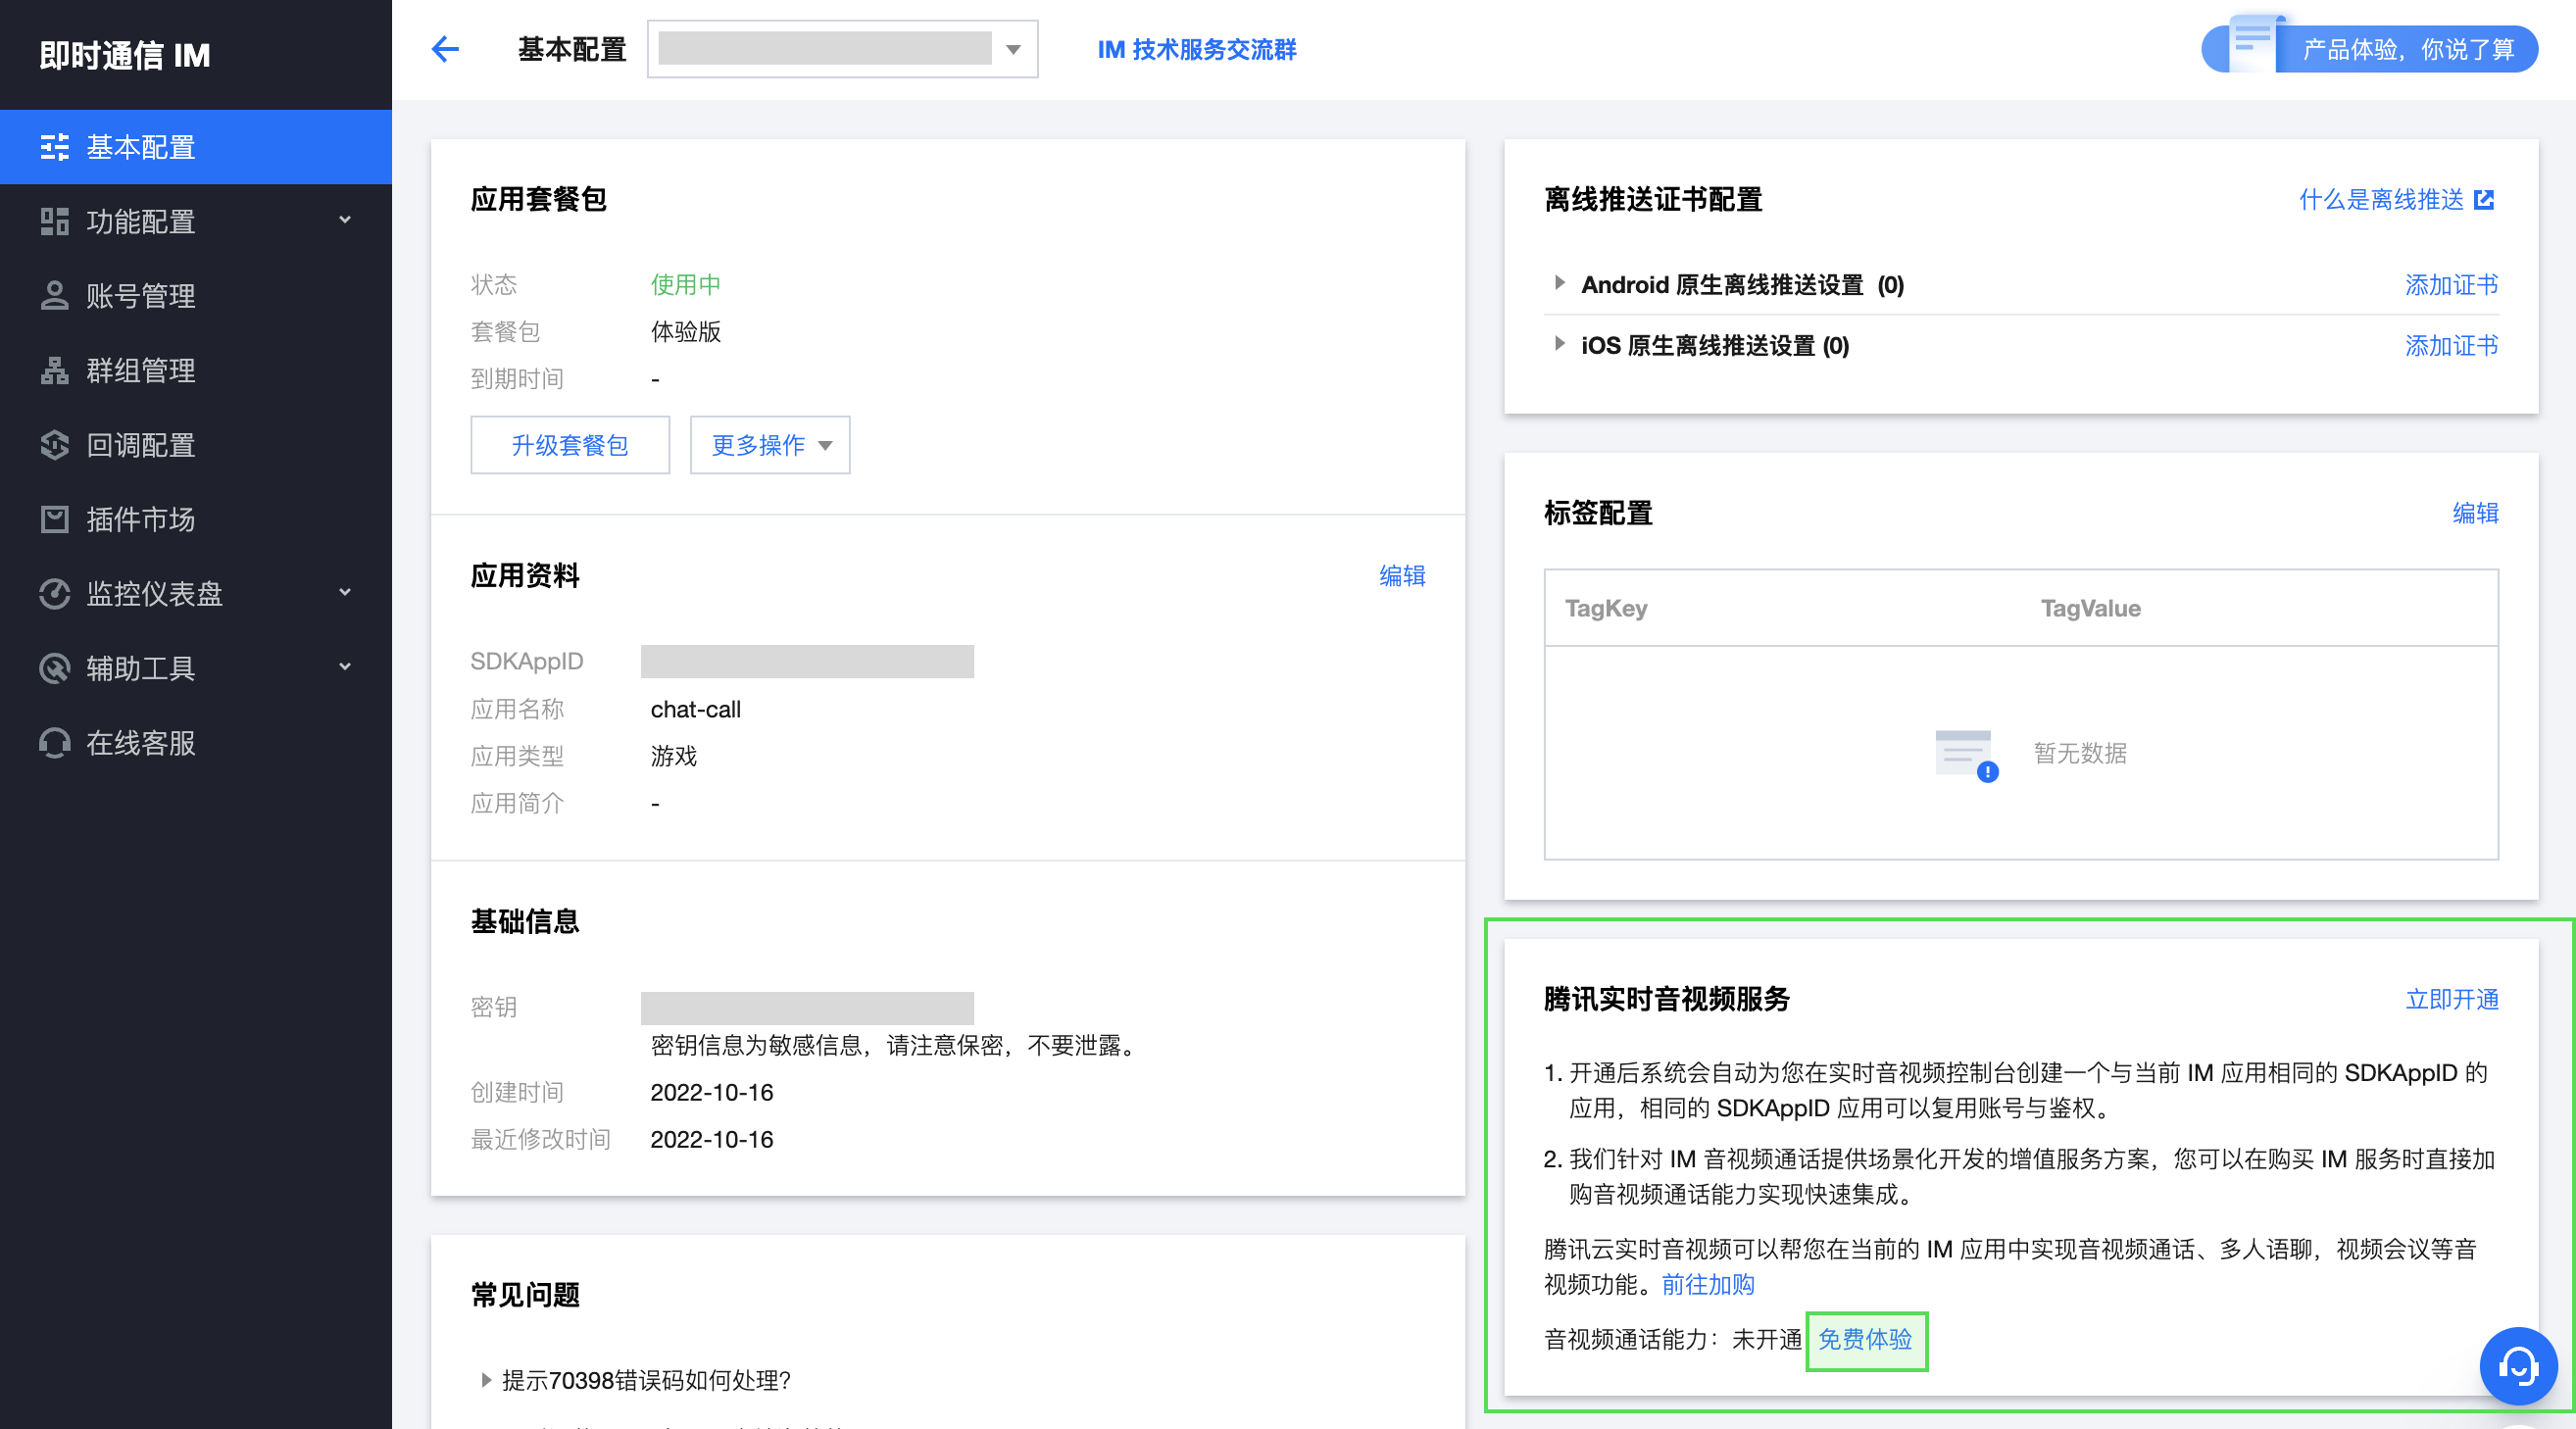
进入 [即时通信 IM 控制台](https://console.cloud.tencent.com/im) ,单击目标应用卡片,进入应用的基础配置页面。
在页面的右下角找到开通腾讯实时音视频服务功能区,单击免费体验即可开通 TUICallKit 的 7 天免费试用服务。
#### 步骤 2:下载 TUICallKit 组件
通过 [npm](https://www.npmjs.com/package/@tencentcloud/chat-uikit-vue) 方式下载 TUICallKit 组件,为了方便您后续的拓展,建议您将 TUICallKit 组件复制到自己工程的 src/TUIKit/Plugin/TUICallKit 目录下:
```shell
# macOS
npm i @tencentcloud/call-uikit-vue
mkdir -p ./src/TUIKit/TUIPlugin/TUICallKit && cp -r ./node_modules/@tencentcloud/call-uikit-vue/src/ ./src/TUIKit/TUIPlugin/TUICallKit
# windows
npm i @tencentcloud/call-uikit-vue
xcopy .\node_modules\@tencentcloud\call-uikit-vue\src .\src\TUIKit\TUIPlugin\TUICallKit /i /e
```
成功后目录结构如图所示:
#### 步骤 3:引入 TUIKit 组件
在 main.ts 中,引入 TUIKit,并注册到 Vue 项目实例中:
```javascript
import { createApp } from 'vue';
import App from './App.vue';
import { TUIComponents, TUICore, genTestUserSig } from './TUIKit';
const SDKAppID = 0; // Your SDKAppID
const secretKey = ''; //Your secretKey
const userID = ''; // User ID
// init TUIKit
const TUIKit = TUICore.init({
SDKAppID,
});
// TUIKit add TUIComponents
TUIKit.use(TUIComponents);
// login TUIKit
TUIKit.login({
userID: userID,
userSig: genTestUserSig({
SDKAppID,
secretKey,
userID,
}).userSig, // The password with which the user logs in to IM. It is the ciphertext generated by encrypting information such as userID.For the detailed generation method, see Generating UserSig
});
createApp(App).use(TUIKit).mount('#app');
```
#### 步骤 4: 获取 SDKAppID 、密钥与 userID
设置 main.ts 文件示例代码中的相关参数 SDKAppID、secretKey 以及 userID ,其中 SDKAppID 和密钥等信息,可通过 [即时通信 IM 控制台](https://console.cloud.tencent.com/im) 获取,单击目标应用卡片,进入应用的基础配置页面。例如:

userID 信息,可通过 [即时通信 IM 控制台](https://console.cloud.tencent.com/im) 进行创建和获取,单击目标应用卡片,进入应用的账号管理页面,即可创建账号并获取 userID。例如:

#### 步骤 5:调用 TUIKit 组件
在需要展示的页面,调用 TUIKit 的组件即可使用。
例如:在 App.vue 页面中,使用 TUIConversation、TUIChat、TUISearch 快速搭建聊天界面。
```javascript
```
#### 步骤 6:启动项目
```javascript
npm run serve
```
#### 步骤 7:发送您的第一条消息

## 拨打您的第一通电话
在您成功完成“发送您的第一条消息”后,可以通过接入 call-uikit-vue 体验通话功能。
#### 步骤 1:开通服务
进入 [即时通信 IM 控制台](https://console.cloud.tencent.com/im) ,单击目标应用卡片,进入应用的基础配置页面。
在页面的右下角找到开通腾讯实时音视频服务功能区,单击免费体验即可开通 TUICallKit 的 7 天免费试用服务。

#### 步骤 2:下载 TUICallKit 组件
通过 [npm](https://www.npmjs.com/package/@tencentcloud/chat-uikit-vue) 方式下载 TUICallKit 组件,为了方便您后续的拓展,建议您将 TUICallKit 组件复制到自己工程的 src/TUIKit/Plugin/TUICallKit 目录下:
```shell
# macOS
npm i @tencentcloud/call-uikit-vue
mkdir -p ./src/TUIKit/TUIPlugin/TUICallKit && cp -r ./node_modules/@tencentcloud/call-uikit-vue/src/ ./src/TUIKit/TUIPlugin/TUICallKit
# windows
npm i @tencentcloud/call-uikit-vue
xcopy .\node_modules\@tencentcloud\call-uikit-vue\src .\src\TUIKit\TUIPlugin\TUICallKit /i /e
```
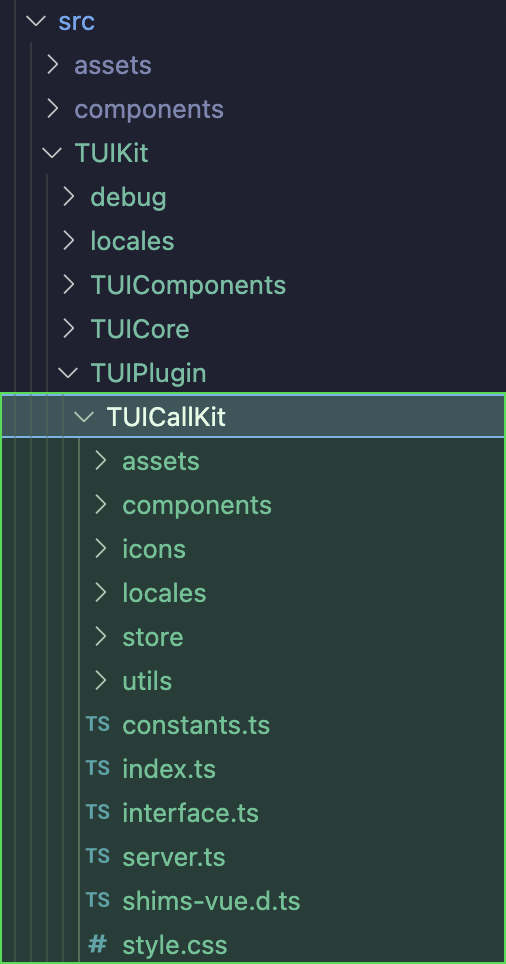
成功后目录结构如图所示:
 #### 步骤 3:引入 TUICallKit 组件
在 main.ts 中,仅需添加两行代码,即可体验通话功能。
引入 TUICallKit,并将其挂载到 TUIKit 中。
```javascript
// import TUICallKit
import { TUICallKit } from './TUIKit/TUIPlugin/TUICallKit';
// TUIKit add TUICallKit
TUIKit.use(TUICallKit);
```
main.ts 文件整体示例代码如下:
```javascript
import { createApp } from 'vue';
import App from './App.vue';
import { TUIComponents, TUICore, genTestUserSig } from './TUIKit';
import { TUICallKit } from './TUIKit/TUIPlugin/TUICallKit/index';
const SDKAppID = 0; // Your SDKAppID
const secretKey = ''; //Your secretKey
const userID = ''; // User ID
// init TUIKit
const TUIKit = TUICore.init({
SDKAppID,
});
// TUIKit add TUIComponents
TUIKit.use(TUIComponents);
// TUIKit add TUICallKit
TUIKit.use(TUICallKit);
// login TUIKit
TUIKit.login({
userID: userID,
userSig: genTestUserSig({
SDKAppID,
secretKey,
userID,
}).userSig, // The password with which the user logs in to IM. It is the ciphertext generated by encrypting information such as userID.For the detailed generation method, see Generating UserSig
});
createApp(App).use(TUIKit).mount('#app');
```
#### 步骤 4:调用 TUICallKit 组件
在需要展示的页面,调用 TUICallKit 的组件即可使用。
例如:在 App.vue 页面中,在上文已搭建的聊天界面基础上,使用 TUICallKit、TUICallKitMini 快速搭建通话界面。
`` :通话 UI 组件主体
``:通话 UI 悬浮窗组件,提供最小化功能
更多 TUICallKit API 参考,请点击 [API 参考 - TUICallKit](https://cloud.tencent.com/document/product/647/81015)
```javascript
```
#### 步骤 5:启动项目
```javascript
npm run serve
```
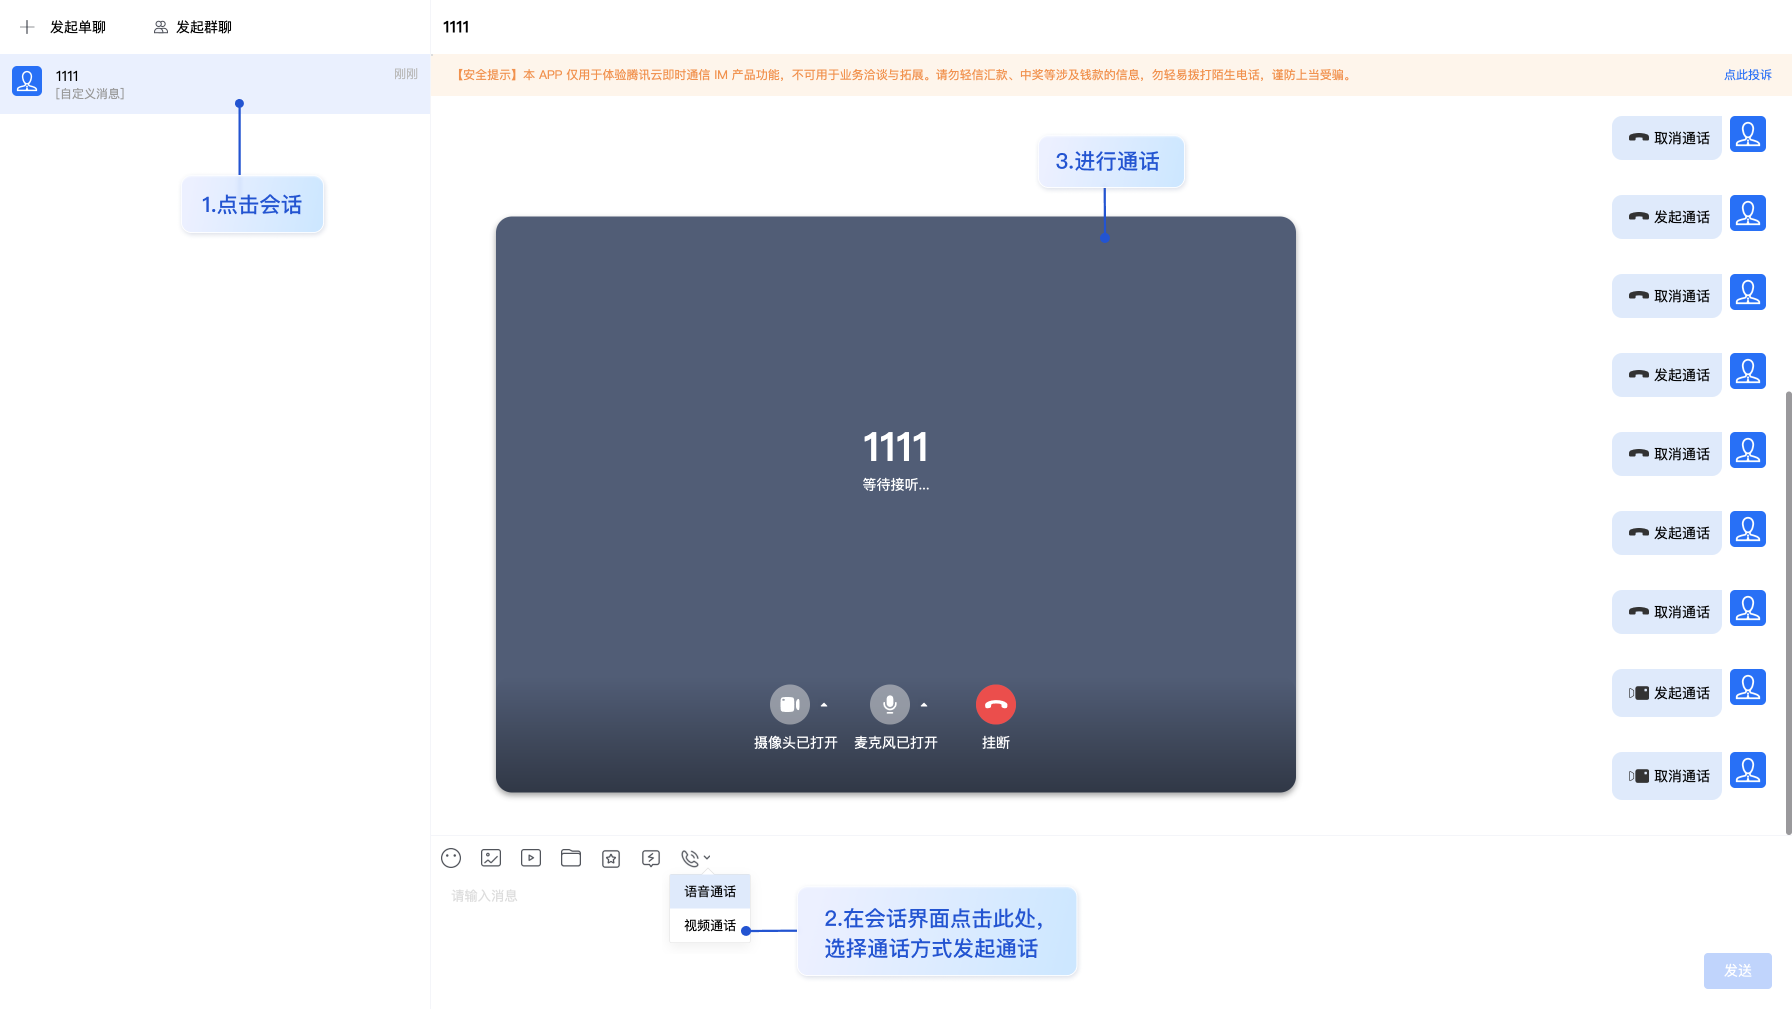
#### 步骤 6:拨打您的第一通电话
### 常见问题
#### 1. 什么是 UserSig?
UserSig 是用户登录即时通信 IM 的密码,其本质是对 UserID 等信息加密后得到的密文。
#### 2. 如何生成 UserSig?
UserSig 签发方式是将 UserSig 的计算代码集成到您的服务端,并提供面向项目的接口,在需要 UserSig 时由您的项目向业务服务器发起请求获取动态 UserSig。更多详情请参见 [服务端生成 UserSig](https://cloud.tencent.com/document/product/269/32688#GeneratingdynamicUserSig)。
> !
>
> 本文示例代码采用的获取 UserSig 的方案是在客户端代码中配置 SECRETKEY,该方法中 SECRETKEY 很容易被反编译逆向破解,一旦您的密钥泄露,攻击者就可以盗用您的腾讯云流量,因此**该方法仅适合本地跑通功能调试**。 正确的 UserSig 签发方式请参见上文。
#### 3. Component name "XXXX" should always be multi-word
- IM TUIKit web 所使用的 ESLint 版本为 v6.7.2 ,对于模块名的驼峰式格式并不进行严格校验
- 如果您出现此问题,您可以在 .eslintrc.js 文件中进行如下配置:
```javascript
module.exports = {
...
rules: {
...
'vue/multi-word-component-names': 'warn',
},
};
```
#### 4. 错误提示“The package you purchased does not support this ability”?
如遇以上错误提示,是由于您当前应用的**音视频通话能力包过期**或**未开通**,请参见以下步骤领取或者开通音视频通话能力,进而继续使用 TUICallKit 组件。
因为新的 IM 音视频通话能力是整合了腾讯云 [实时音视频 TRTC](https://cloud.tencent.com/document/product/647/16788)和 [即时通信 IM](https://cloud.tencent.com/document/product/269/42440) 两个基础的 PaaS 服务,所以当 [实时音视频 TRTC](https://cloud.tencent.com/document/product/647/16788) 的免费额度(10000 分钟)已经过期或者耗尽,就会导致开通此项服务失败,这里您可以点击[ TRTC 控制台](https://console.cloud.tencent.com/trtc/app),找到对应 SDKAppID 的应用管理页,示例如图,开通后付费功能后,再次**启用应用**即可正常体验音视频通话能力。
#### 步骤 3:引入 TUICallKit 组件
在 main.ts 中,仅需添加两行代码,即可体验通话功能。
引入 TUICallKit,并将其挂载到 TUIKit 中。
```javascript
// import TUICallKit
import { TUICallKit } from './TUIKit/TUIPlugin/TUICallKit';
// TUIKit add TUICallKit
TUIKit.use(TUICallKit);
```
main.ts 文件整体示例代码如下:
```javascript
import { createApp } from 'vue';
import App from './App.vue';
import { TUIComponents, TUICore, genTestUserSig } from './TUIKit';
import { TUICallKit } from './TUIKit/TUIPlugin/TUICallKit/index';
const SDKAppID = 0; // Your SDKAppID
const secretKey = ''; //Your secretKey
const userID = ''; // User ID
// init TUIKit
const TUIKit = TUICore.init({
SDKAppID,
});
// TUIKit add TUIComponents
TUIKit.use(TUIComponents);
// TUIKit add TUICallKit
TUIKit.use(TUICallKit);
// login TUIKit
TUIKit.login({
userID: userID,
userSig: genTestUserSig({
SDKAppID,
secretKey,
userID,
}).userSig, // The password with which the user logs in to IM. It is the ciphertext generated by encrypting information such as userID.For the detailed generation method, see Generating UserSig
});
createApp(App).use(TUIKit).mount('#app');
```
#### 步骤 4:调用 TUICallKit 组件
在需要展示的页面,调用 TUICallKit 的组件即可使用。
例如:在 App.vue 页面中,在上文已搭建的聊天界面基础上,使用 TUICallKit、TUICallKitMini 快速搭建通话界面。
`` :通话 UI 组件主体
``:通话 UI 悬浮窗组件,提供最小化功能
更多 TUICallKit API 参考,请点击 [API 参考 - TUICallKit](https://cloud.tencent.com/document/product/647/81015)
```javascript
```
#### 步骤 5:启动项目
```javascript
npm run serve
```
#### 步骤 6:拨打您的第一通电话

### 常见问题
#### 1. 什么是 UserSig?
UserSig 是用户登录即时通信 IM 的密码,其本质是对 UserID 等信息加密后得到的密文。
#### 2. 如何生成 UserSig?
UserSig 签发方式是将 UserSig 的计算代码集成到您的服务端,并提供面向项目的接口,在需要 UserSig 时由您的项目向业务服务器发起请求获取动态 UserSig。更多详情请参见 [服务端生成 UserSig](https://cloud.tencent.com/document/product/269/32688#GeneratingdynamicUserSig)。
> !
>
> 本文示例代码采用的获取 UserSig 的方案是在客户端代码中配置 SECRETKEY,该方法中 SECRETKEY 很容易被反编译逆向破解,一旦您的密钥泄露,攻击者就可以盗用您的腾讯云流量,因此**该方法仅适合本地跑通功能调试**。 正确的 UserSig 签发方式请参见上文。
#### 3. Component name "XXXX" should always be multi-word
- IM TUIKit web 所使用的 ESLint 版本为 v6.7.2 ,对于模块名的驼峰式格式并不进行严格校验
- 如果您出现此问题,您可以在 .eslintrc.js 文件中进行如下配置:
```javascript
module.exports = {
...
rules: {
...
'vue/multi-word-component-names': 'warn',
},
};
```
#### 4. 错误提示“The package you purchased does not support this ability”?
如遇以上错误提示,是由于您当前应用的**音视频通话能力包过期**或**未开通**,请参见以下步骤领取或者开通音视频通话能力,进而继续使用 TUICallKit 组件。
因为新的 IM 音视频通话能力是整合了腾讯云 [实时音视频 TRTC](https://cloud.tencent.com/document/product/647/16788)和 [即时通信 IM](https://cloud.tencent.com/document/product/269/42440) 两个基础的 PaaS 服务,所以当 [实时音视频 TRTC](https://cloud.tencent.com/document/product/647/16788) 的免费额度(10000 分钟)已经过期或者耗尽,就会导致开通此项服务失败,这里您可以点击[ TRTC 控制台](https://console.cloud.tencent.com/trtc/app),找到对应 SDKAppID 的应用管理页,示例如图,开通后付费功能后,再次**启用应用**即可正常体验音视频通话能力。
 #### 5. 如何购买套餐?
请参考购买链接:[音视频通话 SDK 购买指南](https://cloud.tencent.com/document/product/1640/79968),如有其他问题,请点击页面右侧,进行售前套餐咨询。
#### 6. 通话邀请的超时时间默认是多久?
通话邀请的默认超时时间是 30s。
#### 5. 如何购买套餐?
请参考购买链接:[音视频通话 SDK 购买指南](https://cloud.tencent.com/document/product/1640/79968),如有其他问题,请点击页面右侧,进行售前套餐咨询。
#### 6. 通话邀请的超时时间默认是多久?
通话邀请的默认超时时间是 30s。