# Feature Information Template
**Warning: This section needs to be updated for TerriaJS version 8.**
You can add a `featureInfoTemplate` to the items in your catalog `json` file like so:
{
"catalog": [
{
"name": "ArcGIS Server",
"type": "group",
"items": [
{
"name": "Gravity Anomaly two",
"type": "esri-mapServer",
"url": "http://www.ga.gov.au/gisimg/rest/services/earth_science/Geoscience_Australia_National_Geophysical_Grids/MapServer/6",
"attribution" :
{
"text" : "Geoscience Australia",
"link" : "http://www.ga.gov.au"
},
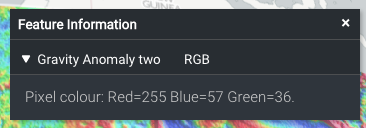
"featureInfoTemplate" : "Pixel colour: Red={{Red}} Blue={{Blue}} Green={{Green}}."
}
]
}
]
}
The template will replace all occurrences of `{{property}}` with the value of the property for that feature.
The result is:
 instead of:
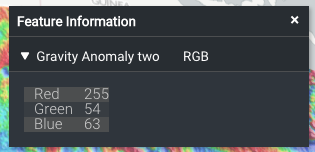 You can provide a template to use for the name of the collapsible section (eg. to replace `RGB` in the example above), like so:
"featureInfoTemplate" : {
"template": "
You can provide a template to use for the name of the collapsible section (eg. to replace `RGB` in the example above), like so:
"featureInfoTemplate" : {
"template": "Pixel colour: {{>foobar}}
",
"name": "Red {{Red}}"
}
## More details
The template is rendered using [Mustache](https://github.com/janl/mustache.js#usage), so you can use all of its features here.
In particular, you can render properties that include html by using triple-braces, eg. `{{{property}}}`.
You can make use of partial templates (and even recursive templates) by specifying your template and partials as a json object, eg.:
"featureInfoTemplate" : {
"template": "Pixel colour: {{>foobar}}
",
"partials": {
"foobar": "Red={{Red}} Blue={{Blue}} Green={{Green}}"
}
}
After Mustache has rendered the template, the result is displayed using [Markdown](https://help.github.com/articles/markdown-basics/), so you could also write:
"featureInfoTemplate" : "Pixel colour: *Red={{Red}} Blue={{Blue}} Green={{Green}}*."
## Formatting numbers
The preferred way to format numbers is using the `formats` option, eg:
"featureInfoTemplate": {
"template": "Pixel colour: Red={{Red}} Blue={{Blue}} Green={{Green}}.",
"formats": {
"Red": {
"type": "number",
"maximumFractionDigits": 2
},
"Green": {
"type": "number",
"maximumFractionDigits": 2
},
"Blue": {
"type": "number",
"maximumFractionDigits": 2
}
}
}
`"type"` specifies the type of formatting that will be applied to the property. Here we are using `"number"` formatting which is also the default formatting if `"type"` is not supplied.
The supported format options are:
- `"maximumFractionDigits": X`: To reduce the number of decimal places to a maximum of X digits.
- `"minimumFractionDigits": X`: To increase the number of decimal places to a minimum of X digits.
- `"useGrouping": true`: To show thousands separators.
- `"style": "percent"`: To show 0.15 as 15%.
A second method is to use `terria.formatNumber` directly in the template. This accepts an initial JSON string describing the same options as above. To simplify the notation, the quotes around the keys are optional here.
"featureInfoTemplate": "template": "Pixel colour: Red={{#terria.formatNumber}}{maximumFractionDigits:3}{{Red}}{{/terria.formatNumber}}."
## URL-encoding strings
To URL-encode a value in a template, use `terria.urlEncode` or `terria.urlEncodeComponent`. For example:
Test: {{#terria.urlEncode}}http://example.com/a b{{/terria.urlEncode}}
Test: {{#terria.urlEncodeComponent}}W/HOE#1{{/terria.urlEncodeComponent}}
## Formatting dates
Similar to formatting numbers you can format dates in the `"formats"` section by suppliying `"dateTime"` in the `"type"` property, eg:
"featureInfoTemplate": {
"template": "Date: {{Date}}",
"formats": {
"Date": {
"type": "dateTime";
"format": "dd-mm-yyyy HH:MM:ss";
}
}
}
The date format style used for the `"format"` property is the style from the [npm dateformat package](https://www.npmjs.com/package/dateformat#usage), e.g. `"dd-mm-yyyy HH:MM:ss"` or `"isoDateTime"`.
As with number you can also use `terria.dateTimeformat` directly in the template. This accepts an initial JSON string describing the same options as above.
"featureInfoTemplate": "template": "{{#terria.formatDateTime}}{format: \"dd-mm-yyyy HH:MM:ss\"}2017-11-23T08:47:53Z{{/terria.formatDateTime}}."
## Replace text
You can replace text by directly using `terria.partialByName` in the template and providing partials for matching and replacement. For example, with the following template and partials,
- If the value of `feature.data.layerId` matches a property name in the `partials`, it will be replaced by corresponding value.
- If there is no matching in the `partials`, the original value will be used.
- Any unsafe values in the `partials` will be stripped off when being rendered.
```json
"featureInfoTemplate": {
"template": "{{Pixel Value}} dwellings in {{#terria.partialByName}}{{feature.data.layerId}}{{/terria.partialByName}} radius.",
"partials": {
"0": "100m",
"1": "500m",
"2": "1km",
"3": "2km"
}
}
```
If `{{Pixel Value}}` equals to `150` and `{{feature.data.layerId}}` to `2`, the text `150 dwellings in 1km radius.` will be rendered.
## Time-series charts
For features with time-varying table-based data structures (eg. CSV, SOS2, SDMX-JSON, if there is a time column), the feature info panel also includes a chart of the data over time, eg.
 You can place this chart in your template using `{{terria.timeSeries.chart}}`. Alternatively, you can access the following component information:
- `{{terria.timeSeries.xName}}` - the x-column name
- `{{terria.timeSeries.yName}}` - the y-column name
- `{{terria.timeSeries.title}}`
- `{{terria.timeSeries.id}}`
- `{{terria.timeSeries.units}}` - the column units as a comma-separated string.
- `{{terria.timeSeries.data}}` - the data as a comma-separated string.
Please note:
- If any of the component information above contains double-quotes, double quotes will be removed before TerriaJS processes the template further.
- If any of the component information above is used as part of tag attributes, it must be surrounded by double-quotes. e.g. ``
So you could reconstruct the chart manually as:
```
You can place this chart in your template using `{{terria.timeSeries.chart}}`. Alternatively, you can access the following component information:
- `{{terria.timeSeries.xName}}` - the x-column name
- `{{terria.timeSeries.yName}}` - the y-column name
- `{{terria.timeSeries.title}}`
- `{{terria.timeSeries.id}}`
- `{{terria.timeSeries.units}}` - the column units as a comma-separated string.
- `{{terria.timeSeries.data}}` - the data as a comma-separated string.
Please note:
- If any of the component information above contains double-quotes, double quotes will be removed before TerriaJS processes the template further.
- If any of the component information above is used as part of tag attributes, it must be surrounded by double-quotes. e.g. ``
So you could reconstruct the chart manually as:
```
{{terria.timeSeries.title}}
{{terria.timeSeries.data}}
```
or use this as a basis to customise the chart.
## Other supporting data
The clicked point's latitude and longitude are also available as `{{terria.coords.latitude}}` and `{{terria.coords.longitude}}`.
The current time for the layer is avaliable as `{{terria.currentTime}}`.
## More examples
Some examples are here: [https://github.com/TerriaJS/terriajs/blob/master/wwwroot/test/init/csv.json](https://github.com/TerriaJS/terriajs/blob/master/wwwroot/test/init/csv.json), and [charts.json](https://github.com/TerriaJS/terriajs/blob/master/wwwroot/test/init/charts.json).
You can add this directly to your catalog by appending `#build/TerriaJS/test/init/csv.json` to the URL to your map, eg. `http://localhost:3001/#build/TerriaJS/test/init/csv.json`.