We’ve brought up the topic of focus many times in our discussion so far, and we’ve told you that the handling and user navigation of focus is mostly done automatically. The focus system is very powerful and can be heavily customized through the use of “focus traversal policy” objects that control keyboard navigation. For typical application behavior, you won’t have to deal with this directly, but we’ll explain a few features you should know about.
Swing handles keyboard focus navigation through the KeyboardFocusManager
class. This class uses FocusTraversalPolicy
“strategy” objects that implement the actual schemes for locating the next
component to receive focus. There are two primary FocusTraversalPolicy types supplied with Java.
The first, DefaultFocusTraversalPolicy, is part of the AWT
package. It emulates the legacy AWT-style focus management that navigated
components in the order in which they were added to their container. The
next, LayoutFocusTraversalPolicy, is the default for
all Swing applications. It examines the layout and attempts to provide the
more typical navigation from left to right and top to bottom, based on
component position and size.
The focus traversal policy is inherited from containers and oriented
around groups of components known as “root cycles.” By default, each
individual window and JInternalFrame is its own
root cycle. In other words, focus traverses all of its child components
repeatedly (jumping from the last component back to the first), and won’t,
by default, leave the container through keyboard navigation.
The default Swing policy uses the following keys for keyboard navigation:
- Forward
Tab or Ctrl-Tab (Ctrl-Tab also works inside text areas)
- Back
Shift-Tab or Ctrl-Shift-Tab (Ctrl-Shift-Tab also works inside text areas)
You can define your own focus traversal keys for forward and back
navigation, as well as for navigation across root cycles using the
setFocusTraversalKeys()
method of a container. Here is an example that adds the keystroke Ctrl-N
to the list of forward key navigation for components in a Frame:
frame.getFocusTraversalKeys(KeyboardFocusManager.FORWARD_TRAVERSAL_KEYS);AWTKeyStrokeks=AWTKeyStroke.getAWTKeyStroke(KeyEvent.VK_N,InputEvent.CTRL_DOWN_MASK);Setnew=newHashSet(old);set.add(ks);frame.setFocusTraversalKeys(KeyboardFocusManager.FORWARD_TRAVERSAL_KEYS,set);
Keys are defined by the AWTKeyStroke class, which
encapsulates the key and input modifiers—in this case, the Control key.
Constants in the KeyboardFocusManager
specify forward, back, and up or down root cycle transfer across
windows.
Finally, you can also move focus programmatically using the
following methods of KeyboardFocusManager:
focusNextComponent()focusPreviousComponent()upFocusCycle()downFocusCycle()
One of Swing’s advanced components is JTree. Trees are good
for representing hierarchical information, like the contents of a disk
drive or a company’s organizational chart. As with all Swing components,
the data model is distinct from the visual representation. This means
you can do things such as update the data model and trust that the
visual component will be updated properly.
JTree is powerful and complex.
It’s big enough, in fact, that like the text tools, the classes that
support JTree have their own package,
javax.swing.tree.
However, if you accept the default options for almost everything,
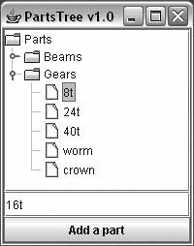
JTree is very easy to use. Figure 18-6 shows a JTree running in a Swing application that
we’ll describe later.
A tree’s data model is made up of interconnected nodes. A
node has a name—typically, a parent—and some number of children
(possibly 0). In Swing, a node is represented by the TreeNode interface.
Nodes that can be modified are represented by MutableTreeNode. A
concrete implementation of this interface is DefaultMutableTreeNode.
One node, called the root node, usually resides at
the top of the hierarchy.
A tree’s data model is represented by the TreeModel interface. Swing provides an
implementation of this interface called DefaultTreeModel. You can create a DefaultTreeModel by passing a root TreeNode to its constructor.
You could create a TreeModel
with just one node like this:
TreeNoderoot=newDefaultMutableTreeNode("Root node");TreeModelmodel=newDefaultTreeModel(root);
Here’s another example with a real hierarchy. The root node contains two nodes, Node 1 and Group. The Group node contains Node 2 and Node 3 as subnodes.
MutableTreeNoderoot=newDefaultMutableTreeNode("Root node");MutableTreeNodegroup=newDefaultMutableTreeNode("Group");root.insert(group,0);root.insert(newDefaultMutableTreeNode("Node 1"),1);group.insert(newDefaultMutableTreeNode("Node 2"),0);group.insert(newDefaultMutableTreeNode("Node 3"),1);
The second parameter to the insert() method is the index of the node in
the parent. After you organize your nodes, you can create a TreeModel in the same way as before:
TreeModelmodel=newDefaultTreeModel(root);
Once you have a tree model, creating a JTree is simple:
JTreetree=newJTree(model);
The JTree behaves like a
souped-up JList. As Figure 18-6 shows, the JTree automatically shows nodes with no
children as a sheet of paper, while nodes that contain other nodes are
shown as folders. You can expand and collapse nodes by clicking on the
little knobs to the left of the folder icons. You can also expand and
collapse nodes by double-clicking on them. You can select nodes;
multiple selections are possible using the Shift and Control keys. And,
as with a JList, you should put a
JTree in a JScrollPane if you want it to scroll.
A tree fires off several flavors of events. You can find out when nodes have been expanded and collapsed, when nodes are about to be expanded or collapsed (because the user has clicked on them), and when selections occur. Three distinct event listener interfaces handle this information.
TreeExpansionListenerTreeWillExpandListenerTreeSelectionListener
Tree selections are a tricky business. You can select any
combination of nodes by using the Control key and clicking on nodes.
Tree selections are described by a TreePath, which
describes how to get from the root node to the selected nodes.
The following example registers an event listener that prints out the last selected node:
tree.addTreeSelectionListener(newTreeSelectionListener(){publicvoidvalueChanged(TreeSelectionEvente){TreePathtp=e.getNewLeadSelectionPath();System.out.println(tp.getLastPathComponent());}});
This section contains an example that showcases the following tree techniques:
Construction of a tree model, using
DefaultMutableTreeNodeCreation and display of a
JTreeListening for tree selection events
Modifying the tree’s data model while the
JTreeis showing
Here’s the source code for the example:
//file: PartsTree.javaimportjava.awt.*;importjava.awt.event.*;importjavax.swing.*;importjavax.swing.event.*;importjavax.swing.tree.*;publicclassPartsTree{publicstaticvoidmain(String[]args){// create a hierarchy of nodesMutableTreeNoderoot=newDefaultMutableTreeNode("Parts");MutableTreeNodebeams=newDefaultMutableTreeNode("Beams");MutableTreeNodegears=newDefaultMutableTreeNode("Gears");root.insert(beams,0);root.insert(gears,1);beams.insert(newDefaultMutableTreeNode("1x4 black"),0);beams.insert(newDefaultMutableTreeNode("1x6 black"),1);beams.insert(newDefaultMutableTreeNode("1x8 black"),2);beams.insert(newDefaultMutableTreeNode("1x12 black"),3);gears.insert(newDefaultMutableTreeNode("8t"),0);gears.insert(newDefaultMutableTreeNode("24t"),1);gears.insert(newDefaultMutableTreeNode("40t"),2);gears.insert(newDefaultMutableTreeNode("worm"),3);gears.insert(newDefaultMutableTreeNode("crown"),4);// create the JTreefinalDefaultTreeModelmodel=newDefaultTreeModel(root);finalJTreetree=newJTree(model);// create a text field and button to modify the data modelfinalJTextFieldnameField=newJTextField("16t");finalJButtonbutton=newJButton("Add a part");button.setEnabled(false);button.addActionListener(newActionListener(){publicvoidactionPerformed(ActionEvente){TreePathtp=tree.getSelectionPath();MutableTreeNodeinsertNode=(MutableTreeNode)tp.getLastPathComponent();intinsertIndex=0;if(insertNode.getParent()!=null){MutableTreeNodeparent=(MutableTreeNode)insertNode.getParent();insertIndex=parent.getIndex(insertNode)+1;insertNode=parent;}MutableTreeNodenode=newDefaultMutableTreeNode(nameField.getText());model.insertNodeInto(node,insertNode,insertIndex);}});JPaneladdPanel=newJPanel(newGridLayout(2,1));addPanel.add(nameField);addPanel.add(button);// listen for selectionstree.addTreeSelectionListener(newTreeSelectionListener(){publicvoidvalueChanged(TreeSelectionEvente){TreePathtp=e.getNewLeadSelectionPath();button.setEnabled(tp!=null);}});// create a JFrame to hold the treeJFrameframe=newJFrame("PartsTree v1.0");frame.setDefaultCloseOperation(JFrame.EXIT_ON_CLOSE);frame.setSize(200,200);frame.add(newJScrollPane(tree));frame.add(addPanel,BorderLayout.SOUTH);frame.setVisible(true);}}
The example begins by creating a node hierarchy. The root node is
called Parts. It contains two
subnodes named Beams and Gears, as shown:
MutableTreeNoderoot=newDefaultMutableTreeNode("Parts");MutableTreeNodebeams=newDefaultMutableTreeNode("Beams");MutableTreeNodegears=newDefaultMutableTreeNode("Gears");root.insert(beams,0);root.insert(gears,1);
The Beams and Gears nodes contain a handful of items
each.
The “Add a part” button inserts a new item into the tree at the
level of the current node, and just after it. You can specify the name
of the new node by typing it in the text field above the button. To
determine where the node should be added, the current selection is first
obtained in the anonymous inner class ActionListener:
TreePathtp=tree.getSelectionPath();MutableTreeNodeinsertNode=(MutableTreeNode)tp.getLastPathComponent();
The new node should be added to the parent node of the current node, so it ends up being a sibling of the current node. The only hitch here is that if the current node is the root node, it won’t have a parent. If a parent does exist, we determine the index of the currently selected node, and then add the new node at the next index:
intinsertIndex=0;if(insertNode.getParent()!=null){MutableTreeNodeparent=(MutableTreeNode)insertNode.getParent();insertIndex=parent.getIndex(insertNode)+1;insertNode=parent;}MutableTreeNodenode=newDefaultMutableTreeNode(nameField.getText());model.insertNodeInto(node,insertNode,insertIndex);
You must add the new node to the tree’s data model using insertNodeInto()—not to the MutableTableNode itself. The model notifies
the JTree that it needs to update
itself.
We have another event handler in this example, one that listens for tree selection events. Basically, we want to enable our “Add a part” button only if a current selection exists:
tree.addTreeSelectionListener(newTreeSelectionListener(){publicvoidvalueChanged(TreeSelectionEvente){TreePathtp=e.getNewLeadSelectionPath();button.setEnabled(tp!=null);}});
When you first start this application, the button is disabled. As soon as you select something, it is enabled, and you can add nodes to the tree with abandon. If you want to see the button disabled again, you can unselect everything by holding the Control key and clicking on the current selection.