Beans use events to communicate. As we mentioned in Chapter 16, events are not limited to GUI components
but can be used for signaling and passing information in more general
applications. An event is simply a notification; information describing
the event and other data are wrapped up in a subclass of EventObject and passed to the receiving object
by a method invocation. Event sources register listeners that want to
receive the events when they occur. Event receivers implement the
appropriate listener interface containing the method needed to receive the
events. This is Java’s general event mechanism in a nutshell.
It’s often useful to place an adapter between an event source and a listener. An adapter can be used when an object doesn’t know how to receive a particular event; it enables the object to handle the event anyway. The adapter can translate the event into some other action, such as a call to a different method or an update of some data. One of the jobs of NetBeans is to help us hook up event sources to event listeners. Another job is to produce adapter code that allows us to hook up events in more complex ways.
Let’s get our juggler under control with the following steps:
Using the Properties pane, change the label of your button to read “Start.”
Now click the small Connection Mode icon at the top of the GUI builder (the second icon, showing two items with arrows pointing at one another).
After pressing the button, NetBeans is waiting for us to select two components to “hook up.” Click first on the Start button and then on the
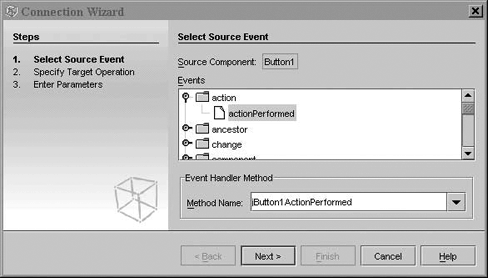
Juggler. NetBeans pops up the Connection Wizard, indicating the source component (the button) and prompting you to choose from a large list of events (see Figure 22-4). Most of them are standard Swing events that can be generated by any kind ofJComponent. What we’re after is the button’s action event.Expand the folder named action, and select
actionPerformedas the source event.At the bottom of the dialog box NetBeans indicates the name of an event handler method that it will generate for us. Leave the method name as is. Click Next to go to the Specify Target Operation screen for the
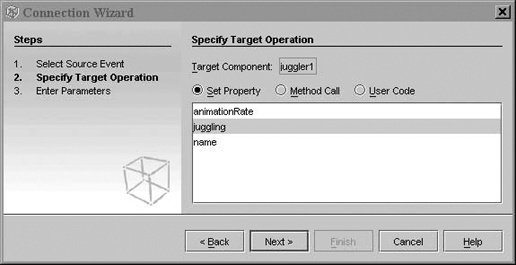
Juggler.The wizard prompts us to choose a property to set on the
Juggler, as shown in Figure 22-5. The display shows three of theJuggler’s properties. Choose thejugglingproperty as the target and click Next.Enter
truein the Value field and click Finish. NetBeans takes you to the source view and shows you the method it has generated to respond to the button action.
We have completed a hookup between the button and the
Juggler. When the button fires an
action event, the juggling property
of the Juggler is set to true.
Scroll around the source view and take a look at the code that
NetBeans has generated to make this connection for us. Specifically, in
the initComponents() method of our
class, it has created an anonymous inner class to serve as the ActionListener for ActionEvents from our button (which it has
named jButton1):
jButton1.addActionListener(newjava.awt.event.ActionListener(){publicvoidactionPerformed(java.awt.event.ActionEventevt){jButton1ActionPerformed(evt);}});
The adapter calls a private method that sets the property on our
Juggler:
privatevoidjButton1ActionPerformed(java.awt.event.ActionEventevt){juggler1.setJuggling(true);}
You’ll notice that most of the code that was written for us is shaded grey to indicate that it is autogenerated code and can’t be directly modified. The body of the private method is open, however, and we could modify it to perform arbitrary activities when the button is pushed. In NetBeans, the hookup is just a starting point.
This may all seem a little obtuse. After all, if we had made the
Juggler an ActionListener in the first place, we would
expect to hook it directly to the button. The use of adapters provides a
great deal of flexibility, however, as we’ll see next.
To complete our example, click the Design button, then repeat the
process, adding a second JButton
labeled “Stop.” We could implement the Stop button in the same way that
we did the Start button, by passing a specific value to the juggling
method, but we’re going to try an alternative here. Click the Connection
Wizard icon; select the Stop button and the Juggler as its target. Again, choose the
actionPerformed method as the source,
but this time, instead of selecting a property on the Juggler, click the Method Call radio button to
see a list of available methods on the Juggler bean. Scroll all the way down and
select the stopJuggling() method.
Click Finish to complete the hookup, and look at the generated code if
you wish. With this, we have seen an example of hooking up a source of
action events to generate an arbitrary method call on a bean. (Of
course, there is a startJuggling()
method as well, which we could have used for the first button.)
Now, the Juggler will do our
bidding. Right-click on the LearningJava1.java
file in the Projects tab of the Explorer pane (or in the source view
of the file) and select Run File. Watch as NetBeans compiles and runs
our example. You should be able to start and stop the juggler using
the buttons! When you are done, quit the juggler application and
return to the GUI editor. Close this example by closing its tab in the
workspace, and let’s move on. (There is no need to save the file
explicitly; NetBeans saves automatically as you edit.)
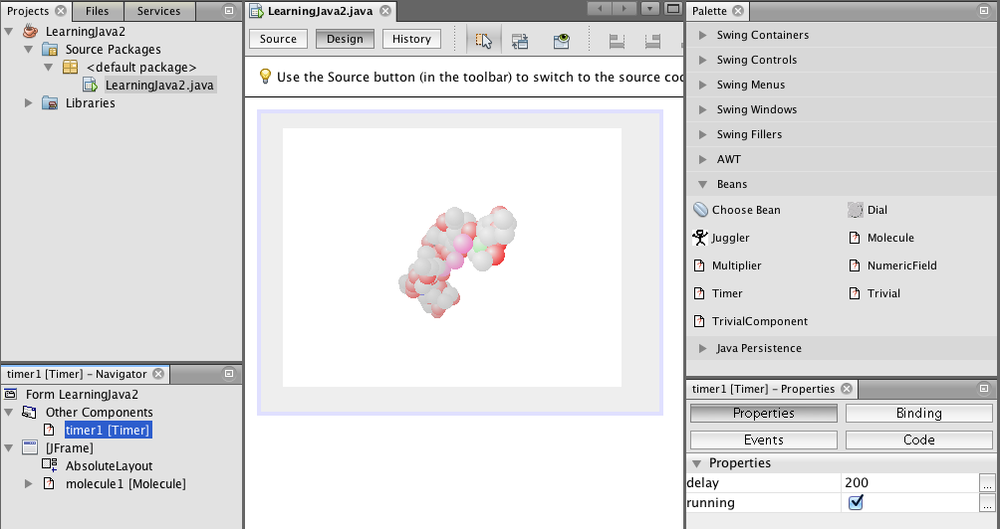
Let’s look at one more interesting example, shown in Figure 22-6. Create a new file in our project as before, choosing Java GUI Forms from the Categories pane and JFrame Form in the File Types pane. Call this file LearningJava2.
Grab a Molecule bean and place
it in the workspace. (The default BorderLayout maximizes its area if you place
the bean in the center.) If you run the example now, you will see that
by dragging the mouse within the image, you can rotate the model in
three dimensions. Try changing the type of molecule by using the
Properties pane: ethane is fun.[45]
Let’s see what we can do with our molecule. Grab a Timer bean from the
palette. Timer is a clock.[46] Every so many milliseconds, Timer fires an event. The timer is controlled
by an long property called delay, which determines the number of
milliseconds between events. Timer is
an “invisible” bean; it is not derived from a JComponent and doesn’t have a graphical
appearance, just as an internal timer in an application doesn’t normally
have a presence on the screen. NetBeans shows these invisible beans just
like any other bean in the Navigator pane on the left. When you wish to
select the Timer, click on it in the
tree in the Navigator pane.
Let’s hook the Timer to our
Molecule. Start the Connection Wizard
and select the Timer (from the tree)
and then the Molecule. Choose the
Timer’s timerFired() event from
the list (expand the folder to display it). Click Next and select the
Method Call radio button. Find and select the rotateOnX() method and
click Finish. Run the example. Now the Molecule should turn on its own every time it
receives an event from the timer. Try changing the timer’s delay property. You can also hook the Timer to the Molecule’s rotateOnY() method. Use
a different instance of Timer and, by
setting different delay values, make it turn at different rates in each
dimension. Fun!
[45] As of this writing, Sun’s Molecule example has some problems when used in NetBeans. Selecting a molecule type other than the default causes a compile-time error. You can use the Preview Design button on the NetBeans form editor to try the other molecule types.
[46] A Timer bean used to come
with the NetBeans distribution but disappeared in version 4.0, so
we’ve added our own replacement. We won’t discuss it here, but the
source code is with the other bean examples and there is nothing
special that isn’t covered elsewhere.