
Follow 3 Easy Steps
Step 1
First make sure your bridge is connected to your network and is functioning properly. Test that the official Philips Hue mobile app can control the lights on the same network.
Step 2
Then you need to discover the IP address of the bridge on your network. You can do this in a few ways.
NOTE – When you are ready to make a production app, you need to discover the bridge automatically using Hue Bridge Discovery Guide.
1. Go to the settings menu in the app. Go to Hue Bridges. Select your bridge. The ip address of the bridge will show.
2. Use an mDNS discovery app to find Philips hue in your network.
3. Use our broker server discover process by visiting https://discovery.meethue.com
4. Log into your wireless router and look Philips hue up in the DHCP table.
Step 3
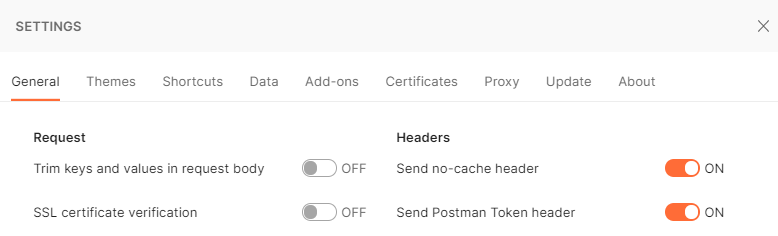
Download, install, and open the Postman tool (or any other API testing tool to your liking) and disable ‘SSL certificate verification’ in File – Settings menu.
NOTE – When you are ready to make a production app, you need to properly validate the certificate, see Using HTTPS.
Using an API testing tool you can populate the components of an HTTPS request – the basis of all web traffic and of the hue API.
1. URL: this is actually the local address of a specific resource (thing) inside the hue system. It could be device, light, room, scene or many more things. This is the object you’ll be interacting with in this command.
2. Request method: here you have a choice of the 4 HTTPS methods the hue system uses.
GET: this is the command to fetch all information about the addressed resource
PUT: this is the command to modify an addressed resource
POST: this is the command to create a new resource inside the addressed resource
DELETE: this is the command to delete the addressed resource
3. Request body: this is the part of the message which describes what you want to change and how. Here you enter, in JSON format, the resource name and value you’d like to change/add.
4. Response code: This will indicate whether your request succeeded or failed.
5. Response body: Here you’ll see the response to your command. Also in JSON format.
So let’s get started…
First let’s do a very simple request and get information about the devices in your hue system.
Fill in the details below leaving the body empty and press the Send button.
| URL | https://<bridge ip address>/clip/v2/resource/device |
| Method | GET |
Make sure you are on the same network as the bridge, and that you use the ip you obtained in step 2. Now you should see the response code 403 Forbidden:
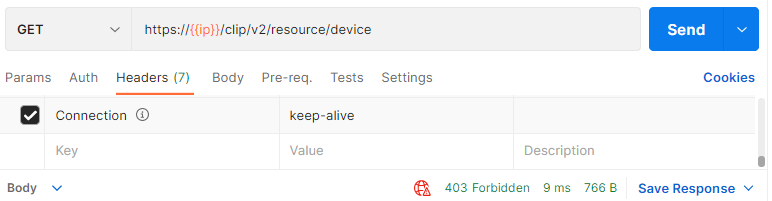
That’s because we did not yet provide a hue-application-key header for authorization.
We need to use the randomly generated application key that the bridge creates for you. Fill in the info below and press the Send button.
| URL | https://<bridge ip address>/api |
| Body | {"devicetype":"app_name#instance_name", "generateclientkey":true} |
| Method | POST |
You should get back an error message letting you know that you have to press the link button.
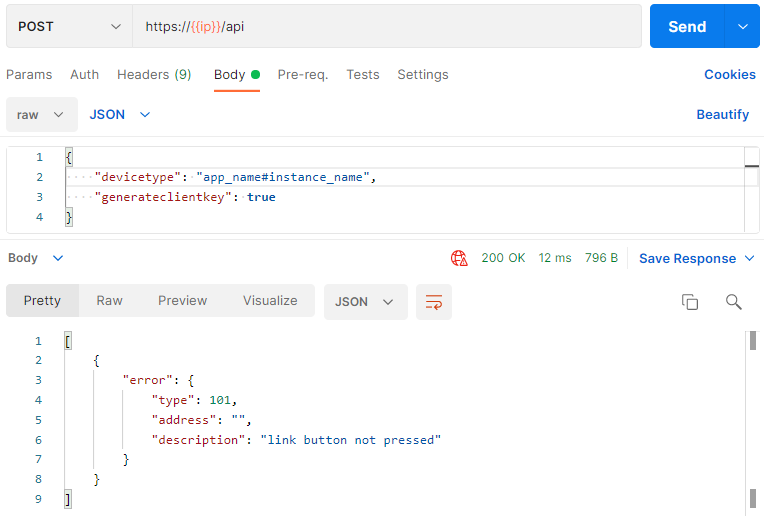
This is our security step so that only apps you want to control your lights can. By pressing the button we prove that the user has physical access to the bridge.
Go and press the button on the bridge and then press the Send button again and you should get a success response like below.
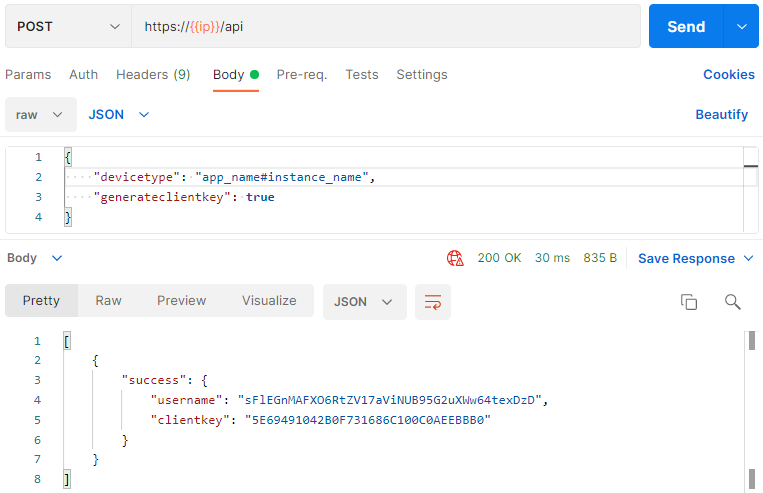
You’ve now created an authorized username, which we’ll use as the hue-application-key from now on.
Retrieving device list
In the Headers section you should add a header with name hue-application-key and value the username (sFlEGnMAFXO6RtZV17aViNUB95G2uXWw64texDzD in above example). From here on we will refer to this username as appkey. Now if you do the first GET request again you should get a 200 OK response code with a whole lot of information about what devices you have and what services they offer in the response body. This data is all in JSON format so can be easily processed by your applications.
| Address | https://<bridge ip address>/clip/v2/resource/device |
| Method | GET |
| Header | hue-application-key: <appkey> |
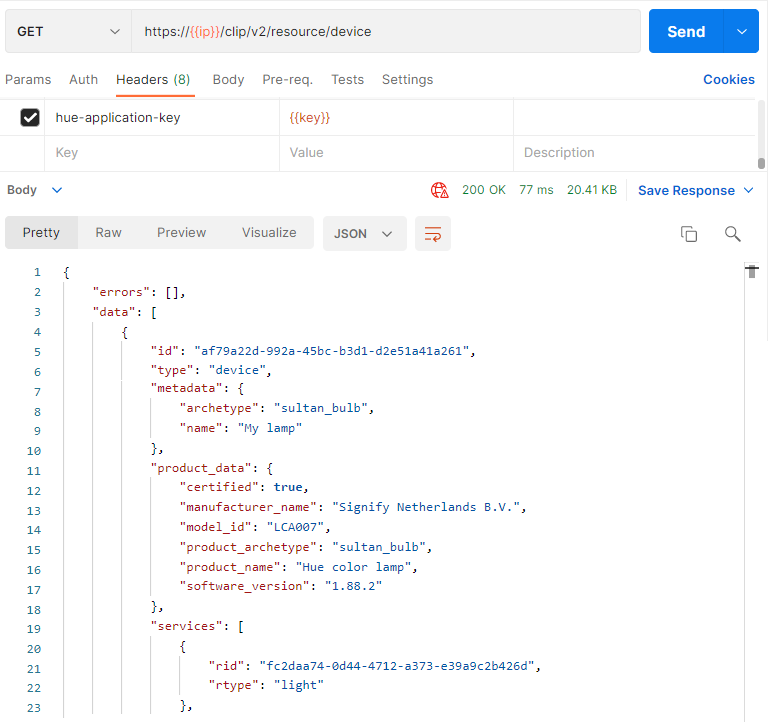
Congratulations you’ve just sent you first authorized CLIP command!
Controlling a light
Okay now that we have a hue-application-key with permission to use the system lets start having some fun.
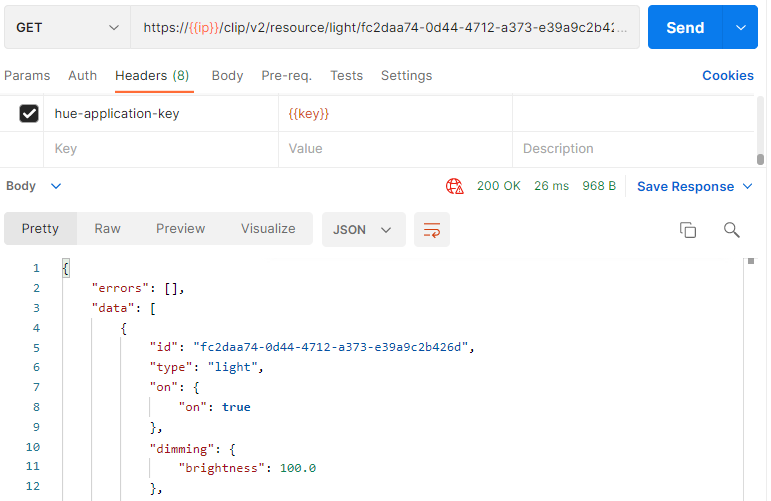
You should see that most Hue devices offer a light service. Each light service has its own URL, which you can construct using the “rtype” and “rid” of the service. Let’s get information about the light service with rid fc2daa74-0d44-4712-a373-e39a9c2b426d by filling that in the id part of the address below. In your case you need to take the rid of the light service reported by your device.
| Address | https://<bridge ip address>/clip/v2/resource/light/<id> |
| Method | GET |
| Header | hue-application-key: <appkey> |
In this response you can see all of the properties this light service has. The most interesting ones are the feature objects on, dimming, color_temperature, and color. These are the ones we’ll use to control the light.
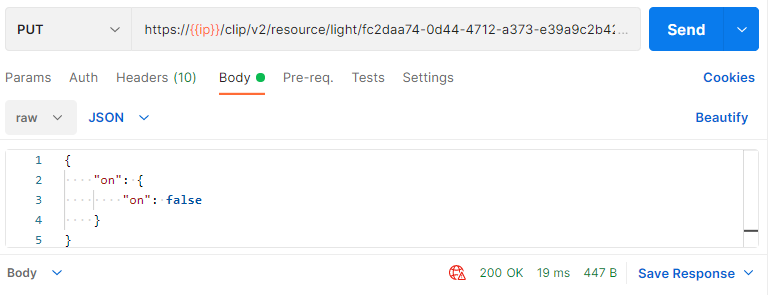
Let’s start with the “on” object. This is a very simple object with an on attribute that can have 2 values: true and false. So let’s try turning the light off.
| Address | https://<bridge ip address>/clip/v2/resource/light/<id> |
| Method | PUT |
| Header | hue-application-key: <appkey> |
| Body | {"on":{"on":false}} |
Looking at the command you are sending we’re addressing the “on” object of the light service and telling it to modify the “on” value inside it to false (i.e. off). When you press the Send button the light should turn off.
Change the value in the body to true and after pressing Send the light will turn on again.
Now let’s do something a bit more fun and start changing some colors. Enter the command below.
| Address | https://<bridge ip address>/clip/v2/resource/light/<id> |
| Method | PUT |
| Header | hue-application-key: <appkey> |
| Body | {"dimming":{"brightness":50.0},"color":{"xy":{"x":0.4605,"y":0.2255}}} |
Now we’re modifying a couple more attributes to set the brightness to 50% and the color to purple at the same time.

The x and y values for color vary between 0 and 1. Try changing the values and keep pressing the Send button and see the color of your light changing. You can use this image to see what values correspond to which colors.

There is also an eventing mechanism to automatically receive changes to resources but more on this later.
Now you understand the basics of the commands you can send to hue through an API testing tool – but we can also send the commands as part of an app. Intrigued now? Read more at Core Concepts.